
Taking your glass art to the next level with a home studio is an exciting step. But choosing your first kiln? That can feel overwhelming. You’re probably asking practical questions like, “Will it fit in my space?” or “Is my wiring okay?” This guide is here to help you find the best glass kiln for beginners. We’ll focus on what really matters—space, power, and safety—so you can confidently pick the best kiln for fusing glass and grab the right glass fusing supplies for your new setup.
However, purchasing a kiln can be a daunting experience especially when you are still a beginner and you have no clue what you’re looking for. There are a plethora of factors to consider as you begin your search.
To make the process a tad less overwhelming for you, we’ve compiled a list of factors to consider for helping you find the kiln that best suits your needs and interests.
What to Ask Before Buying Your First Glass Fusing Kiln
When buying a kiln, you must be ready to ask yourself a list of the following questions:
● What Size Kiln Do You Really Need?
This tops our list of requirements when buying a kiln. You will want to be able to fill your kiln to maximize efficiency every time you fire. Therefore, to determine the size of the kiln you should buy, it is imperative to consider not only the dimensions of the pieces you’ll be making but also how many.
Recommendations for a Beginner Kiln
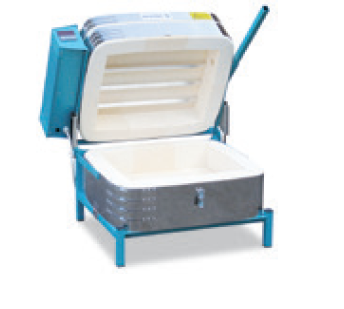
Many artists just starting out aren’t sure what kinds of projects they’ll want to make long-term, which can make choosing a kiln feel like a huge commitment. The best first kiln is usually a small one that plugs into a regular 120V home outlet and has a programmable digital controller. Kilns with an interior under 15 inches typically meet this requirement, making them easy to set up in a home studio or garage without needing an electrician. This allows you to focus on learning the craft rather than worrying about complex installation. Starting with a manageable size ensures you can get firing right away.
One feature you absolutely shouldn’t skip is a digital controller. Some basic models come with an “infinity switch” that only has settings like low, medium, and high, but this doesn’t offer the precision needed for glass fusing. A digital controller lets you program specific firing schedules—the exact temperatures and times—which is critical for consistent and successful results. It makes the process much easier and more repeatable. As you browse the different kilns available, be sure to choose one with a reliable digital controller to make your fusing journey smoother from day one.
Limitations of Smaller Kilns
While a smaller kiln is a fantastic starting point, it’s good to know its limitations as your skills and ambitions grow. With a small, top-fired kiln, you might not have enough depth for very tall projects, such as pieces made with deep draping molds or pot melts. Most smaller kilns also have heating elements only in the lid, which means you can’t stack shelves to fire multiple layers of projects at once. The heat simply won’t be even enough to fuse the lower layers properly, limiting the volume of work you can produce in a single firing.
The main reason smaller kilns are so beginner-friendly is their power source, and this is also the biggest difference when you decide to upgrade. Larger kilns, typically those over 15 inches wide, almost always require a 240V power supply, which is the same kind used for an electric stove or dryer. This often means hiring an electrician to install a dedicated circuit and outlet in your workspace. While a larger kiln opens up a world of possibilities for bigger and more complex projects, the added cost and installation requirements are important factors to consider for the future.
● What Types of Glass Projects Will You Make?
Temperature maximums don’t vary significantly between different glass kiln models due to the fact that glass is a low-fire material. However, you will require different temperatures and firing schedules depending on the project you are making and the techniques you’re planning to undertake.
Understanding Firing Temperatures
Understanding firing temperatures is a huge part of getting your glass fusing projects to turn out just right. Each technique requires a specific temperature range to achieve the look you’re going for. Glass fusing generally happens at lower temperatures, usually under 1699°F. Here’s a quick guide to some common firing temperatures:
- Slumping: 1215-1249°F
- Tack Fusing: 1350-1369°F
- Contour Fuse: around 1400-1450°F
- Full Fuse: 1450-1479°F
- Glass Casting: 1550-1675°F
Sticking to these temperature ranges is crucial for ensuring your glass pieces fuse correctly without cracking or distorting. It’s also really important to have even heat distribution, since glass can crack easily with sudden temperature changes. This is a key difference from ceramic kilns, which typically heat from the sides. Our glass kilns heat from the top and sides, creating a more uniform temperature that’s perfect for fusing.
For beginners, I can’t recommend a kiln with a digital controller enough. They are so much more user-friendly and can store multiple firing programs, which makes managing different projects a breeze. Some of the more advanced models even have touchscreens and Wi-Fi, so you can keep an eye on your kiln from your phone.
● Where Will Your New Kiln Live?
Before you delve into the purchase and decide on kiln size and model, you need to consider the maximum width, length, and height you’re willing to accommodate for. You must also consider the fact that the kiln needs to be a minimum of 12 inches away from any walls.
Apart from these considerations, you must also think about what kind of ventilation the space has and what kind of access to outlets and breakers are available.
● Does Your Home Have Enough Power?
The bigger the size of the kiln is, the more energy is required to run it. So, before bringing in the kiln, you must try to match the ampere and voltage requirements for your desired kiln to what you have available in the space you’ll be keeping it in.
You will have to make further investments in the installation, if you decide on a kiln that has higher energy requirements.
Understanding Key Kiln Features
It’s always good to have a list of characteristics and specific qualities to look for when purchasing a kiln. We are here to give you an overview of attributes to consider.
➢ Why Even Heat Distribution Matters
This is undeniably one of the most significant factors to consider when buying a kiln. Glass rarely fires over 1700 degrees Fahrenheit unlike other materials that you typically use in kilns. Heat distribution is extremely important for fused glass firing as glass is a low-fire material.
Sure, you can fire glass projects in a ceramics kiln and you can purchase it if you want to create art in different mediums. However, they typically have side elements. If you buy a glass kiln, it will not only radiate heat from the sides, but from the top of the kiln as well.
This aids in countering glass’ sensitivity to variation in temperature. Also, better heat distribution is conducted in shallower kilns. You must consider the depth of your kiln before buying.
➢ Matching Your Kiln to Your Home’s Wiring
Electricity and voltage are also the factors you must consider when purchasing a kiln. The voltage of a normal household is 120V. Voltage might not be an issue if you are planning to buy smaller kilns. However, if you want to delve in larger ones, you must consult your electrician as they will require 240V.
Also, you must also ensure you have a breaker to meet the amperage requirements for your olympic kiln.
➢ Choosing the Right Kiln Controller
Most models of the kilns come with different types of controllers. If you choose the most basic kilns, they come with manual controls. You will be expected to start the kiln at the lowest setting and take charge of all the temperature changes.
Sure, this process requires more effort, but it will offer you the flexibility to regulate the firing process. They come with electrical controls as well. Sure, they are more expensive but they are easier to operate. The best thing is that they regulate temperatures independently.
Digital vs. Manual Controllers
When you’re shopping for kilns, the type of controller it has is one of the most important features to consider. For glass fusing, I can’t recommend a digital controller enough. They are a game-changer because they allow you to program the precise heating and cooling schedule your glass needs to fuse perfectly without cracking. You can essentially set it and forget it—just input your program, hit start, and let the kiln handle the rest. Many digital models even let you save your favorite firing schedules, which is a fantastic time-saver when you’re working on multiple projects.
On the other hand, manual controllers are typically found on more basic kiln models. With a manual setup, you are the controller. This means you need to be nearby to adjust the temperature dials throughout the entire firing process. While this offers hands-on control, it also introduces a lot of room for error. Glass is incredibly sensitive to temperature changes, and a moment of distraction can unfortunately ruin a piece. For the consistency and peace of mind you want when fusing glass, a digital controller is the clear winner and a worthwhile investment for your studio.
➢ How to Set Up Your Kiln Safely
Considering the location where you’ll place the kiln is imperative, It determines the necessity of certain kiln attributes. If you are thinking of placing your kiln in a place that is frequently populated, considering ventilation needs is imperative.
You must make sure your kiln is near a window, and choose the model with good venting systems.
Clearance and Flooring
Safety is your top priority when setting up a studio space. When you find the perfect spot for your new kiln, make sure you can leave at least 18 inches of clear space around all sides. This isn’t just for convenience; it’s essential for proper air circulation and significantly reduces any fire risk. Think of it as giving your kiln some personal space to breathe. The best foundation for your kiln is a concrete floor, which provides a stable, non-flammable surface. If you don’t have a concrete floor, you can purchase a kiln stand with a bottom shelf to place a fire-resistant surface on. Always keep flammable materials like curtains, paper, and cleaning supplies far away from the kiln’s designated area.
Ergonomics and Loading
Think about how you’ll physically interact with your kiln. Your comfort matters, and setting up your equipment ergonomically will prevent strain and make your creative process much more enjoyable. If you’re looking at top-loading kilns, consider the height of the stand it will be on. You should be able to load and unload your glass projects without hunching over or bending awkwardly. A comfortable height means you can place your pieces precisely and lift them out safely. Your back will thank you after a long day in the studio, allowing you to focus on your art instead of an aching spine.
➢ Key Technical Specifications to Check
Once you have a handle on the big-picture items like size, project type, and power requirements, it’s time to look at the finer details. The technical specs of a kiln can seem a little intimidating, but understanding a few key components will make a huge difference in your firing success and the longevity of your equipment. These features directly impact how evenly your glass heats, how reliable your kiln is, and how much maintenance you’ll be doing. Paying attention to these details now will save you a lot of potential frustration later and help you choose a kiln that truly supports your artistic goals.
Lid Material: Fiber vs. Brick
The material of your kiln’s lid plays a surprisingly important role in the quality of your finished pieces. Many kilns have lids made of either ceramic fiber or firebrick. For glass fusing, a ceramic fiber lid is the superior choice. Why? Because brick lids have a tendency to shed small particles of dust and debris over time, which can fall directly onto your glass during firing, ruining a project. While you can vacuum a brick lid regularly to minimize this, a fiber lid almost completely eliminates the problem, giving you cleaner results with less maintenance.
Relay Type: Solid-State vs. Mechanical
The relay is the part of your kiln that cycles the heating elements on and off to regulate the temperature. It’s one of the hardest-working components, and often the first to fail. You’ll find two main types: mechanical and solid-state. Mechanical relays have moving parts that click on and off, and this physical movement causes wear and tear over time. Solid-state relays, on the other hand, use electronic switches with no moving parts. This makes them significantly more durable and reliable. When you’re comparing kilns, choosing one with a solid-state relay is a smart investment in its long-term performance.
Heating Element Design
As we’ve mentioned, even heat is everything in glass fusing. The placement of the heating elements is critical to achieving this. Kilns designed specifically for glass have heating elements in both the lid and the sidewalls. The elements in the lid provide direct, radiant heat down onto the surface of the glass, ensuring the entire piece heats up uniformly. In contrast, many ceramics kilns only have elements on the sides. While you can fire glass in them, the lack of top-down heat makes it much harder to get consistent results, especially with larger pieces.
Kiln Shape and Style
The physical shape of a kiln also affects heat distribution. For glass fusing, shallower, wider kilns are generally better than deep, narrow ones. A shallow design allows the heat from the lid elements to reach the glass more evenly across its entire surface. This reduces the temperature difference between the center and the edges of your project, which is key to preventing thermal shock and stress cracks. While deep kilns are necessary for pottery or large casting projects using molds, a clamshell or top-loading kiln with a generous width and modest depth is ideal for most fusing work.
➢ Considering Dual-Media Kilns
What if your creative interests extend beyond glass to include ceramics? If you’re short on space or budget, a dual-media kiln might seem like the perfect solution. These multipurpose kilns are designed to handle the firing schedules for both glass and pottery, offering a convenient all-in-one package. They can save you the expense and studio footprint of buying two separate kilns. However, it’s important to know that this versatility comes with a compromise. A kiln specifically designed for glass will always provide the most optimal heat distribution for fusing, and a dedicated ceramics kiln will be better suited for pottery. A dual-media model is a jack-of-all-trades but a master of none.
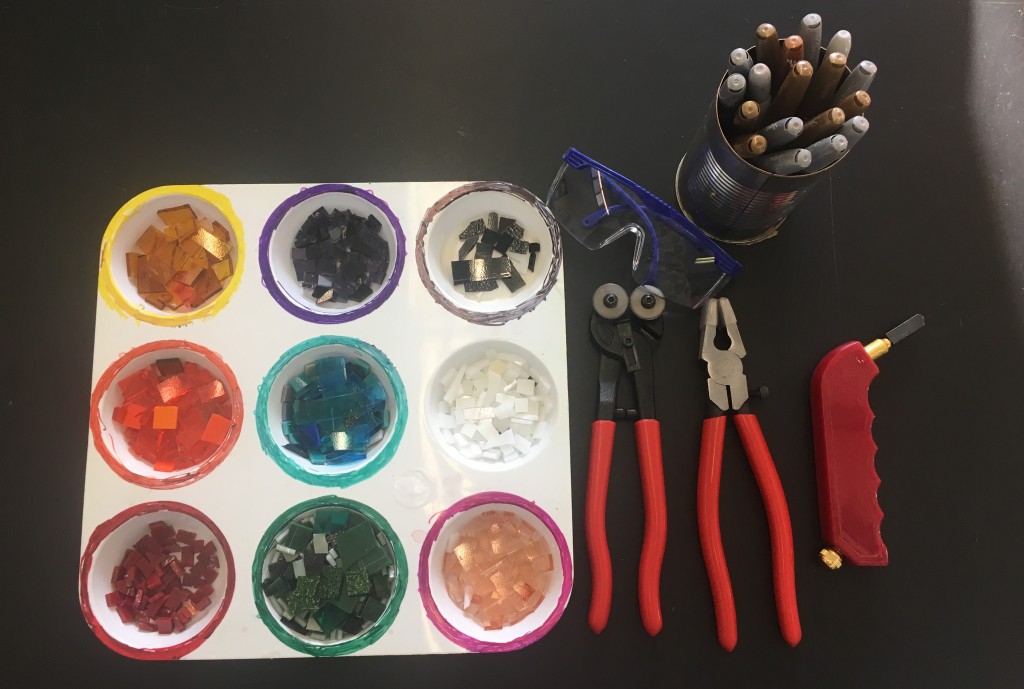
Essential Accessories: Kiln Furniture and More
Once you’ve chosen your kiln, the next step is to outfit it for success. The kiln itself is the main event, but you’ll need a few key accessories, collectively known as kiln furniture, to protect your equipment and your projects. Think of these items as the essential support system for your glass art. Without them, you risk damaging your new kiln or ending up with fused pieces that are stuck to the kiln floor. Investing in quality furniture from the start ensures your firings are smooth, safe, and effective, letting you focus on your creativity instead of worrying about potential mishaps inside the kiln.
Kiln Shelves and Posts
The most fundamental pieces of kiln furniture are shelves and posts. Kiln shelves provide a flat, stable surface for your projects, while kiln posts are used to elevate those shelves inside the kiln. As experts at Kiln Frog point out, “You need kiln shelves and posts to lift your glass pieces, allow air to flow, and protect the kiln floor.” This setup is crucial for creating space between your projects and the kiln’s floor and heating elements. It also allows you to fire multiple layers of smaller projects at once, maximizing the efficiency of each firing cycle and saving both time and energy.
Why You Need Kiln Furniture
So, why is this setup so important? Kiln furniture is essential because it helps “heat spread evenly and protect the bottom of your kiln from accidents.” Proper air circulation around your glass is key to achieving a consistent, even fuse without thermal shock. Furthermore, shelves act as a protective barrier. If a piece of glass melts more than expected or runs off one of your slumping molds, it will spill onto the shelf, not the expensive brick floor of your kiln. Always use kiln wash or shelf paper on your shelves to prevent the glass from sticking, making cleanup easy and extending the life of your furniture.
Managing Your Initial Investment
A new kiln is a significant purchase, and it’s completely normal to feel a bit of sticker shock. It represents a real commitment to your craft, both financially and in terms of studio space. Before you take the plunge, it’s wise to make sure that glass fusing is a passion you want to pursue long-term. The good news is that you don’t have to buy a kiln right away to get started. There are several practical, low-cost ways to gain experience, refine your techniques, and confirm that this is the right path for you before making such a large investment in equipment.
Trying the Craft Before Buying a Kiln
You can ease into the world of glass fusing without an immediate four-figure investment. As many seasoned artists will tell you, “You don’t have to buy everything at once.” A great first step is to find a local art center or glass studio that offers classes or open studio time. This allows you to learn the fundamentals and use professional-grade equipment under expert guidance. Some studios even offer kiln rental time by the hour or by the firing, giving you the freedom to experiment with your own projects. This approach lets you test different types of glass, like COE90 and COE96, learn what kiln features you like, and build your confidence before committing to your own setup.
Tips from the Glass Fusing Community
When you’re making a big purchase like a kiln, one of the best resources available is the collective wisdom of artists who have already been through the process. The glass fusing community is incredibly generous with its knowledge, and you can learn a lot by listening to their experiences. Online forums, social media groups, and local guilds are treasure troves of practical advice, honest reviews, and real-world tips that you won’t find in a product manual. Tapping into this community knowledge can help you avoid common pitfalls and choose a kiln that will serve you well for years to come.
Brand Reputations and User Experiences
While technical specifications are important, the real-world performance of a kiln is what truly matters. Different brands have different reputations for reliability, ease of use, and customer support. For example, in a recent discussion on Reddit, one user noted, “If you’re buying a new kiln, many users suggest the EvenHeat for its reliable performance.” Hearing directly from artists who use these kilns every day provides invaluable insight. Pay attention to comments about how evenly a kiln fires, how intuitive its controller is, and how responsive the company is if an issue arises. This feedback can help you identify brands that consistently deliver a positive experience.
Planning for Long-Term Maintenance and Repairs
A kiln is a workhorse, and like any major piece of equipment, it will eventually need maintenance and repairs. Thinking about this ahead of time can save you a lot of future frustration. Before you buy, investigate how easy it is to source replacement parts like heating elements, relays, or thermocouples for the models you’re considering. The experience of other artists can be very telling. For instance, one user on Reddit shared that replacing bricks in their Paragon kiln after an accident was a “nightmare.” This kind of feedback highlights the importance of choosing a model that is not only effective but also serviceable, ensuring you can keep your studio running smoothly without long downtimes for repairs.
Ready to Find Your Perfect Glass Kiln?
Now that you know what to look for in a kiln, you must waste no time in getting the one that best fits your needs. We hope that we could help you find a glass fusing kiln you need to take your passion to the next level.
If you need any more assistance regarding glass casting supplies or other products, feel free to get in touch with us. We wish you all the best for your thriving art studio.
Frequently Asked Questions
Can I use a ceramics kiln for fusing glass? While you technically can, it’s not the best tool for the job. Glass kilns are designed with heating elements in the lid, which provides the even, top-down heat that glass needs to fuse properly. Most ceramics kilns heat from the sides, which can cause the edges of your glass piece to get hotter than the center, leading to uneven results and potential stress cracks. For consistent success, a kiln made for glass is your best bet.
If I can only afford one “upgrade” feature, what should it be? Without a doubt, a digital controller. Some basic kilns use manual dials, which require you to constantly monitor and adjust the temperature yourself. Glass fusing depends on very precise temperature control. A digital controller allows you to program the entire firing schedule in advance, so you can press start and trust the kiln to do the work perfectly. It’s the single most important feature for removing guesswork and ensuring your projects turn out right every time.
Do I need to hire an electrician for a beginner kiln? Probably not! The reason smaller kilns are so great for beginners is that most are designed to run on a standard 120-volt household outlet, just like your other appliances. You only need special 240-volt wiring, which often requires an electrician, when you move up to larger, more powerful kilns. As long as you choose a model with an interior under 15 inches, you should be able to plug it in and get started right away.
Besides the kiln, what are the absolute must-have accessories to get started? You’ll need a basic set of what’s called “kiln furniture.” This isn’t as complicated as it sounds—it just means a kiln shelf to place your glass on and some kiln posts to elevate the shelf off the kiln floor. You will also need either kiln wash or special shelf paper to coat the shelf before every firing. This creates a barrier that prevents your melted glass from permanently fusing to the shelf.
I’m worried about safety. What’s the most important rule for setting up my kiln at home? The golden rule is giving your kiln plenty of breathing room. You must place it on a non-flammable surface, like a concrete floor, and ensure there are at least 18 inches of clear space on all sides. Keep it far away from walls, curtains, or anything else that could catch fire. Proper clearance ensures good airflow and is the most critical step for operating your kiln safely in a home studio.
Key Takeaways
- Assess Your Studio Space First: Before you start shopping, measure your available space and check your power supply. Most beginners can start easily with a smaller kiln that plugs into a standard 120V household outlet, which avoids the immediate need for an electrician.
- A Digital Controller is Non-Negotiable: To get the consistent results glass fusing demands, a digital controller is essential. It automates complex firing schedules, giving you the freedom to set it and walk away. Also, choose a kiln with heating elements in the lid to ensure your pieces heat evenly.
- Test the Waters Before You Invest: A kiln is a significant commitment. Consider taking a class or renting kiln time at a local studio to confirm your passion for the craft. This is a great way to learn what features you value most before purchasing your own equipment.
Related Articles
- Skutt KM1022 KilnMaster Series Ceramic Kiln | Art Glass Supplies – Skutt K
- Petite Microwave Kiln | Art Glass Supplies – Microwave Kiln
- Skutt KM1227-3 Production Series Ceramic Kiln | Art Glass Supplies – Skutt
- Olympic Kiln 309GFE | Art Glass Supplies – Olympic Kilns
- Olympic Kiln 189 Slider | Art Glass Supplies – Olympic Kilns