
Your dream glass art studio could look very different depending on the techniques you choose. It might be built around a roaring furnace for glassblowing, a programmable kiln for fusing and slumping, or a simple, well-lit workbench for stained glass. The path you take in the hot glass vs cold glass discussion directly impacts your equipment needs, your space, and your budget. If you’re planning your creative space or thinking about trying a new method, this guide is for you. We’ll explore the three main categories of glass art—hot, warm, and cold—and detail the essential tools and setup required for each one.
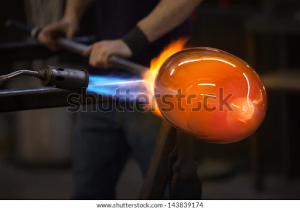
Glass is an amazingly versatile art material that can be formed and shaped in many different ways. It has the artistic quality of being able to bend and reflect light in a very unique manner. Its versatility has thus resulted in different types of glass art techniques.
There are primarily three categories of glass art techniques. Artists use them according to their needs and the purpose of glass art. These handmade glass art techniques are:
- Hot Glass Technique
- Warm Glass Technique
- Cold Glass Technique
There are various methods used to create glass art within these methods. In this guide, we’ll explain each glass art technique in detail.
Understanding Glass and Temperature
Before we get into the specific techniques, it’s helpful to understand the relationship between glass and temperature. How glass behaves when heated and cooled is the foundation of every art form we’ll discuss. Managing temperature correctly is what allows you to shape glass into beautiful art, while getting it wrong can lead to frustrating cracks and breaks. It’s all about controlling the transformation of glass from a solid to a liquid-like state and back again safely. This fundamental knowledge will help you troubleshoot issues and achieve the results you envision for your projects, whether you’re cutting your first piece or firing a complex fused panel.
The Science Behind Thermal Shock
Have you ever poured a cold drink into a warm glass, only to have it crack? That’s thermal shock in action. It’s a common fear for glass artists, and for good reason. Thermal shock happens because of a sudden, uneven change in temperature across a piece of glass. When one part of the glass gets hot or cold much faster than another, it creates internal stress. If that stress is greater than the strength of the glass, it will break. This is why controlled heating and cooling cycles inside a kiln are so critical for your projects, as they ensure the temperature changes slowly and evenly.
How Temperature Changes Create Stress in Glass
So, what’s actually happening on a molecular level? It’s simple physics: things expand when they get hot and contract when they get cold. If you apply a sudden temperature change to one area of a glass piece, that spot tries to expand or contract much faster than the rest of the glass. For example, if you pour cold water onto a hot piece of glass, the surface touching the water shrinks rapidly while the rest of the glass remains expanded. This internal tug-of-war creates immense stress that radiates through the material, often resulting in a crack that relieves the tension.
Factors Affecting Thermal Shock Risk
The risk of thermal shock depends on a few key factors. The most significant is the temperature differential—the bigger the difference between the hot and cold parts of the glass, the higher the stress and the more likely it is to break. The thickness of the glass also plays a role; thicker glass has a harder time distributing temperature evenly, making it more susceptible to shock. This is why annealing, or slowly cooling glass in a controlled manner, is a non-negotiable step in warm and hot glass techniques. It allows the entire piece to cool down uniformly and relieve any internal stress that developed during heating.
Physical Properties of Hot vs. Cold Glass
The way glass responds to temperature is exactly what makes it such a magical medium for artists. At room temperature, it’s a hard, brittle solid that can be cut and ground. As you apply heat, it doesn’t just melt like an ice cube. Instead, it goes through a long, gradual softening process, becoming more like thick honey. This transitional state allows for techniques like fusing and slumping, where you can bend glass over molds or join separate pieces together into a single, cohesive design. Understanding these working temperature ranges is key to mastering any glass art technique and predicting how your piece will behave in the kiln.
Why Glass is Called a “Rigid Liquid”
You might hear glass referred to as a “rigid liquid” or an amorphous solid. This just means that its molecular structure is random and disordered, like a liquid, instead of being in a neat, crystalline pattern like a true solid. This unique structure is what gives glass its versatility. It can be worked with when it’s cold for stained glass projects, or heated until it’s molten for glassblowing. This is also why compatibility, measured by the Coefficient of Expansion (COE), is so important. Different types of glass, like COE90 and COE96, expand and contract at different rates, and mixing them in a fusing project will cause stress and cracking during cooling.
1. Hot Glass
Hot glass is a technique that includes working with molten glass at high temperatures using glass casting molds. Here is how it works:
- Place pieces of glass in a furnace
- Heat the furnace to approximately 2000oF
- The process makes the glass malleable
- Collect the molten glass from the furnace
- Use this hot viscous glass in glass sculpting, blowing, and casting into molds
Hot glass is used to create various glass art items such as:
- Bowls
- Vases
- Sculptures
- Goblets
- Containers
- Ornaments
and more.
Types of Hot Glass Techniques
Hot Glass Blowing
It is the art of creating glass sculptures by shaping hot molten glass. Here is how you do it:
- Collect the molten glass by inserting the tip of a blowpipe into the furnace
- Roll the pipe until a gob of glass attaches to it
- Roll the gob on a flat metal slab
- Create a sort of bubble of glass by blowing from the other end of the pipe
- Constantly blow and roll the pipe to get the desired shape
- Remove the glass from the glass pipe with the help of steel tweezers
Hot Glass Casting
It is a process of casting glass art by placing hot molten glass into a casting mold. The temperature of the glass is slowly brought down to room temperature. There are 3 types of hot glass casting. Here we explain how to cast hot glass.
Sand Casting
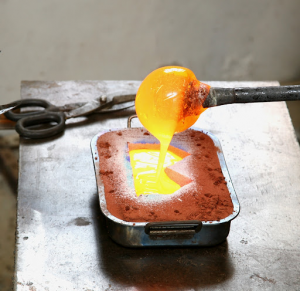
- Carve the required design into the treated sand to form a mold
- Pour the hot molten glass into the sand mold
- Wait for the glass to cool down
- Once the glass is solidified, remove the sand
- Reveal a perfect solidified casting
Ideal for creating multiple glass art with rough-textured granular surfaces.
Open-Faced Molding
- Make a clay mold
- Pour plaster around a clay pattern
- Let it set
- Remove the clay
- Dry the plaster mold in the oven
- Fill the mold with glass
- Cast it in a glass kiln
Ideal for casting glass art where one side is flat—coasters, glass tile, etc.
Lost Wax Casting
- Build a mold around sacrificial wax
- Melt out the wax to form a cavity
- Pour molten glass into the cavity
- Let it cool
- Remove the mold
- Get the final glass piece
Ideal for creating highly detailed glass art.
Lampworking
If you’ve ever been mesmerized by tiny, intricate glass beads or detailed sculptures, you were likely looking at the results of lampworking. Also called flameworking, this technique swaps a massive furnace for a high-temperature torch, giving you incredible control over your work. You’ll use the torch to melt colorful glass rods and tubes, shaping the molten glass with hand tools and gravity. It’s a method that really lets you focus on the fine details, making it perfect for creating jewelry, marbles, and small figurines. What I love most about lampworking is that it’s a much more accessible way to start working with hot glass. You don’t need a huge studio space, making it a fantastic option for hobbyists and artists who want to bring glass art into their home workshop.
Equipment for Hot Glass Work
Working with hot glass is an incredible experience, but it does require a dedicated setup with some serious equipment. Let’s be real: techniques like glassblowing and casting are an investment, mainly because you need tools that can handle incredibly high temperatures safely. The three main players in a hot glass studio are the furnace, the glory hole, and the annealer. The furnace is where your glass lives, melting it down into a workable, honey-like consistency. The glory hole is a reheating chamber you’ll use constantly to keep your piece malleable as you shape it. Finally, the annealer is where your finished piece goes to cool down slowly and safely. Think of these as the foundation of your studio.
Beyond the big three, you’ll build a collection of essential hand tools that become extensions of your own hands. These include the blowpipe for blowing hollow forms and the punty rod for handling solid pieces. You’ll also need tools like jacks, shears, and tweezers for shaping, cutting, and manipulating the molten glass. And we can’t forget about safety—it’s non-negotiable. High-quality heat-resistant gloves, safety glasses, and proper ventilation are just as important as any shaping tool. Having the right gear not only protects you but also gives you the confidence to focus on your creativity and bring your vision to life.
Furnaces and Annealers
Think of the furnace as the heart of a hot glass studio, a powerhouse running at over 2000°F to turn solid glass into a glowing, molten liquid. This is where you’ll gather glass on your blowpipe to begin creating. But just as important as heating the glass is cooling it down correctly, and that’s where the annealer comes in. After you’ve perfected your piece, it needs to cool down extremely slowly to prevent thermal shock—that’s the internal stress that causes glass to crack or even shatter when it cools too quickly. The annealer is a special oven that carefully controls this cooling process, sometimes over many hours or days. Many artists use versatile kilns for annealing, which gives them precise control to ensure their finished art is durable and stress-free.
2. Warm Glass
Warm glass is a technique to create glass art at a temperature of 1200-1600oF. Instead of the glass furnace, the warm glass technique usually involves a kiln/oven. Common terms often used for warm glass are:
- Kiln-Cast Glass
- Kiln Glass
- Fused Glass
- Slumped Glass
- Glass Bending
- Bent Glass
and more.
Warm glass is used to create various glass art items such as:
- Sheets
- Tiles
- Plates
and more.
Types of Warm Glass Techniques
Slumping
It is a technique of heating flat sheet/plate glass to give it the desired shape of the surface below. Here is how you do it:
- Design a mold
- Lay a glass sheet or plate over the mold
- Put it in a kiln
- Fire it up to 1300 degrees Fahrenheit
- The glass melts down due to the heat
- The gravity pulls the glass down into the mold
- Wait for the glass to cool down
- Remove the mold
- Get final glass art piece
Ideal for creating larger, functional glass pieces—bowls, dishes, plates, ashtrays, etc.
Fusing
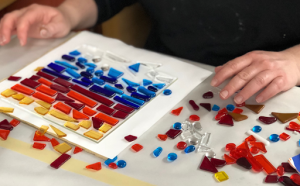
It is a process of heating two or more pre-cut pieces of glass to melt together. It allows you to create dynamic, colorful pieces of unique glass art. Here is how it’s done:
- Prepare your kiln
- Cut the glass into desired shapes
- Make sure the glass is clean
- Assemble the glass into the kiln
- Fire the kiln to a suitable temperature
- Check to see that the glass is completely cool
- Remove your glass piece, and it’s done
Stand back and admire your fused glass.
Ideal for creating glass tiles, notably beads, jewelry, etc.
Pâte de Verre
Pâte de verre, which translates to “paste of glass,” is a beautiful kiln-casting method that produces delicate, thin-walled pieces with a unique texture. The process involves mixing fine glass powder, or frit, with a binding agent to create a paste. This paste is then carefully applied to the inner surface of a mold. Once fired in a kiln, the glass particles fuse together to form a solid object. The texture of the final piece depends on the coarseness of the frit you use; fine powders create an opaque, sugary surface, while coarser powders result in a more transparent and crystalline appearance, giving you a lot of creative control over the final look.
Combing and Fire Polishing
Combing is one of the more hands-on warm glass techniques, allowing you to directly manipulate glass inside the kiln. After arranging glass pieces and heating them until they are soft and molten, you can use a long metal tool like a steel rake or rod to gently drag, or “comb,” through the surface. This creates stunning feathered and swirled patterns. Fire polishing is a finishing technique used to give your piece a smooth, glossy look. It involves briefly heating the glass just enough to soften the sharp edges, rounding them out and giving the surface a professional, high-quality sheen without altering its overall shape.
The Kiln Firing Process
Working with a kiln is central to almost all warm glass techniques. When you heat glass, it doesn’t just melt; it goes through several stages of softening, allowing for different creative outcomes based on temperature and time. A single project might even go through multiple firings, such as an initial fuse to join pieces followed by a slump firing to shape it in a mold. Just as important as heating is the cooling process. Glass must be cooled down very slowly in a controlled manner, a step called annealing. Rushing this step can create stress within the glass, causing it to crack or shatter—a heartbreaking end to a promising project.
Essential Kiln Equipment
For warm glass art, most artists rely on electric kilns because they offer incredible precision. Unlike furnaces used for glass blowing, kilns can be programmed to follow specific heating and cooling schedules. A crucial component is the pyrometer, which is essentially a high-temperature thermometer that gives you an accurate reading of the kiln’s internal temperature. Modern kilns often come with digital controllers that manage the entire firing schedule for you. You can program how fast it heats up, how long it holds a certain temperature, and how slowly it cools, giving you consistent and reliable results every time.
Practical Tips for Kiln Firing
Successful kiln firing is all about managing temperature changes to avoid thermal shock. Always make sure your glass is clean and at room temperature before placing it in the kiln. One of the most common mistakes is opening the kiln too soon out of excitement. Be patient and let the kiln cool completely to room temperature before you peek. It’s also vital to use glass that is compatible, meaning it expands and contracts at the same rate. This is measured by its Coefficient of Expansion (COE). Mixing glass with different COEs, like COE90 and COE96, will create stress as the piece cools, leading to cracks.
3. Cold Glass
The cold glass category includes all kinds of glass art techniques that don’t involve high temperatures. It helps cold glass artists to work on glass art without heating the glass. This type of glass working is usually performed in combination with hot and warm glass.
Types of Cold Glass Techniques
Etching
It involves applying a strong acid such as hydrofluoric acid, to the surface of the glass. It helps you change the texture & appearance of the glass. Ideal for getting a translucent matte finish.
Engraving
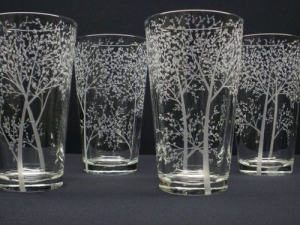
It is a process of inscribing onto the glass surface. There are 3 types of engraving methods:
- Tool Engraving
- Rotary Engraving
- Laser Engraving
Sandblasting
Involves blasting with gritty material against the surface of the glass. Sandblasting offers the same effect as acid etching. Some of the most common grit materials are:
- Aluminum Oxide
- Silica Carbide
- Quartz Sand
- Steel Grit
- Soda
- Glass Bead
Important Note: Use dichroic powder to fill sandblasted patterns.
Grinding
Grinding helps you achieve a certain shape. You can grind excess glass on your glass pieces with the help of grinding tools such as:
- Abrasive Stone Burrs
- Diamond Hand Pads
- Diamond Files
- Diamond Burrs
et cetera.
Polishing
Glass polishing eliminates defects—scratches, pitting, etc.—that have formed on the glass. It helps you restore the original brightness and transparency of the glass. Some of the most common polishing tools are:
- Microfiber Dishcloth
- Electric Polisher
- Velcro Discs (ranging from 150 to 1000 grains)
*Important Note: Before using any technique (especially hot & warm), make sure to follow all the safety procedures. It is highly risky to work with such high temperatures. Without the proper knowledge, do not operate glass machines/tools—glass kiln, grinding tools, engraving tools, etc.
Stained Glass
Stained glass is a timeless art form that falls squarely into the cold glass category. Instead of using heat to shape or fuse the material, this technique involves cutting pieces of colored glass and assembling them into a design. The pieces are then joined together, typically using either traditional lead came channels or the copper foil method popularized by Tiffany Studios. This assembly creates a beautiful mosaic that comes to life when light passes through it, showcasing the unique ability of glass to bend and reflect color. Because it doesn’t require a kiln, it’s an accessible entry point for many artists, and you can find all the necessary stained glass tools and sheets to get started on your own masterpiece.
Safety First: Working with Glass
Working with glass is an incredibly rewarding process, but it’s essential to prioritize safety in your studio. Whether you’re fusing, slumping, or creating intricate stained glass pieces, understanding the risks helps you protect yourself and create with confidence. The beauty of glass comes from its unique physical properties, but those same properties require respect and careful handling. According to the Glass Art Society, establishing good safety habits is crucial for every artist. From managing extreme temperatures to dealing with sharp edges, a few key safety practices can make all the difference. Let’s walk through the most important safety considerations to keep in mind so you can focus on bringing your creative vision to life without any unwanted surprises.
Recognizing the Dangers of Hot Glass
One of the biggest hazards in a glass studio is, unsurprisingly, the heat. Techniques like fusing and slumping require a kiln that reaches incredibly high temperatures, and the glass itself becomes a serious burn risk. The challenge is that your eyes can’t always tell you what’s dangerous.
Hot Glass Looks the Same as Cold Glass
This is a fundamental rule of glass safety that you should never forget: hot glass looks exactly the same as cold glass. There’s no color change or visible glow to warn you that a piece is still hundreds of degrees. This is why you must always treat any piece of glass that has recently been in a kiln as if it’s hot. Use heat-resistant gloves and proper tools, like tongs or punties, to handle items. Establish a designated cooling area in your studio where pieces can rest undisturbed until they have returned to room temperature. Rushing this process is a recipe for a serious burn, so patience is a critical part of your toolkit.
Preventing Accidents with Temperature
Beyond the immediate danger of burns, rapid temperature changes can cause glass to behave in unpredictable ways. This phenomenon is called thermal shock, and it happens when one part of the glass expands or contracts faster than another, creating internal stress. If that stress becomes too great, the glass can crack or even shatter. This is why controlled heating and cooling schedules (annealing) are so important when firing your projects. A sudden draft from an open door or placing a hot piece on a cold metal surface can be enough to cause a fracture, ruining hours of your hard work.
Tips for Everyday Glassware
You can see the principle of thermal shock in everyday life. Have you ever poured boiling water into a cool glass tumbler only to have it crack? The inside of the glass expanded much faster than the outside, causing it to break. To prevent this, you can warm the glass first with a splash of warm water or place a metal spoon inside before pouring. The metal helps absorb and distribute the heat more evenly. This same science applies to the beautiful COE96 glass you work with in the studio. Understanding how to manage temperature changes not only keeps you safe but also ensures the structural integrity and longevity of your finished art.
How to Safely Clean Up Broken Glass
Even with the best precautions, glass can break. When it does, cleaning it up safely is your top priority. First, put on a pair of thick gloves and sturdy, closed-toe shoes to protect your hands and feet. Start by carefully picking up the larger pieces and placing them in a dedicated, puncture-proof container, like a sturdy cardboard box. Next, use a broom and dustpan to sweep the area thoroughly. For the tiny, almost invisible slivers that remain, you can gently press a damp, folded paper towel over the surface to pick them up. Never reuse cracked or broken glass for a project, as it’s structurally compromised and can be dangerous. Once you’ve collected all the pieces, seal the box, label it clearly as “Broken Glass,” and dispose of it according to your local waste management guidelines.
Conclusion
With so many choices available for glass art, you can choose the one that meets your needs. Now you know what hot, cold, & warm glass techniques are. We hope this guide will help you to better understand glass art techniques.
Frequently Asked Questions
I’m a complete beginner. Which type of glass art is the easiest to start with? If you’re just starting out, cold working techniques like stained glass are a fantastic entry point. The initial investment in tools is much lower, and you don’t need a kiln, which can be a big hurdle. You can set up a small workspace on a sturdy table and learn the fundamentals of cutting, grinding, and assembling glass. For those drawn to the magic of melting glass, fusing small items like jewelry or coasters in a tabletop kiln is another very accessible way to begin your journey with warm glass.
What does COE actually mean, and why can’t I mix different types of glass? COE stands for Coefficient of Expansion, which is just a technical way of saying how much a specific type of glass expands when it’s heated and shrinks when it cools. Think of it as the glass’s unique “personality” when it comes to temperature. If you try to fuse two types of glass with different COEs (like a COE90 and a COE96), they will shrink at different rates as they cool. This creates a massive amount of internal stress, and your beautiful piece will almost certainly crack. Sticking to one COE for a project is the golden rule of glass fusing.
Can I use a kiln I already own for ceramics to fuse glass? You often can, but there are a few important things to consider. Ceramic kilns typically have heating elements on the sides, while glass kilns often have them in the lid for more even heating across a flat surface. You’ll also need a very precise digital controller to manage the specific heating and cooling schedules that glass requires. As long as you can control the temperature accurately and ensure your glass heats evenly, your ceramic kiln can absolutely pull double duty for warm glass projects.
Do I need a huge, dedicated studio to create glass art? Not at all! The amount of space you need really depends on the technique you choose. Hot glass work like glassblowing requires a significant, well-ventilated space for the furnace and other large equipment. However, you can easily set up a stained glass or copper foil station on a workbench in a spare room or garage. Even kiln work can be done in a smaller space, as many artists start with tabletop kilns that don’t have a massive footprint.
What is the single most important safety rule I should remember? Always remember that hot glass looks exactly the same as cold glass. There is no visual cue—no glow or color change—to warn you that a piece just out of the kiln is still hundreds of degrees. You must get into the habit of treating every piece as if it’s hot until you are absolutely certain it has cooled completely to room temperature. Using the proper heat-resistant gloves and tools isn’t just a suggestion; it’s essential for keeping yourself safe in the studio.
Key Takeaways
- Match your tools to your technique: Your studio needs will depend entirely on the type of glass art you pursue. Hot glass requires a furnace, warm glass techniques like fusing and slumping are done in a kiln, and cold work like stained glass can be started with a well-lit workbench and hand tools.
- Master temperature control to prevent breakage: The secret to durable glass art is managing temperature. Use slow, controlled kiln schedules for heating and cooling (annealing) to avoid thermal shock, and always use glass with a matching COE for fusing projects to prevent stress cracks.
- Treat all glass as if it’s hot: This is the most important safety rule in any glass studio because you can’t see temperature. Always use proper tools and heat-resistant gloves to handle pieces that have been fired until you are certain they have returned to room temperature.
Related Articles
- 8″ Mini Square Casting Mold| Art Glass Supplies – Pot & Screen Melts
- Snow Flake Texture Fusing Tile | Art Glass Supplies – Slumping & Draping M
- Petite Microwave Kiln | Art Glass Supplies – Microwave Kiln
- Succulent Texture Fusing Tile | Art Glass Supplies – Slumping & Draping Mo
- Slit Hole Scrap Master Casting Mold | Art Glass Supplies – Casting Molds