
People have been melting glass together for thousands of years, connecting us to a rich and ancient tradition every time we open the kiln. While the core technique is historic, today’s artists have access to tools and materials early artisans could only dream of. The variety of brilliant colors, iridescent coatings, and specialty glass like frit and stringers offers endless creative freedom. Glass fusing is a wonderful way to participate in a timeless craft with a modern twist. In this guide, we’ll cover the fundamental steps so you can connect with this history while creating something entirely new and personal.
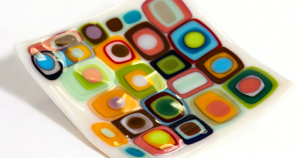
Fusing glass offers a number of possibilities to create both functional & aesthetic pieces of art glasswork. The art of fusing can be used to create jewelry, sculptures, dishware, and more.
Despite the complex appearance, fusing is quite simple. You can learn how to blend many pieces of glass into a stunning art piece with the right tools and practice.
In this article, we’ll guide you through the process of fusing. We’ll explain in detail how to prepare for your fusing projects.
What Is Fusing?
Fusing is the process of blending two or more pieces of compatible glass together. It allows you to manipulate the glass in a variety of ways. It involves heating the pieces of glass that need to be fused in a kiln—olympic kiln, glass kiln, and more at a particular temperature.
After these reach a particular soft point, all pieces fuse together to form a single piece of glass. You can create colorful, dynamic, and unique works of glass art.
A Brief History of Glass Fusing
It might seem like a modern craft, but people have been fusing glass for a very long time. Believe it or not, evidence shows that ancient Egyptians were practicing glass fusing as far back as 2000 BCE. For thousands of years, it was the primary method for creating small glass objects. That changed when glassblowing was invented, as it was a much faster process for making functional items like cups and bottles. Fusing fell out of the spotlight for centuries but saw a resurgence in the early 1900s. It really began to gain popularity again as an art form in the United States during the 1960s, and it has been growing ever since.
Today, artists and hobbyists have access to incredible tools and a stunning variety of glass that early artisans could only dream of. From vibrant colors to iridescent coatings, the materials available allow for endless creativity. This rich history adds a layer of depth to the craft, connecting contemporary artists to a tradition that spans millennia. Every time you place a piece in the kiln, you’re participating in an ancient art form, reimagined for the modern world. It’s a wonderful way to connect with the past while creating something entirely new and personal.
Advice for Beginners
Getting started with a new hobby can feel intimidating, but glass fusing is an incredibly rewarding and flexible art form. One of the best parts about it is the amount of control you have over your design. Unlike pottery or painting, where the material can be unpredictable, glass fusing allows you to arrange all your components while the glass is cold. You can take your time cutting shapes, layering colors, and perfecting your composition before it ever goes into the kiln. This makes it a very approachable medium for people who enjoy a methodical, thoughtful creative process. You get to be the architect of your piece from start to finish.
The real magic happens inside the kiln, where heat transforms your carefully arranged pieces into a single, unified work of art. The process lets you combine colors and shapes to make both beautiful decorative art and useful objects like bowls, plates, and jewelry. Whether you’re aiming for a sleek, modern design or a complex, textured piece, the fundamental techniques are the same. Don’t be afraid to experiment with different types of glass, from transparent sheets to colorful frit. The possibilities are truly endless, and the journey of discovering what you can create is half the fun.
You Don’t Need an Art Background to Start
One of the most common misconceptions that holds people back from trying a new craft is the belief that you need to be a “natural artist.” With glass fusing, that simply isn’t true. It’s a fun and flexible medium where you can create stunning pieces without ever picking up a paintbrush. You can work with clear or colored glass to make flat panels, curved dishes, or even three-dimensional sculptures. The unique properties of glass—its transparency and ability to reflect light—do a lot of the heavy lifting for you, creating beautiful effects that are hard to achieve in other mediums. Your focus can be on color, shape, and texture, which are skills anyone can develop with a little practice.
Managing the Initial Costs of Glass Fusing
Let’s be upfront: glass fusing can be an expensive hobby to get into, primarily because you need a kiln to fire your pieces. A quality kiln is an investment, and the cost can be a significant barrier for beginners. However, it’s helpful to think of it as a long-term purchase that opens up a world of creative potential. The art you create with glass often has a higher perceived value than other crafts, whether you decide to sell it or simply enjoy it in your home. The good news is, you don’t have to buy a kiln right away. There are several ways to get started without making that big initial purchase.
Finding a Local Studio to Rent Kiln Time
If the cost of a kiln is holding you back, a great alternative is to find a local studio that offers firing services. Many glass shops, community art centers, and even some retirement communities have kilns they rent out to the public. This arrangement allows you to create your projects at home on your own schedule and then bring them to the studio to be fired for a small fee. It’s the perfect way to experiment with the craft and make sure you enjoy it before committing to buying your own equipment. A quick online search for “kiln firing services near me” is a great place to start.
Why Taking a Class Is a Great First Step
For anyone new to glass fusing, taking an in-person class is one of the best ways to begin. Learning from an experienced teacher ensures you understand the fundamentals of safety, cutting, and kiln programming. A class provides a structured environment where you can ask questions and get hands-on guidance. Plus, you’ll have access to all the studio’s tools and equipment, including their kilns, without having to buy anything yourself. It’s a fantastic, low-commitment way to try the craft, learn proper techniques, and connect with other local artists who share your interest.
Essential Supplies for Glass Fusing
Once you’re ready to set up your own workspace, you’ll need a few key supplies. The most important item is, of course, the glass itself. It’s crucial to use glass that is compatible, meaning it expands and contracts at the same rate when heated. This is measured by its Coefficient of Expansion (COE). The two most common types for fusing are COE90 and COE96. You should never mix glass with different COE ratings in the same project, as it will crack during cooling. Beyond sheet glass, you can also incorporate fun elements like frit (crushed glass), stringers (thin rods), and confetti (thin shards) to add texture and detail to your work.
You’ll also need some basic tools. A good glass cutter, running pliers, and breaking-groyer pliers are essential for scoring and shaping your glass. Safety glasses are non-negotiable to protect your eyes from tiny glass splinters. To prepare your kiln, you’ll need kiln wash or shelf paper to prevent the glass from sticking to the shelf. If you want to create bowls or plates, you’ll need ceramic molds to shape the glass as it slumps. Finally, don’t forget a simple but vital step: always clean your glass thoroughly with a lint-free cloth and alcohol before firing. Any fingerprints or smudges can permanently burn into your finished piece.
Select the Same Coefficient of Expansion (COE)
The key component of a successful fusing is selecting the right glass with the same COE. Different kinds of glass with different COE have a distinct rate at which these expand and contract.
If you fuse multiple pieces of glass with different COE, the final product will crack during cooling. You can use different types of glass—frit, rod, powder, and stringer—with the same COE.
Pro Tip: To check the fusing compatibility of two different glass types, do a test fuse with small pieces first. If these crack during any stage of fusing, avoid using these together.
The Glass Fusing Process: A Step-by-Step Guide
Once you have your compatible glass, you’re ready for the fun part. The actual process of fusing might seem complex, but it’s a straightforward sequence of steps that anyone can master. Think of it less like a complicated science experiment and more like following a recipe to create something beautiful and uniquely yours. The magic lies in transforming separate, sharp-edged pieces of glass into a single, smooth, and cohesive design. Let’s walk through the entire process from start to finish, so you know exactly what to expect when you begin your first project and can feel confident as you get started.
First, you’ll want to prepare your workspace and kiln shelf. A clean, organized area makes everything run more smoothly. Begin by cutting your COE90 glass or COE96 glass into your desired shapes. After cutting, you must clean every piece thoroughly to remove any fingerprints, oils, or dust. This is a critical step, as any residue can cause unwanted bubbles or hazy spots in your final piece. Once your glass is sparkling clean, you can arrange your design on the prepared kiln shelf. For more intricate patterns, a tiny drop of fusing glue can be a lifesaver, helping to hold everything perfectly in place before it goes into the kiln.
With your design fully assembled, it’s time to fire it up. Carefully place the shelf into the kiln and begin the heating program. The glass will be heated to a target temperature, typically between 1,292°F and 1,510°F, where it becomes molten and fuses together. The exact temperature and the amount of time it’s held there will depend on the glass you’re using and the final effect you want. After the glass has fully fused, it must cool down very slowly inside the kiln. This controlled cooling stage, known as annealing, is essential for removing internal stress from the glass, which prevents fractures and ensures your piece is strong and durable for years to come.
After the kiln has completely cooled down to room temperature—patience is key here—you can finally open it and remove your new creation. The once-separate pieces will now be a single, solid object. If your goal was a flat panel, a suncatcher, or a piece of jewelry, you might be done! However, if you want to give your piece a three-dimensional shape, like a bowl or a plate, your next step is a second firing. This process, called slumping, involves placing the fused glass over one of our ceramic or stainless steel molds and firing it at a lower temperature, allowing gravity to gently shape it into its final, functional form.
Thoroughly Clean the Glass Pieces
For a flawless end product, you need to make sure your glass pieces are cleaned well. You can clean with mild soap and water. For better results use a high-quality specialized glass cleaning agent.
- Spray the glass with the cleaning agent.
- Rinse it off with clean water.
- Wipe it with a clean dry cloth.
It helps you get rid of any residue, oil, dirt, or dust and prevents your final glass product from becoming foggy.
Find the Right Kiln
Always choose a kiln that is specifically designed for firing glass. Avoid using kilns that are meant for ceramics. You might not get an accurate result.
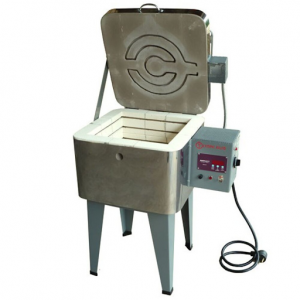
Selecting the size of your kiln according to your fusing needs is also important for better results.
- If you’re planning on doing minor glass fusing projects, it’s better to invest in a small kiln.
- If you wish to work on multiple fusing projects, consider buying a large kiln.
Get a Kiln Shelf
Make sure you invest in a high-quality kiln shelf that can withstand temperatures of up to 2000° Fahrenheit (1093° Celsius). It helps you set your glass on the kiln. These are available in a variety of materials such as:
- Cordierite
- High alumina
- Silicon carbide
- Nitride bonded silicon carbide
and more.
Pro Tip: For better fusing, make sure your kiln casting mold also withstands high temperatures similar to the kiln shelf.
Apply Kiln Primer
For smooth fusing, you need to apply kiln primer—kiln wash and kiln paper. Kiln primer has the following benefits:
- It can withstand high temperatures.
- It prevents your glass from sticking to the kiln shelf.
- It ensures your glass comes off easily.
- It also protects your shelf from glaze meltdown.
Difference between Kiln Wash & Kiln Paper
Kiln papers are significantly more expensive than kiln washes. Every time a kiln shelf is used, you need to apply a new kiln wash and remove it after firing. It is a messy and time-consuming process.
On the other hand, you just need to place a new kiln paper every time you fire your kiln.
Purchase the Essential Safety Equipment

Protective Eyeglasses
These will protect your eyes from small sharp glass fragments. These fragments can pop off during cutting, nipping, and breaking the glass.
Heat-Resistant Gloves
These will help you protect your hands from the intense heat when you stick your hands into your kiln.
Respirator/Mask
It protects you from glass dust, also called silica. If you breathe this dust, it can cause damage to your lungs.
First-Aid Kit
When you work with such high temperatures, it is a must to have a first-aid kit ready. It should include:
- Band-aids
- Aspirin/Tylenol
- Neosporin
- Cotton bandages
- Small scissors
- Antiseptic solution
- First-aid tape
et cetera.
Why COE Compatibility Is Crucial
Think of COE, or the Coefficient of Expansion, as the personality of your glass. It dictates how much the glass will expand when heated and shrink when it cools. For a successful fusion, every piece of glass in your project must have the same personality—or COE. If you try to fuse glass with different COEs, like a COE90 with a COE96, they will expand and contract at different rates. As the piece cools, this difference in movement creates immense stress, causing the glass to pull itself apart and crack. This is why sticking to a single COE for all your components, from sheets to frit and stringers, is the golden rule of glass fusing.
Expert Tip: Stick to One Glass Manufacturer Per Project
While you can technically test different glasses for compatibility, the easiest way to guarantee success is to use glass from a single manufacturer for your entire project. Companies like Bullseye or Wissmach rigorously test their products to ensure everything within their specific COE line is compatible. This means you can confidently mix and match different colors and forms—like sheets, powders, and rods—from the same brand without worrying about unexpected cracks. This simple guideline removes the guesswork and is especially helpful when you’re just starting out, letting you focus on your design instead of complex material science.
Choosing the Right Art Glass vs. Float Glass
When you’re gathering supplies, it’s important to use true art glass designed for kiln work. This type of glass has its color mixed in during manufacturing and, most importantly, has a tested and labeled COE. You might be tempted to use other types of glass you find, like float glass (window panes) or bottle glass, but these are not suitable for fusing projects. Their COE is unknown and inconsistent, making them incompatible with art glass and even with each other. Fusing them will almost certainly result in a cracked, failed piece. Always invest in quality, compatible art glass to ensure your finished work is strong and beautiful.
Get the Necessary Glass Cutting Tools
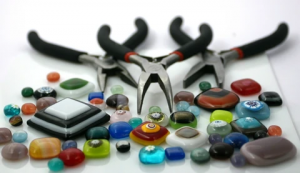
Glass Cutters
Glass cutters help you score lines on the sheet glass and cut them into the required shapes.
Mosaic Cutters
Mosaic cutters have sharp cutting tips that allow you to nip glass rods and sheets.
Grozing Pliers
Grozing pliers help you chip away the rough edges of the glass before fusing.
Running Pliers
The slight curves of running pliers help you apply pressure on the glass to break it evenly.
Breaking Pliers
Similar to running pliers, breaking pliers help break the glass along the scored lines.
Marker
A marker allows you to draw designs on the glass before firing. The marks burn off in the firing.
Step 2: Cut and Arrange Your Glass Design
Now for the fun part—bringing your artistic vision to life. Unlike other forms of glass art where you work with molten material, glass fusing allows you to design and arrange your piece while the glass is cold. This gives you all the time you need to perfect your layout, layer colors, and add details like frit or stringers. Before you can arrange your masterpiece, you first need to cut your glass sheets into the desired shapes and sizes. This might sound intimidating, but with the right tools and a little practice, you’ll be cutting glass like a pro in no time.
The Score and Break Method
Cutting glass is much simpler than it seems. The primary technique is called the “score and break” method. Using a specialized glass cutter, you’ll create a shallow score line across the surface of the glass. This doesn’t cut all the way through; it just creates a controlled weak point. Then, using running pliers or simply your hands, you apply gentle pressure on both sides of the score line. The glass will cleanly break right where you scored it. This method gives you precise control, allowing you to create straight lines and gentle curves for your design.
Designing Your Piece While the Glass Is Cold
One of the biggest advantages of glass fusing is the ability to work with your materials at room temperature. You can take your time arranging your cut pieces of COE90 glass on your kiln shelf, experimenting with different layouts and color combinations. You can layer pieces to create depth, place them side-by-side for a mosaic effect, or sprinkle on decorative elements like powders and frits. This relaxed, deliberate process allows for incredible creativity and precision, ensuring your design is exactly how you want it before it ever enters the kiln.
Step 3: Understanding the Kiln Firing Process
Once your design is complete, it’s time for the magic to happen inside the kiln. The firing process is what transforms your separate pieces of glass into a single, unified work of art. It’s not as simple as just turning the heat on and off; it’s a carefully controlled process with specific temperature stages designed to heat and cool the glass safely. Understanding the basics of what happens during firing will help you achieve the exact look you want, whether it’s a textured piece with defined edges or a smooth, fully blended surface. Modern kilns with digital controllers make managing this process straightforward.
The Firing Schedule: Ramps and Soaks
A firing schedule is essentially a recipe that tells your kiln how to heat and cool your glass. This schedule is made up of “ramps” and “soaks.” A ramp is a period where the kiln’s temperature is increasing at a specific rate. A soak is a period where the kiln holds a specific temperature for a set amount of time. These stages are critical for heating the glass evenly and allowing it to properly fuse without trapping air bubbles or causing stress. Different schedules are used to achieve different results, from a light tack fuse to a full fuse.
Key Temperature Ranges for Fusing
Glass fusing happens at very high temperatures, typically between 1,292°F and 1,510°F (700°C to 820°C). The exact temperature your project needs to reach depends on the type of glass you’re using and the effect you want to achieve. For example, a lower temperature might be used for a tack fuse where you want the glass pieces to stick together but maintain some of their original shape and texture. A higher temperature is needed for a full fuse, where the glass becomes molten enough to blend together completely, creating a smooth, flat surface.
Levels of Fusing: Tack Fuse vs. Full Fuse
The final texture of your piece is determined by the top temperature it reaches and how long it stays there. In a “tack fuse,” the glass gets just hot enough for the pieces to stick together securely, but they retain much of their individual shape and dimension. This creates a textured, layered look. In a “full fuse,” the glass is heated to a higher temperature, causing the edges to soften, round out, and blend seamlessly into one another. The longer the glass soaks at this top temperature, the smoother and more integrated the final piece will be.
How Project Size Affects Firing Time
The size and thickness of your glass project directly influence the firing schedule. Smaller, thinner pieces, like those for jewelry, can heat up and cool down much more quickly. A small pendant might be fully fired and annealed in just a few hours. Larger and thicker projects, however, require much slower ramps and longer soaks to ensure the glass heats evenly all the way through. Rushing the process on a large piece can create internal stress, leading to cracks during the cooling phase, so patience is key.
Avoiding Devitrification
Devitrification is a common issue in glass fusing where a hazy or scummy layer forms on the surface of the glass during firing. This happens when the glass is held at a high temperature for too long, causing crystals to form. To avoid this, it’s important to use a well-tested firing schedule and ensure your glass is perfectly clean before it goes into the kiln. Fingerprints, dust, or oils can contribute to devitrification. Proper cleaning and an efficient firing and cooling cycle are your best defenses for keeping your glass perfectly clear and glossy.
Step 4: The Importance of Annealing
After the glass has reached its top temperature and fused together, the cooling process begins. This isn’t as simple as just turning off the kiln. The glass must be cooled down in a slow, controlled manner through a process called annealing. This is arguably the most critical step for ensuring the structural integrity and longevity of your finished piece. Skipping or rushing the annealing stage can lead to a beautiful piece of art that cracks or shatters days, weeks, or even months later due to hidden internal stress.
How Annealing Prevents Thermal Shock
As glass cools, it contracts. If the outside of the glass cools faster than the inside, it creates immense internal stress. Annealing prevents this by holding the glass at a specific temperature (typically around 900°F to 1000°F) where the glass is stable but can still relax and relieve this stress. The kiln then cools down very slowly through this critical range before shutting off. This process, which can take 10-12 hours or more for larger pieces, ensures the entire piece is a uniform temperature, preventing thermal shock and making your creation strong and durable.
Advanced Techniques: Shaping Glass with Slumping
Once you’ve mastered the basics of flat fusing, you can explore the three-dimensional possibilities of shaping glass. Slumping is a technique that uses gravity and heat to bend a flat, fused piece of glass over or into a mold, transforming it into a functional or sculptural object. This process is typically done in a separate, lower-temperature firing after your initial design has been fused. It opens up a whole new world of projects, allowing you to create custom bowls, plates, vases, and other unique forms that combine your fused glass designs with practical shapes.
Using Molds to Create Bowls and Plates
To slump glass, you’ll need a mold made from a material that can withstand kiln temperatures, like ceramic or stainless steel. You simply place your pre-fused glass piece on top of or inside one of the many available molds and fire it again. As the kiln heats up, the glass will soften and slowly “slump,” or sink, into the shape of the mold. The final form depends on the mold you choose and the firing schedule you use. With this technique, you can turn a beautiful flat panel into a stunning, custom-made platter or a delicate, curved bowl.
Caring for Your Fused Glass Creations
Proper care for your glass starts before it even enters the kiln. It is absolutely essential to clean your glass thoroughly before firing. Any smudges, fingerprints, or oils left on the surface can permanently burn into the glass, creating a cloudy or flawed finish. A simple wash with soap and water or a specialized glass cleaner, followed by a rinse and a wipe with a lint-free cloth, will do the trick. For your finished pieces, treat them as you would any other glassware. Hand-washing is recommended, especially for delicate or sculptural items, to ensure they remain beautiful for years to come.
Conclusion
The right way to become a fusing expert is to start with the basics. It is easy to create stunning artwork with glass if you are well prepared.
Now you know how to choose the right types of glass, kiln, kiln shelf, kiln primer, slumping molds, and various other slumping supplies. We hope this guide will help you to better understand what fusing is.
Make sure you have all the cutting tools and safety equipment before you start your fusing project.
Frequently Asked Questions
Do I have to buy an expensive kiln to start fusing glass? Not at all! The cost of a kiln can feel like a huge hurdle, but you don’t need to make that investment right away. A great first step is to find a local art studio or glass shop that rents out kiln time. This allows you to create your pieces at home and then bring them in for firing. Taking a beginner’s class is another fantastic option, as it gives you access to all the necessary equipment and expert guidance without the upfront cost.
What is COE, and why is it so important? COE, or Coefficient of Expansion, is simply a measure of how much glass expands when it’s hot and shrinks as it cools. For a project to be successful, every single piece of glass you use must have the same COE. If you mix different COEs, the pieces will shrink at different rates during cooling, creating stress that will cause your beautiful work to crack. Sticking to one COE, like all COE90 or all COE96, is the most important rule in glass fusing.
What’s the difference between fusing and slumping? Think of it as a two-part process for creating anything with a shape, like a bowl or plate. Fusing is the first step, where you arrange your design with flat pieces of glass and fire them in the kiln until they melt into a single, solid panel. Slumping is the second step. You take that flat, fused piece, place it on top of a mold, and fire it again at a lower temperature. This allows gravity to gently bend, or “slump,” the glass into the shape of the mold.
Can I use glass from a window or an old bottle for my projects? It’s a common question, but the answer is a definite no. Glass from windows, bottles, or jars is not designed for fusing and has an unknown COE. It is not compatible with the art glass you’ll be using, and trying to fuse them together will almost certainly result in a cracked and failed piece. Always stick with tested art glass that has a clearly labeled COE to ensure your work is strong and stable.
Why did my finished piece come out with a hazy or cloudy surface? A hazy finish is usually caused by one of two things. The most common reason is that the glass wasn’t perfectly clean before firing. Any fingerprints, oils, or dust can permanently burn onto the surface, creating a cloudy look. The other possibility is devitrification, where crystals form on the glass surface from being held at a high temperature for too long. Thoroughly cleaning your glass and using a reliable firing schedule are the best ways to get that perfectly clear, glossy finish.
Key Takeaways
- Stick to One COE for Success: For a project to survive the kiln, all your glass—from sheets to frit—must have the same Coefficient of Expansion (COE). Mixing different COEs creates internal stress during cooling that will inevitably crack your finished piece.
- Design with Confidence Before Firing: Glass fusing gives you the unique advantage of arranging and perfecting your entire design while the glass is cold. This methodical process offers complete creative control before the kiln transforms your separate components into a single work of art.
- Try the Craft Before Investing in a Kiln: You don’t need to buy your own kiln right away. Taking a local class or renting kiln time at a studio are excellent, low-commitment ways to learn the fundamentals and confirm your passion for the art form before purchasing major equipment.
Related Articles
- 8″ Mini Square Casting Mold| Art Glass Supplies – Pot & Screen Melts
- Slit Hole Scrap Master Casting Mold | Art Glass Supplies – Casting Molds
- Petite Microwave Kiln | Art Glass Supplies – Microwave Kiln
- Snow Flake Texture Fusing Tile | Art Glass Supplies – Slumping & Draping M
- Harvest Textured Fusing Tile | Art Glass Supplies – Slumping & Draping Mol