
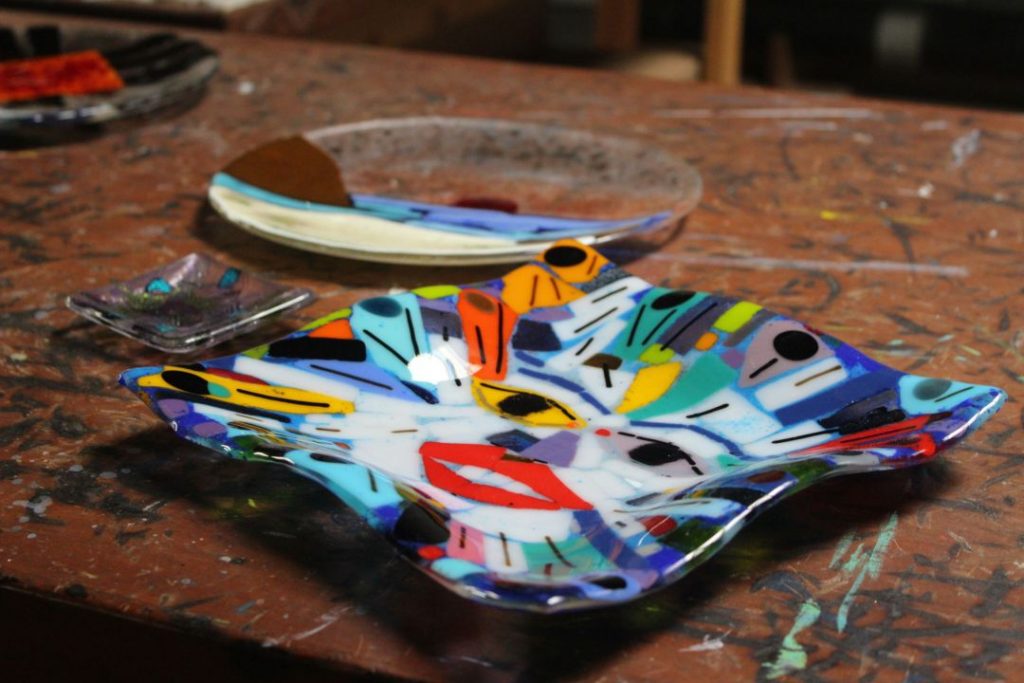
Turning a flat sheet of glass into a gracefully curved bowl or a textured platter feels like magic, but it’s a skill any artist can learn. This transformative process is called glass slumping, and it’s the key to creating functional and sculptural glass art in your own kiln. By carefully heating glass over or into a mold, you can shape it into nearly any form you can think of. While it might sound complex, the fundamentals are straightforward. This article breaks down the entire process, explaining the difference between slumping and fusing, the tools you’ll need, and the techniques for achieving beautiful, consistent results.
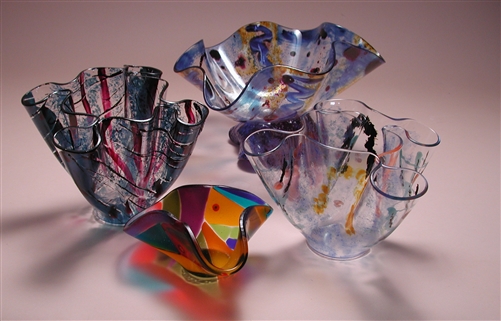 Glass slumping offers a number of possibilities to create unique glass bowls, platters, and art glasswork. It helps your mold glass into different shapes and textures using heat, gravity, and slumping molds.In this blog, we’ll guide you through the process of slumping. We’ll explain:
- What Is Slumping?
- Slumping Vs. Fusing
- Equipment Required for Slumping
- Glass Slumping Techniques
- How to Slump Glass into a Mold
What Is Slumping?
Slumping is a type of kilnforming process that utilizes gravity and heat to mold glass into the desired shapes. With different mold textures and shapes to choose from, the slumping possibilities are endless. In this process, a glass sheet is laid over a slumping mold and put in an Olympic kiln or microwave kiln. Fire the kiln up to 1300° Fahrenheit. When the glass becomes soft because of heat, gravity pulls it down into the mold. Once the glass sheet takes the desired shape, the kiln is slowly annealed and cooled down to room temperature. The temperature of precise annealing depends on the type of glass.
Getting Started in Glass Slumping
Jumping into a new creative hobby is always exciting, and glass slumping opens up a world of beautiful, functional art you can make yourself. Before you start, it’s helpful to understand what you’ll need and what to expect in terms of costs. The initial setup can feel like a big step, but there are smart ways to begin your journey without breaking the bank. Thinking through the essentials and finding ways to start small will help you build your skills and your studio at a pace that feels right for you.
Understanding the Costs
Let’s be real: getting set up for glass slumping does require an initial investment. The most significant expense is the kiln, which is the heart of your operation. Beyond that, you’ll need materials like fusible glass sheets—we carry a huge variety of both COE90 and COE96 glass—and a collection of slumping molds to create your shapes. As noted by the experts at Kiln Frog, “Starting glass fusing can be expensive because of the kiln, tools, and materials.” While these costs are real, thinking of them as an investment in your craft can help. The key is to start with a clear budget and prioritize the essential equipment first.
How to Start Affordably
You don’t have to buy a full studio setup overnight. A great way to dip your toes in the water is by finding a local glass studio or community art center that offers classes or kiln rentals. This approach lets you learn the fundamentals and confirm your passion for the craft before committing to expensive equipment. According to Kiln Frog, “Even though setting up a home glass studio can be costly, you don’t have to buy everything at once. Many people start by taking classes or using kilns at community art spaces.” This strategy allows you to spread out the costs over time, buying tools and materials as you grow more confident and knowledgeable in your new hobby.
Slumping Vs. Fusing
These are the two unique processes of creating glass art in the kiln. Both require different temperatures and must be performed at separate times in the kiln. So, let’s find out what glass fusing and glass slumping is.
Glass Slumping
- Enables you to reshape glass with the help of mold, heat, and gravity
- Needs low kiln temperature to perform—1200° to 1300° Fahrenheit
- Allows you can create larger, functional art glass pieces—dishes, plates, bowls, and ashtrays
Glass Fusing
- Enables you to combine multiple glass sheets to create unique surface patterns
- Needs high kiln temperature to perform—1300° to 1500° Fahrenheit
- Allows you to create smaller art glass pieces—glass tiles, notably beads, and jewelry
Important Note: It is recommended to always fuse your glass before you slump it. It prevents air bubbles and you have better control over the end result.
Tack Fusing (1350-1369°F)
Tack fusing is your go-to technique when you want to join pieces of glass together while keeping some of their original texture and dimension. Think of it as a light “tack” weld for glass. This process happens at lower temperatures, typically between 1350°F and 1369°F. At this heat, the glass becomes just soft enough to bond where the pieces touch, but not so molten that they completely flatten out. This is perfect for creating layered designs where you want the individual components to remain distinct. It’s a great way to add depth to your work, whether you’re using colorful sheets of COE96 glass or arranging smaller decorative elements.
Contour Fusing (1400-1450°F)
If you’re looking for a middle ground between a textured and a completely smooth finish, contour fusing is the technique for you. Performed at a slightly higher temperature range of 1400°F to 1450°F, this process softens the glass enough to round out and smooth the sharp edges of your pieces. However, it doesn’t get hot enough to make them lose their individual shapes entirely. The result is a more refined, polished look that still maintains the dimensionality and contours of your original design. This method is ideal for projects where you want a soft, finished appearance without creating a single flat surface, giving your art a gentle, pillowy effect.
Full Fusing (1450-1479°F)
When your goal is to merge multiple pieces of glass into one seamless, flat piece, you’ll need to do a full fuse. This technique requires the highest temperatures of the fusing processes, usually between 1450°F and 1479°F. At this heat, the glass becomes completely molten, allowing the separate pieces to flow together and form a single, smooth surface. It’s essential to use compatible glass, like sheets from our COE90 collection, to ensure the final piece is stable and won’t crack as it cools. Full fusing is the foundation for many projects, creating the solid blank you might later slump into a bowl or dish.
The Importance of Annealing
Once your glass has been fused or slumped into its final shape, the work isn’t over. The next step, annealing, is arguably the most critical part of the entire process. Annealing is the controlled, slow cooling of your glass inside the kiln. As glass heats and cools, it develops internal stress. If it cools too quickly, that stress gets locked in, making the piece extremely fragile and prone to cracking—sometimes days or even weeks later. A proper annealing schedule allows the temperature to distribute evenly, relieving that stress and ensuring your beautiful creation is strong and durable. Every artist learns that patience during the annealing phase is the key to a successful project.
Equipment Required for Slumping
You will need the below-mentioned equipment to start your slumping projects.
Glass Slumping Kiln
A glass slumping kiln is necessary to get the required temperature. For slumping, you will need a glass kiln that is able to fire to about 1400° to 1500° Fahrenheit.
Glass Kilns vs. Ceramic Kilns
You might be wondering if you can use a ceramic kiln for glass, and the answer is generally no. The main difference is how they heat up. Glass kilns have heating elements on the top and sides to distribute heat evenly across your project. Ceramic kilns, on the other hand, typically only heat from the sides. This even heat is critical for glass, which is sensitive to sudden temperature changes and can easily crack from thermal shock. According to the experts at Kiln Frog, this top-down heating is essential because glass can break if it heats or cools too quickly. Using a kiln designed specifically for glass ensures your pieces heat and cool uniformly, giving you much better results.
The Need for Digital Controls
When you’re shopping for a glass kiln, a digital controller is a non-negotiable feature. Manual controls just don’t offer the precision needed for glasswork. Slumping requires very specific heating and cooling schedules, with different stages of ramping up, holding (or “soaking”), and cooling down. A digital controller lets you program these multi-step firing schedules with accuracy, so you can get consistent, repeatable results every time. It takes the guesswork out of the process and gives you complete control over the outcome of your beautiful glass pieces. You can explore a range of kilns with digital controllers to find one that fits your studio space and project goals.
Power Requirements for Your Kiln
Before you fall in love with a kiln, check your studio’s power supply. Smaller kilns, usually those under 15 inches, can often be plugged into a standard 120-volt household outlet, which is super convenient. However, larger kilns that can handle bigger projects typically need more power and require a 240-volt circuit, similar to what an electric dryer or oven uses. It’s a good idea to have an electrician check your setup to make sure you can safely support the kiln you want to buy. Planning for your power needs ahead of time will save you a lot of headaches later and ensure you can get your new equipment up and running without any surprises.
Essential Kiln Accessories
Your kiln is the main event, but you’ll need a few key accessories to get started. Kiln shelves and posts are essential for supporting your glass projects inside the kiln. They lift your piece off the kiln floor, which allows heat to circulate evenly all around it and protects the kiln’s interior. You’ll also need kiln wash or shelf paper to coat the shelf before firing. This acts as a separator, preventing the molten glass from sticking to the shelf—a mistake you only make once! Many kilns have an optional “furniture kit” you can purchase, which conveniently bundles the right-sized shelves and posts together for your specific model.
Tips for Kiln Efficiency
Here’s a simple tip to make your firings more energy-efficient and effective: try to fire a full kiln whenever possible. Kilns operate most efficiently when they are loaded to capacity. Firing a single small project in a large, empty kiln wastes a lot of energy. Planning your projects so you can load several pieces at once not only saves on your electricity bill but also makes the most of your time and the kiln’s heating power. It’s a small habit that can make a big difference in your studio’s workflow and costs over time, letting you create more art with less waste.
Why a Blowtorch Isn’t a Substitute
It might be tempting to think you can use a blowtorch to slump a small piece of glass, but it’s not a safe or effective substitute for a kiln. A blowtorch simply can’t generate enough widespread, even heat to properly soften the glass for slumping. Instead, it creates intense, localized hot spots. According to the glass experts at The Crucible, this uneven heating can cause thermal shock, which will likely crack your glass. For the controlled, gradual temperature changes that slumping requires, a kiln is the only way to go. It’s the right tool for achieving that beautiful, smooth shape you’re looking for in your finished piece.
Slumping Molds
Slumping molds are made out of different elements that can withstand high temperatures when fired in the kiln. You can select your molds based on the slumping project.
Common Mold Materials
The material your mold is made from plays a huge role in the final look and feel of your slumped glass piece. Molds are designed to withstand the intense heat of a kiln, but different materials offer unique benefits. Ceramic molds are easily the most popular choice among glass artists, and for good reason. They handle high temperatures beautifully and are available in an incredible variety of shapes, sizes, and textures. This versatility allows you to create everything from simple, elegant bowls to intricately patterned art pieces. Because they are so widely used, you can find a vast selection of ceramic molds to bring almost any creative vision to life.
If durability is your top priority, stainless steel molds are an excellent option. These sturdy molds can be used over and over again without degrading, making them a great long-term investment for your studio. They are particularly well-suited for creating functional pieces like plates and platters because they impart a perfectly smooth finish to the glass. While you might also come across molds made from silicone or plaster, they tend to be used for more specialized applications. Silicone offers flexibility for unique shapes but has lower temperature limits, while plaster is a cost-effective choice for custom, one-time projects but lacks the longevity of ceramic or steel.
Kiln Wash
Kiln wash helps you prepare and protect your slumping mold. Apply multiple layers of kiln wash to prevent the glass from sticking to your mold.
Safety Equipment
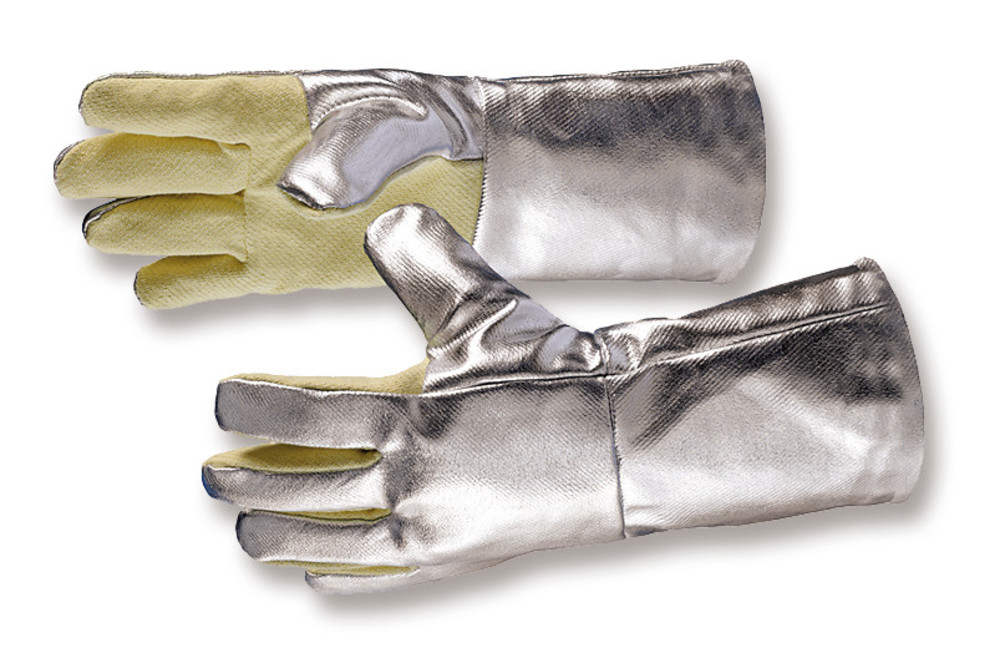 Safety comes first. Working with molten glass at more than 1000° Fahrenheit can be pretty dangerous. Invest in infrared safety glasses and heat-resistant gloves to ensure your safety. These are not expensive at all. You can easily find these in any art supply store and online glass fusing supplies. Important Note: It is highly recommended to learn slumping under the guidance of an experienced teacher before setting up your own studio.
Glass Slumping Techniques
There are 3 types of glass slumping techniques. you can choose according to your project—platter, bowl, art piece, etc. 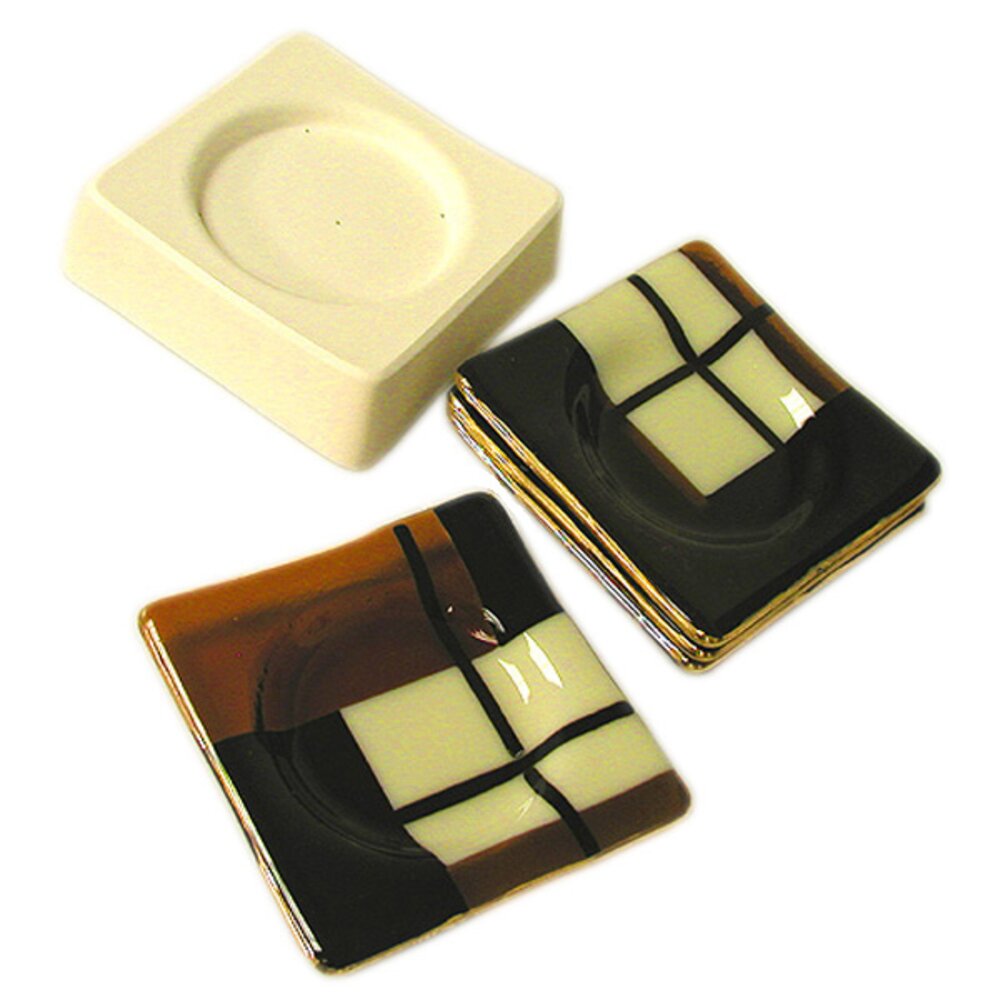
Over the Mold
- Place a glass sheet on the top of a convex mold in the kiln
- Fire the kiln to make the glass sheet soft
- The heat and gravity allows the glass sheet to drape over the mold and take the desired shape
- The glass remains shiny on the outside of the bowl
- Stainless steel molds are ideal for this type of mold slumping
Into the Mold
- Balance a glass sheet on top of a mold in the kiln
- Fire the kiln to make the glass sheet soft
- The soft glass sheet sinks into the mold with the help of heat and gravity
- Make sure there are tiny air holes at the bottom of the mold for air to escape during the firing
- The glass remains shiny from the inside of the bowl
- Ceramic molds are ideal for this type of mold slumping
Through the Mold
- Place the glass on the mold, also known as drop ring
- Fire the kiln to make the glass sheet soft
- The combination of heat and gravity pulls soft glass sheet down through the mold
- Rigidized ceramic fiberboard and drop-out clay ring molds are ideal for through the mold slumping
How to Slump Glass into a Mold
You can slump all types of glass sheets in 5 easy steps:
Step 1: Workspace Preparation
Collect all the needed material—mold, kiln, safety equipment, etc.—before you start your project.
Safe Kiln Placement and Clearance
Choosing the right spot for your kiln is one of the most important safety decisions you’ll make. The best place for a kiln is a garage or utility room, especially one with a concrete floor, because it provides a stable and non-combustible surface. Once you’ve picked your spot, it’s crucial to maintain proper clearance. As a rule of thumb, always keep at least 18 inches of clear space around all sides of your kiln. This buffer zone is essential for preventing heat from transferring to nearby walls or objects, which could create a fire hazard. Make sure the area is completely free of flammable materials like curtains, paper, or chemicals.
Ensuring Proper Ventilation
Proper ventilation is non-negotiable when you’re working with a kiln. During the firing process, kilns generate a significant amount of heat and can release fumes from binders or other substances burning off the glass. To keep your workspace safe, you need good airflow to dissipate this heat and vent any fumes. Placing your kiln near an open window or door is a great start, as this simple step can make a big difference. If you’re working in a more enclosed space without easy access to a window, you might want to consider installing a dedicated ventilation system. This protects your health and makes the firing process much safer for everyone in your home or studio.
Step 2: Mold Preparation
- Prepare your mold by applying kiln wash
- Kiln wash application method depends on the type of mold
- Use a high-quality shelf primer to protect the glass from sticking to the mold
- Apply multiple layers of the kiln wash and let it dry
- If applied correctly, your mold can withstand multiple firing
- Carefully handle and store primed molds to prevent breakage and chips
Step 3: Slump Preparation
- Put a glass sheet on a mold
- Place the mold inside a glass kiln
- Make sure the mold is 2 or more inches above the heating elements of the kiln
- if not, elevate the mold to promote uniform heating & cooling
Step 4: Let’s Fire
- Work out your firing schedule according to the thickness and size of your glass piece
- Fire your kiln and bring it up to the required temperature range for slumping—1100–1250° Fahrenheit
- Make sure you gradually increase the temperature to prevent thermal shock
- Similarly, gradually decrease the temperature during the annealing process
- Program your glass kiln to cool at 100° per hour
- Finally, when the temperature is around 70°, allow it to cool at room temperature
Step 5: Admire your Slumped Glass
 By the time the glass sheet is cooled down to room temperature, the soft glass will be crystallized. It will turn back into a rigid form of glass with the shape and texture of the mold.
Conclusion
Mastering glass slumping involves some trial and error especially with the ‘through a mold’ technique. It requires you to make regular inspections to check how far the glass sheet has slumped. It’s also crucial to maintain the right temperature so that the glass does not slump in excess. It will affect the final texture and finish of the end product. The final results may also vary depending on the:
- Size of the project
- Type of kiln
- Type of glass used
- Number of glass layers
Frequently Asked Questions
Can I use a regular ceramics kiln for slumping glass? While it might seem like a kiln is a kiln, glass and ceramics require different heating methods. Glass kilns are designed with heating elements on the top to heat the glass evenly across its surface, which is essential for preventing cracks from thermal shock. Ceramic kilns typically heat from the sides, which can cause uneven temperatures and lead to disappointing results. For consistent, successful slumping, a kiln made specifically for glass is your best bet.
What happens if I slump my glass at too high a temperature? Finding the right temperature is key to getting the shape you want. If you fire your kiln too hot, the glass can become overly fluid and slump too quickly or excessively. This can cause the glass to thin out too much in the center, stick to your mold, or lose any surface details you created during the fusing stage. The goal is to gently soften the glass just enough for gravity to do its work, not to turn it into a puddle.
Why is it so important to cool the glass down slowly? The slow cooling process, called annealing, is the most critical step for creating a strong, durable piece of art. As glass cools, it develops internal stress. If it cools too quickly, that stress gets locked in, making the glass extremely fragile and likely to crack later on, sometimes days after it’s out of the kiln. A controlled, gradual cooling schedule allows that stress to release, ensuring your beautiful bowl or platter will last.
My glass stuck to my mold. What did I do wrong? This is a common frustration, and it almost always comes down to your mold separator. Before firing, your mold needs a thorough and even coating of kiln wash or shelf primer, which acts as a barrier between the hot glass and the mold surface. If the coating is too thin, uneven, or has chipped off, the glass will bond directly to the mold. Always make sure your kiln wash is applied correctly and is completely dry before you begin.
I don’t have a kiln. Is there any way for me to try glass slumping? Absolutely! You don’t need to own a full studio to get started. Many community art centers and local glass studios offer classes or kiln rental time. This is a fantastic way to learn the fundamentals from experienced artists and confirm your passion for the craft before you invest in your own equipment. It allows you to experiment with different techniques and materials without the upfront cost.
Key Takeaways
- Fuse Before You Slump: Always fuse your glass pieces into a single, flat design first using higher temperatures. Slumping is the second step, where you shape that fused piece over a mold at lower temperatures. This two-step process gives you more control and prevents unwanted air bubbles.
- A Glass Kiln is Essential: You need a kiln designed specifically for glass with a digital controller to manage the precise heating and cooling schedules slumping requires. To start affordably, consider taking a class or renting kiln time at a local studio before investing in your own equipment.
- Prep Your Mold and Plan Your Cool-Down: Your project’s success depends on what happens before and after the heat. Always coat your mold with kiln wash to prevent the glass from sticking, and program a slow, controlled annealing schedule to prevent stress cracks and ensure a durable final piece.
Related Articles
- Night Light Slumping Mold | Art Glass Supplies – Slumping & Draping Molds
- Large Round Slump Ring Mold | Art Glass Supplies – Slumping & Draping Mold
- Slab Server Casting Mold | Art Glass Supplies – Colour De Verre
- Coaster Slumping Mold | Art Glass Supplies – Slumping & Draping Molds
- Small Organic Bowl Slumping Mold | Art Glass Supplies – Slumping & Draping