
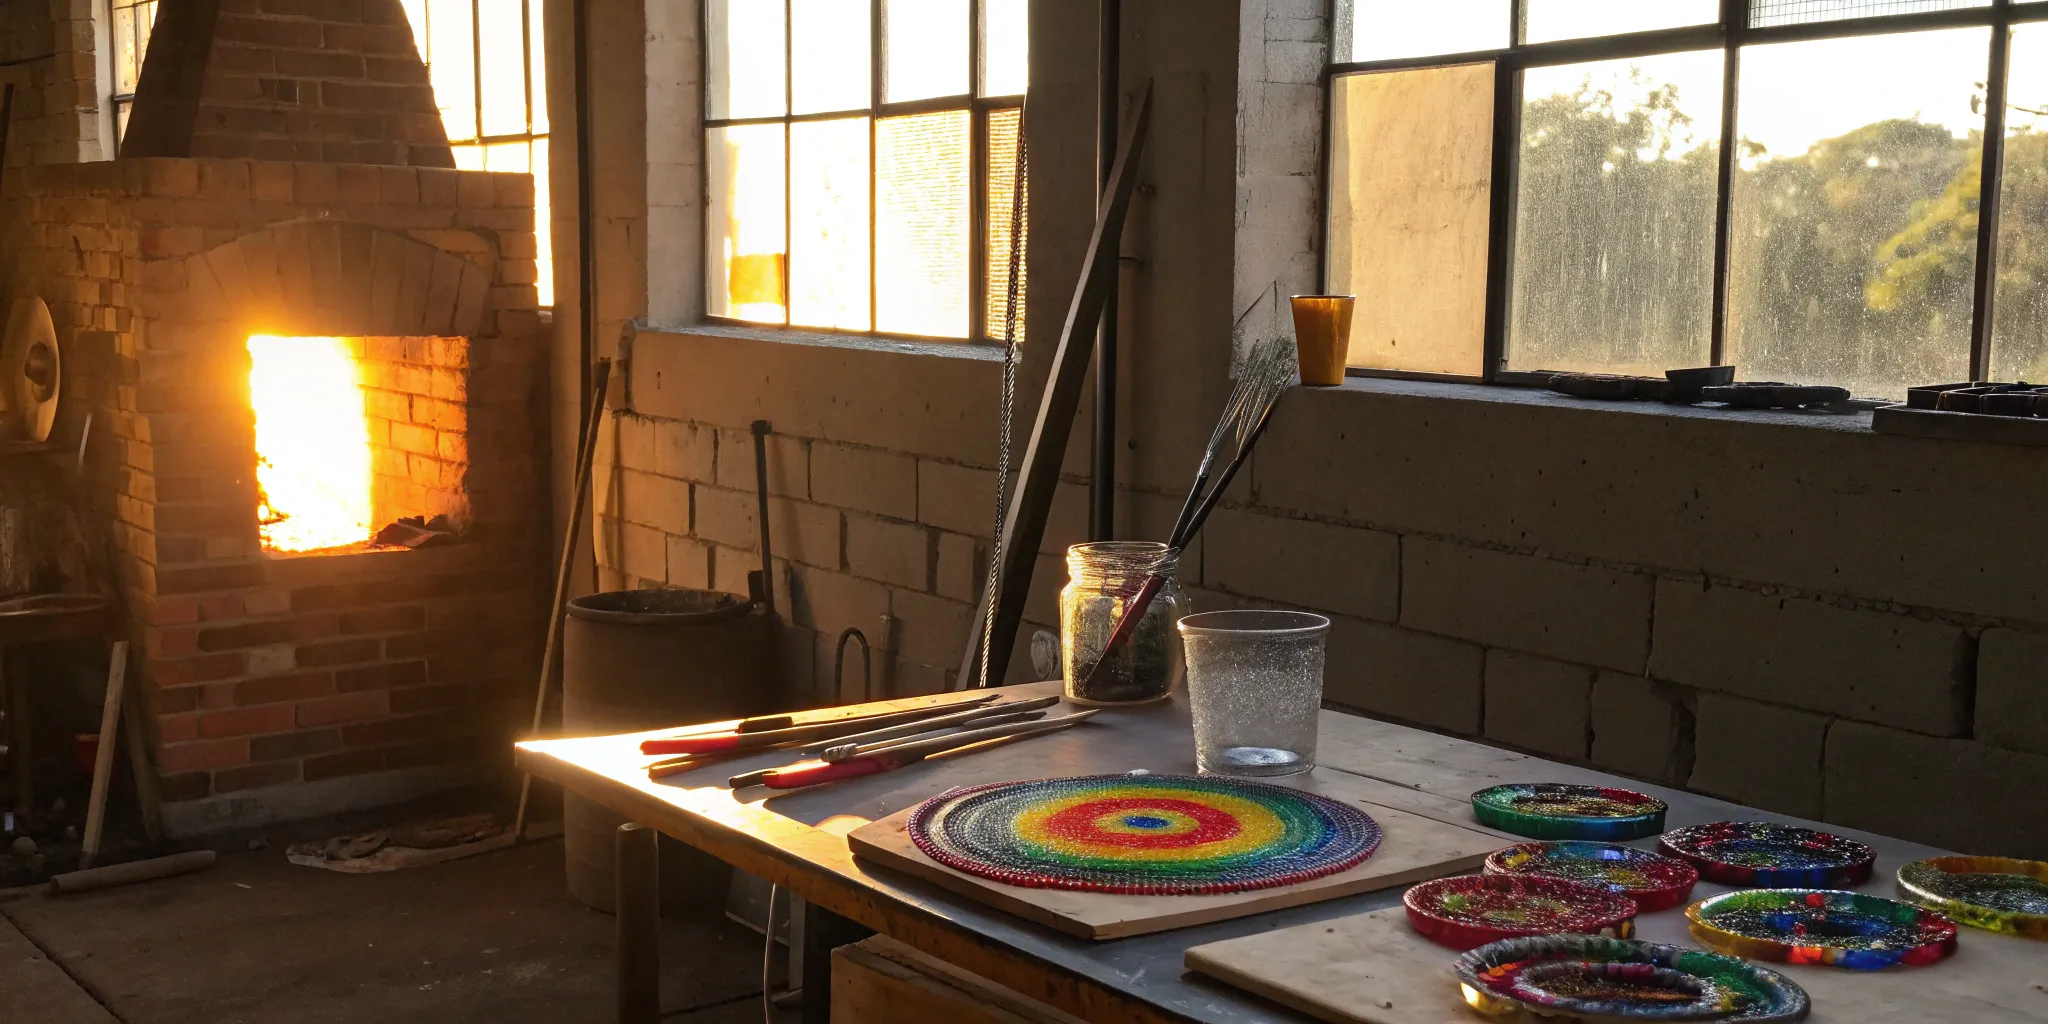
You’ve got your base sheet of glass—your blank canvas. Now, how do you add those painterly details? The answer is in stringers glass fusing. Think of stringers as your fine-tipped pens for crisp lines and frit as your paint for creating soft textures and color washes. These materials are the key to adding a new level of complexity to your work. And when you stick with Bullseye compatible 90 glass, you know all your colors and textures will fire perfectly together. You can just focus on your design, confident your masterpiece will emerge from the kiln strong and beautiful.
Key Takeaways
- Draw with Stringers, Paint with Frit: Use thin glass stringers to create crisp lines and fine details, much like drawing with a pen. Apply crushed glass frit to add painterly color gradients, shading, and unique textures to your work.
- Stick to a Single COE for Success: The most important rule in glass fusing is to use materials with the same Coefficient of Expansion. Mixing COE90 glass (like Bullseye) with other types will cause stress fractures, so always keep your glass system consistent for strong, stable results.
- Vent Your Designs to Avoid Bubbles: To achieve a smooth, professional finish, extend your frit and stringer patterns all the way to the edge of your base glass. This simple technique creates an escape route for trapped air during firing, preventing unwanted bubbles from forming.
A Quick History of Glass Fusing
Glass fusing might feel like a modern craft, but it’s an art form with ancient roots. The technique of melting two or more pieces of glass together in a kiln dates back thousands of years, with early examples discovered from ancient Egypt around 2000 BCE. While it fell out of favor for centuries, overshadowed by glass blowing and stained glass, it saw a major resurgence in the United States during the 1960s studio glass movement. Artists began experimenting with new technologies and materials, transforming fusing from a historical curiosity into the vibrant, accessible art form we know today. This revival opened the door for everyone, from professional artists to at-home hobbyists, to explore the creative possibilities of shaping and coloring glass with heat.
Preparing for Your First Glass Fusing Project
A successful project begins long before your glass ever enters the kiln. Setting up a clean, organized workspace is the first step to creating beautiful, professional-looking pieces. Before you start cutting, make sure your work area is free of dust and debris. Once you’ve cut your glass shapes, it’s crucial to clean every single piece thoroughly with a lint-free cloth and a glass cleaner or denatured alcohol. Any fingerprints, oils, or dust left on the surface can trap air during the firing process, leading to unwanted bubbles or hazy spots in your finished work. Taking a few extra minutes to prepare your space and materials properly will save you a lot of frustration and help you achieve the clear, polished results you’re looking for.
Essential Safety Gear You’ll Need
Working with glass is incredibly rewarding, but safety should always be your top priority. Before you even think about cutting your first piece, make sure you have the right protective gear. First, get a good pair of protective eyeglasses to shield your eyes from any tiny glass shards that can fly up during cutting or breaking. You’ll also need a pair of heat-resistant gloves to protect your hands when working near a hot kiln. Finally, a simple respirator or dust mask is essential for protecting your lungs from inhaling fine glass dust (silica), especially when grinding edges or working with powders. And it’s always a smart idea to keep a basic first-aid kit nearby with bandages and antiseptic, just in case of a small cut or burn.
Basic Tools and Supplies for Beginners
The single most important supply for glass fusing is compatible glass. This means all the glass in your project must have the same Coefficient of Expansion (COE), which is the rate at which it expands and contracts when heated and cooled. If you mix glass with different COE ratings, your piece will crack under the stress. The two most common types for artists are COE90 and COE96. At ArtGlassSupplies.com, we carry a huge selection of both, so you can find the perfect colors and styles for your project. Just remember to stick with one type for each piece you create to ensure it comes out of the kiln strong and intact.
Glass Cutting Tools
Once you have your glass, you’ll need a few basic tools to cut it into your desired shapes. A quality glass cutter is used to score a line on the glass surface. After scoring, you’ll use running pliers to apply gentle, even pressure and “run” the score across the glass, creating a clean break. For snapping off smaller pieces or straight lines, breaking pliers are your go-to tool. If you have any rough or sharp edges after a break, grozing pliers are perfect for nipping them away. These essential tools form the foundation of any glass artist’s toolkit and give you precise control over your designs.
Kiln Preparation
Your kiln is the heart of your glass fusing studio, and preparing it correctly is key to a successful firing. You’ll need a kiln specifically designed for glass, as they offer the precise temperature control required for fusing. Before placing your project inside, you must prepare the kiln shelf. This involves applying a coating of kiln wash, a chalky substance that acts as a separator and prevents the molten glass from sticking permanently to the shelf. You’ll need to apply a fresh, even coat of kiln wash and let it dry completely before every firing. This simple step protects both your project and your equipment, ensuring your beautiful creation releases easily once it has cooled.
Glass You Should Never Use
While it might be tempting to experiment with glass you find around your home, it’s critical to avoid certain types. Never use window glass, bottle glass, or any other found glass for fusing projects. The reason goes back to that all-important COE. The COE of these materials is unknown and is almost certainly incompatible with the art glass you’re using. Attempting to fuse them with your COE90 or COE96 glass will cause significant stress as the pieces cool at different rates, resulting in cracks and a ruined project. Always stick to glass that is specifically tested and labeled for fusing to guarantee your work will last.
Glass Fusing on a Budget
The initial investment in glass fusing, particularly the kiln, can feel like a big hurdle. But you don’t have to buy everything at once to get started. A fantastic way to begin is by renting kiln time. Many local art studios, community centers, or glass shops offer this service for a reasonable fee, allowing you to fire your projects without owning your own equipment. Taking an in-person beginner’s class is another great option. You’ll get hands-on instruction and access to all the necessary tools and supplies, which is the perfect way to decide if the craft is right for you before committing to a big purchase. Starting small lets you learn the fundamentals and build your confidence affordably.
Getting Started with Bullseye Stringers and FritsBullseye Glass Stringers and Frits?
If you’ve ever admired a piece of fused glass with intricate lines, delicate shading, or a beautifully textured surface, you were likely looking at the work of stringers and frits. Think of these materials as the secret ingredients that take your glass art to the next level. They allow you to add details that would be impossible to achieve by simply cutting and layering sheets of glass. Stringers and frits are essentially Bullseye glass that has been reshaped into thin strands or crushed into small particles.
Because they are made from the same high-quality glass, they are fully compatible with Bullseye’s entire line of COE90 glass, ensuring your final piece is strong and stable after firing. Whether you want to draw a precise line, create a soft, watercolor-like background, or add a pop of speckled color, these versatile materials give you the creative freedom to do it. Let’s break down what each one is and how you can use them in your next project.
So, What Are Glass Stringers?
Imagine a piece of glass pulled into a long, thin strand, almost like a piece of spaghetti. That’s a glass stringer. These delicate rods are perfect for “drawing” on glass. You can use them to create crisp lines, intricate patterns, outlines, or even write names and words. Stringers come in a variety of colors and diameters, giving you precise control over the look of your lines. You can lay them straight onto your base glass or gently bend them over a candle flame to create beautiful curves and organic shapes. They are a go-to tool for adding fine details in both kilnforming and torchworking.
And What About Glass Frits?
Frit is simply glass that has been crushed into small particles. It comes in several different grain sizes, or gauges, ranging from fine powder to coarse, chunky bits. Each size creates a unique effect in your finished piece. Fine powder frit is ideal for creating soft color gradients and shaded areas, much like painting. Medium grades can be used for a speckled, textured look, while coarse frit adds bold, dimensional texture. Using frit is a fantastic way to add rich color and depth to your designs without having to cut and place countless tiny pieces of sheet glass.
Using Stringers and Frits in Glass Fusing
Using stringers and frits is a straightforward process. You simply arrange them on your base sheet of glass to create your desired design. Once you’re happy with the composition, the entire piece is fired in one of the many available kilns. As the glass heats up, the stringers and frit melt and fuse permanently into the base glass, becoming one solid piece. A great tip for avoiding unwanted air bubbles is to run your stringer or frit designs all the way to the edge of the glass. This creates a small channel that allows any trapped air to escape as the glass melts, giving you a smoother, more professional finish.
Choosing the Right Bullseye Stringers and Frits
One of the best parts of working with Bullseye glass is the incredible variety of accessory glass available. When you’re ready to add detail, texture, and color to your fused glass projects, you’ll find a whole world of stringers and frits waiting for you. These components are designed to work seamlessly with COE90 glass, giving you consistent and beautiful results. Let’s look at the different types you can find and how you can use them to bring your artistic vision to life.
From Thin to Thick: A Guide to Stringer Gauges
Think of Bullseye stringers as thin strands of glass, like spaghetti. These delicate rods are perfect for drawing lines, creating outlines, or adding fine details to your work. They are incredibly versatile and can be used in both kilnforming, where you melt them onto a larger piece of glass, and torchworking. Stringers come in different diameters, or gauges, typically around 1mm for delicate lines or 2mm for a bolder look. You can lay them straight or gently heat them with a candle to bend them into organic curves before placing them on your base glass.
Frit Textures: Powder, Fine, Medium, and Coarse
Frit is simply glass that has been crushed into small particles. Bullseye offers frit in several different sizes, or gauges, each creating a different effect. Using frit is a fantastic way to add dimension, shading, and unique textures to your fused glass art. The main sizes you’ll encounter are powder (like flour, for “painting”), fine (like sugar, for filling small areas), medium (small pebbles for texture), and coarse (larger chunks for a bold, dimensional effect). Each size opens up new creative possibilities, from creating soft gradients to building up chunky, tactile surfaces on your pieces.
Adding Color and Texture to Your Art
You’ll never feel limited by color when working with Bullseye. Both stringers and frits are available in a massive spectrum of colors, including everything from neutral whites and grays to vibrant reds, blues, and greens. This makes it easy to find the exact shade you need for your project. Beyond solid colors, Bullseye also produces special mixes. You can find two-color or three-color frit mixes that create beautiful, variegated effects with just one application. These pre-mixed options are a simple way to add complexity and visual interest to your work without having to blend the colors yourself.
Achieving Opalescent, Transparent, and Iridescent Looks
The finish of the glass is just as important as its color. Bullseye stringers and frits come in several different finishes, and understanding them will help you achieve your desired outcome. Opalescent glass is opaque and milky, perfect for solid designs. Transparent glass is clear and see-through, which is great for layering colors. Iridescent glass has a thin, metallic coating that creates a beautiful, rainbow-like shimmer when it catches the light. Many artists use a combination of these finishes to create depth and contrast in their fused and stained glass projects.
Understanding Key Fusing Concepts
Once you get the hang of working with stringers and frits, you can start exploring some of the more technical aspects of glass fusing. Don’t worry, these concepts aren’t as intimidating as they sound. Understanding a few key principles—annealing, devitrification, and slumping—is what separates a good result from a great one. These processes are all about controlling heat and time to ensure your glass is strong, clear, and shaped exactly how you envision it. Mastering them will give you the confidence to move from flat panels to more complex, three-dimensional art.
The Critical Role of Annealing
Think of annealing as a spa day for your glass. After being fired at high temperatures, the glass needs to cool down slowly and evenly to relax. This controlled cooling process is essential for reducing internal stress within the glass. If glass cools too quickly, it creates tension points that can cause it to crack or even shatter, sometimes days or weeks after it comes out of the kiln. A proper annealing cycle, which is a critical part of your firing schedule, ensures the final piece is strong, stable, and durable enough to last a lifetime. It’s a non-negotiable step for creating high-quality, professional work.
What is Devitrification (and How to Avoid It)
Have you ever pulled a piece from the kiln and found a hazy, scummy film on the surface? That’s likely devitrification, or “devit” for short. It happens when the glass surface begins to crystallize instead of remaining smooth and glossy. While it can be frustrating, it’s usually preventable. Devit is often caused by holding the glass at a high temperature for too long or by contaminants on the glass surface. To avoid it, always clean your COE90 glass thoroughly before firing and follow a tested firing schedule. Using a devit spray can also help protect the surface and keep your glass beautifully clear and shiny.
From Flat to Formed: An Intro to Slumping
Slumping is where the real magic happens. This is the process of taking your flat, fused glass design and giving it a three-dimensional shape. To do this, you place your fused piece on top of or inside a ceramic or stainless steel form and fire it again at a lower temperature. The heat makes the glass just soft enough to “slump” and take the shape of the mold, turning it into a bowl, a plate, a vase, or a sculptural element. Precise temperature control is key here; you want the glass to bend into the form without melting so much that it loses its design details. It’s a fantastic way to transform your art into functional objects.
Your Step-by-Step Guide to Using Stringers and Frits
Once you have your stringers and frits, the real fun begins. These materials are incredibly versatile, allowing you to add intricate lines, vibrant colors, and unique textures to your glass art. Whether you’re aiming for sharp, graphic designs or soft, painterly effects, learning a few core techniques will help you bring your vision to life. The key is to experiment and see how these little bits of glass can transform a simple sheet into a masterpiece. Let’s walk through some practical steps for applying stringers and frits, along with tips to help you achieve clean, professional results right from your own kiln.
How to Place and Arrange Your Stringers
Think of stringers as your pen or pencil for drawing on glass. You can lay them down as straight lines or gently heat them with a candle or torch to bend them into organic curves. For precise placement, use tweezers to arrange them on your base glass. If you need shorter pieces, simply score them with a glass cutter and snap them, or nip them with wheeled glass nippers. Bullseye stringers are perfect for all kinds of kilnforming, from creating delicate patterns on a platter to adding fine details to a fused glass scene. A little bit of clear-drying glue can help hold your design in place before it heads into the kiln.
Creating Depth by Layering Glass Frit
Applying frit is all about controlling the texture and color in your piece. For a smooth, even layer, use a sifter to gently dust the frit over your base glass. You can also use stencils to create specific shapes and patterns. If you want a more textured, dimensional look, try piling the frit in certain areas. When creating designs with frit or stringers, it’s a good practice to run your pattern all the way to the edge of the glass. This simple trick helps prevent unwanted air bubbles by giving them an escape route during firing. Layering different colors and sizes of frit is a great way to create beautiful gradients and unique color blends.
Pro Tips for Designing with Stringers and Frits
A little planning goes a long way in glass fusing. Before you start, it’s wise to understand how different colors might interact. Some glass combinations create stunning, unexpected reactions, while others can result in muddy tones. Running small test pieces first can save you from surprises. Also, be mindful of how you stack your glass. Trapping large pockets of air, like placing small decorative pieces between two solid sheets, can cause your design to distort or even crack during firing. Using a light box can help you visualize your layers and spot potential air traps before you commit to a full firing cycle.
The 6mm Rule: A Fusing Fundamental
Here’s a core principle that will guide so many of your fusing projects: the 6mm rule. It’s a simple but powerful concept. When you heat glass to a full fuse temperature in a kiln, it naturally wants to flow and settle at a uniform thickness of about 6mm, or a quarter of an inch. Understanding this behavior is key to creating pieces that are stable and structurally sound. The easiest way to follow this rule is to start your projects with a base made of two layers of standard 3mm COE90 glass. This two-layer foundation provides the ideal thickness, preventing your piece from becoming too thin, warped, or fragile after firing. It’s the secret to that professional, substantial feel you see in high-quality fused glass art.
Getting Your Firing Schedule Just Right
Your firing schedule is what ultimately determines the final look of your stringers and frits. If you want your design elements to remain raised and defined, a tack fuse at a lower temperature is the way to go. For a smooth, glossy surface where the stringers and frits melt completely into the base glass, you’ll need a full fuse at a higher temperature. The right schedule is also your best tool for controlling bubbles and avoiding distortion. Firing schedules vary based on your kiln, the thickness of your glass, and your desired outcome, so always start with the manufacturer’s recommendations and adjust based on your own test results.
Example Firing Schedule for Stringers
Let’s walk through a sample full-fuse schedule for a typical two-layer project (about 6mm thick) using COE90 glass. Remember, every kiln fires a bit differently, so think of this as a great starting point for your own tests. First, heat slowly at 300°F per hour up to 1225°F and hold for 30 minutes. This is the bubble soak, which helps release any trapped air. Next, ramp up the heat more quickly at 600°F per hour until you reach the full-fuse temperature of 1460°F. Hold it there for 10 minutes; this process soak allows the stringers to melt smoothly into your base glass. After the soak, let the kiln cool rapidly to the annealing range (around 900°F), hold it there to relieve stress, and then cool slowly to room temperature. This careful cooling process is what prevents thermal shock and keeps your beautiful piece from cracking.
How to Avoid Common Stringer and Frit Mistakes
Working with stringers and frits is incredibly rewarding, but a few common issues can trip up even experienced artists. Knowing what to watch for can save you from frustrating results and wasted materials. Most problems come down to managing two things: air and compatibility. By paying attention to how you layer your glass and which types you combine, you can ensure your vision comes to life exactly as you planned it in the kiln. Let’s walk through some of the most frequent mistakes and how you can sidestep them for a perfect fuse every time.
How to Get a Smooth, Bubble-Free Finish
Few things are more disappointing than pulling a piece from the kiln to find it distorted or full of unplanned bubbles. These issues usually happen when air gets trapped within your design and has nowhere to go during firing. As the kiln heats up, that trapped air expands, pushing the glass around and creating bubbles that can mar your surface. A simple way to prevent this is to give the air an escape route. When you’re creating designs with frit or stringers, try to extend your pattern all the way to the edge of your base glass. This creates tiny channels that allow air to track out from between the particles as the glass softens and fuses. It’s a small adjustment in your process that makes a huge difference in achieving a smooth, professional finish on your COE90 glass projects.
Why Glass Compatibility (COE) Matters
This is a big one: you absolutely cannot mix glasses with different Coefficients of Expansion (COE) in the same fusing project. All Bullseye glass products, including their stringers and frits, are tested compatible with a COE of 90. Other glass systems, like System 96, have a COE of 96. While the numbers seem close, the difference is critical. Glass expands when heated and contracts when it cools. If you mix a piece of COE96 glass with your Bullseye project, they will contract at different rates. This creates immense stress within the piece, and it will almost certainly crack—if not in the kiln, then days or even weeks later. Always check the COE of all your materials and stick to one system for a single project to guarantee a strong, stable result.
How to Fix Common Layering Mistakes
While extending your designs to the edge helps with tiny air pockets, larger structural gaps can cause even bigger problems. Beginners sometimes stack glass in a way that traps large pockets of air, especially when placing smaller decorative elements between two large sheets of glass. Creating a sealed “box” or pocket with no ventilation is a recipe for distortion. When that trapped air expands, it can create a large bubble that misshapes your entire piece, leaving it with an uneven surface or, in severe cases, causing it to crack. Before firing, look at your project from the side. If you see significant gaps or enclosed spaces, rearrange your layers to allow air to escape. Careful stacking is key to achieving a flat, uniform fuse.
Why You Should Test Combinations First
Glass is a beautiful and sometimes mysterious material. Certain colors can react with each other in the heat of the kiln, creating unexpected but stunning new shades, outlines, or textures. However, some reactions can be muddy, unpleasant, or not what you intended for your design. For example, glasses containing sulfur and copper can create a dark, undesirable reaction line where they meet. To avoid surprises on a major project, it’s always a good idea to run a small test first. Create a small tile with the color combinations you plan to use and fire it in your kiln. This quick step lets you see exactly how your chosen glasses will interact, so you can move forward with confidence or adjust your palette before you commit your time and materials to a larger piece.
Advanced Techniques and Creative Ideas
Once you’re comfortable with the basics of placing stringers and applying frit, you can start exploring more advanced ways to manipulate glass. These techniques are all about pushing the boundaries of your materials to create truly unique textures, patterns, and finishes. Think of this as moving beyond simply decorating the surface of your glass and starting to alter its very form and character. From creating your own custom components to adding professional-grade finishes, these ideas will help you add a new layer of artistry and intention to your work. Let’s look at a few ways you can get more creative in your studio.
Making Your Own Glass Stringers
While pre-made stringers are incredibly convenient, making your own gives you complete control over the thickness and character of your lines. You can create custom stringers by heating a scrap of compatible COE90 glass in your kiln until it’s molten, then using pliers to grab an edge and pull it out into a long, thin strand. The speed of your pull is what determines the final diameter. If you pull quickly, you’ll get a very thin, delicate stringer. A slower, more deliberate pull will result in a thicker, bolder line. This technique is perfect when you need a specific gauge that isn’t commercially available or when you simply want to use up your scrap glass in a creative way.
Creating a “Holey” or Web-Like Effect
For a beautiful, organic texture, you can create a piece that looks like a delicate web or a piece of lace. Start by cutting strips of glass, about a quarter-inch wide, and arrange them on a kiln-washed shelf in a crisscross pattern, leaving plenty of open space between them. Don’t worry if the strips break as you handle them; those little imperfections actually contribute to a more interesting and random final pattern. When you fire the piece, the glass will pull together and soften, creating a single, interconnected sheet filled with artistic holes. This technique is a fantastic way to create unique design elements that you can layer onto other projects or use as standalone art.
Finishing Your Piece with Sandblasting
The way you finish a piece can completely change its final look and feel. While a glossy, fire-polished surface is beautiful, sandblasting offers a sophisticated alternative. A sandblaster uses fine abrasive material to etch the surface of the glass, giving it a soft, matte finish that diffuses light beautifully. This is an excellent way to add contrast to a piece that has both glossy and matte areas. Beyond aesthetics, sandblasting is also a practical way to clean up your work. It can easily remove any stubborn kiln wash from the back of your piece, giving it a clean and professional appearance from every angle before you place it in one of your molds for slumping.
What Makes Bullseye Glass So Special?
When you’re adding fine details to your glass art, the last thing you want is an unpleasant surprise coming out of the kiln. The materials you choose for those delicate lines and textured layers matter just as much as your main sheet glass. This is where Bullseye stringers and frits really shine. For years, artists have relied on Bullseye because their products deliver predictable, beautiful results every single time.
Choosing Bullseye isn’t just about buying a brand name; it’s about investing in consistency for your art. Their commitment to compatibility, color stability, and quality control means you can spend less time worrying about technical issues and more time bringing your creative vision to life. Whether you’re layering frits for a painterly effect or laying down crisp lines with stringers, you can trust that Bullseye products will work together seamlessly. This reliability is crucial for both beginners who are learning the ropes and professional artists who need to produce consistent, high-quality work for their clients.
Working with Bullseye Compatible 90 Glass
If you’ve ever had a beautiful piece crack in the kiln, you know the heartbreak of glass incompatibility. This is where the Coefficient of Expansion, or COE, comes in. It’s a measure of how much glass expands and contracts when heated and cooled. For a fused piece to be stable, all the glass in it must have the same COE. Bullseye makes this incredibly simple because their entire product line is tested to be compatible COE 90 glass. This means you can mix any Bullseye sheet, frit, or stringer without a second thought. This system gives you the creative freedom to experiment and build complex designs with confidence, knowing your finished artwork will be strong and stable.
Get Reliable, Consistent Color Every Time
One of the biggest challenges in glass fusing can be predicting how colors will look after firing. Some glass colors can shift or react unexpectedly in the kiln, but Bullseye is famous for its stable and consistent palette. The color you see in the jar of frit is reliably the color you’ll get in your final piece. This consistency is a game-changer, especially when you’re trying to replicate a design or create a matching set of jewelry. With Bullseye’s extensive range of vibrant, dependable colors, you can plan your projects with precision and achieve the exact aesthetic you’re aiming for. You can focus on your artistry, not on second-guessing your materials.
Count on Quality for Flawless Fusing
The secret to Bullseye’s consistency lies in its rigorous quality control. Every stringer and batch of frit is manufactured and checked at their factory in Portland, Oregon, ensuring it meets their high standards. This means you won’t find unwanted debris in your frit, and your stringers will have a uniform diameter, making them easy to work with. This attention to detail ensures that your materials are pure and perform predictably in the kiln. When you use Bullseye, you’re getting a product that has been carefully crafted and inspected, which saves you time, reduces waste, and helps you produce professional-quality results with every firing.
How Much Do Bullseye Stringers and Frits Cost?
Let’s talk about one of the most practical parts of planning any project: the cost. Investing in high-quality materials is essential for getting the results you want, and understanding the price of Bullseye stringers and frits helps you budget effectively. The cost can vary quite a bit depending on what you need, from the type and size to the specific color you choose.
What to Expect to Pay
The price for Bullseye accessory glass depends on the product type and quantity. Generally, you can expect individual containers of frits and powders to range from about $11 to over $150 for rare colors or larger volumes. Stringers and ribbons often fall into a more consistent range, typically around $38 for a tube. Glass rods have the widest price variation, costing anywhere from a few dollars for a single rod to over $250 for a bulk assortment. These differences often reflect the complexity of manufacturing certain colors and the amount of glass you’re getting in each package.
Want to Save Money? Consider Buying in Bulk
If you’re a prolific artist or have a few go-to colors you use in almost every piece, buying in larger quantities is a great way to save money. Many suppliers offer volume discounts, which lower the price per ounce as the quantity increases. This is especially helpful for foundational colors like clear, black, or white frit that you might use for bases or backgrounds. Planning your projects ahead of time allows you to stock up on the COE90 glass you’ll need, reducing both costs and the chance of running out of a key material mid-project.
Getting the Best Value for Your Project
When deciding what to buy, think about the value each product brings to your specific artwork. Fine frit powder is perfect for creating soft, shaded effects, while coarse frit adds bold texture and dimension. Similarly, thin 0.5 mm stringers allow for delicate linework, while thicker 8 mm rods can be used to create substantial design elements. The best value comes from choosing the right material for your artistic vision. Using these materials with different molds can also open up new creative possibilities, making your initial investment go even further in your studio.
Where to Buy Bullseye Glass Stringers and Frits
Finding the right materials is just as important as your artistic vision. When you’re ready to stock up on Bullseye stringers and frits, you’ll want a supplier that not only has what you need but also supports your creative process. Since Bullseye manufactures its own glass right here in the USA, you can count on high-quality, consistent products every time you fire up the kiln. The key is finding a retailer that makes getting those products into your studio easy and enjoyable, so you can focus on your art.
Think of your supplier as a partner in your creative journey. A great one will feel like a one-stop shop with a deep inventory, letting you get all your COE90 glass, tools, and accessories in a single order. This saves you time and shipping costs, and it means you can start your next project sooner. Look for a company with clear product descriptions, helpful customer service, and a genuine passion for glass art that matches your own. When you find a supplier you trust, you can spend less time hunting for materials and more time in the studio bringing your ideas to life.
Finding a Reliable Glass Supplier
When picking a supplier, think about reliability and selection. You want a partner who understands the needs of glass artists. A great supplier will have a comprehensive inventory, meaning you won’t have to put a project on hold waiting for a specific color of frit to be restocked. Check for a company with a solid reputation for fast shipping and careful packaging—the last thing you want is to open a box of broken stringers. We pride ourselves on carrying a huge selection of Bullseye products and getting them to your door safely. A good supplier also offers resources and expertise, helping you feel confident in every purchase you make for your studio.
Does Your Supplier Have What You Need?
A diverse product selection is your creative playground. When it comes to Bullseye, look for a supplier that offers a full range of options. For frits, this means having everything from fine powders for delicate shading to coarse grades for creating bold, textured effects. For stringers, you’ll want access to a rainbow of colors in various thicknesses, from ultra-thin 0.5 mm strands to thicker rods. The best retailers will stock not just the basics but also specialty items like iridescent or opalescent finishes. Having a wide variety of stained glass supplies at your fingertips allows you to experiment freely and achieve the exact look you’re going for in your work.
The Right Way to Store Your Stringers and Frits
Once you have your beautiful new supplies, taking good care of them is essential for great results. Store your frits in clearly labeled, airtight containers to prevent moisture contamination and keep colors from mixing. For stringers, a simple divided container or tube system can keep them organized and protected from breakage. When you’re working, keep your station clean to avoid unwanted debris in your projects. A great handling tip is to run your frit or stringer designs all the way to the edge of your base glass. This simple step helps trapped air escape during firing, which is a key technique for preventing pesky bubbles and ensuring your finished piece looks clean and professional.
Related Articles
- Bullseye Glass Stringers Yellow Transparent COE90 – COE90 Stringers
- Bullseye Glass Tan Transparent Frit COE90 – COE90 Transparent Frit
- Bullseye Glass Stringers Light Bronze Transparent COE90 – COE90 Stringers
- Bullseye Glass Stringers Cobalt Blue Opalescent COE90 – COE90 Stringers
- Bullseye Glass Stringers Light Green Transparent COE90 – COE90 Stringers
Frequently Asked Questions
What’s the real difference between COE 90 and COE 96 glass? Think of the COE number as a glass’s personality—specifically, how much it likes to expand and shrink when heated and cooled. For a fused piece to be strong, all the glass parts need to have the same personality, or COE. If you mix COE 90 Bullseye glass with COE 96 glass, they will cool down at different rates, creating stress that will cause your beautiful piece to crack. Sticking to one COE system, like Bullseye’s COE 90, is the most important rule for successful fusing.
I’m new to this. What’s the easiest frit size to start with? If you’re just starting out, I recommend beginning with medium frit. It’s incredibly versatile and forgiving. It’s large enough to handle easily without creating a lot of dust, but small enough to fill in areas with rich, speckled color. It gives you a great feel for how frit melts and spreads in the kiln. Once you’re comfortable with medium, you can experiment with fine powder for shading or coarse frit for adding bold texture.
How do I safely bend stringers without them breaking? Bending stringers is a great way to create flowing, organic lines. The easiest way to do this is with the flame from a simple candle. Hold the stringer with tweezers a few inches above the flame, not directly in it, and gently move it back and forth. You’ll feel it start to soften and become pliable. You can then carefully shape it into a curve. Work slowly and let the heat do the work to avoid snapping the glass.
Can I mix different frit sizes or stringer colors in my design? Absolutely! Mixing is where so much of the creativity happens. You can layer different colors of stringers to create outlines and patterns, and they will fuse together beautifully. You can also combine different sizes of frit. For example, sprinkling a layer of fine frit over a base of coarse frit can create amazing depth and unique textures in your finished piece. Just remember to run a small test first if you’re unsure how certain colors might react with each other.
You mentioned tack fuse and full fuse. What will my project look like with each? Your firing schedule determines the final texture of your piece. A tack fuse uses a lower temperature, so the stringers and frits will melt just enough to stick permanently to the base glass while remaining raised and defined. This is perfect if you want a textured, dimensional surface. A full fuse uses a higher temperature, causing all the glass elements to melt completely into one another, resulting in a perfectly smooth, glossy finish.