
Moving beyond flat panels and into the world of three-dimensional glass art is an exciting step for any artist. The tool that makes this leap possible is the slumping mold. It’s the silent partner in your kiln that coaxes a rigid sheet of COE90 glass into a graceful curve, a functional dish, or an intricate sculpture. But not all molds are created equal. The material a mold is made from directly impacts how it interacts with heat and glass, influencing everything from your firing schedule to the final finish of your piece. To truly master this technique, you first need to understand what are glass slumping molds made of. From the porous reliability of ceramic to the rugged durability of stainless steel, we’ll explore the properties of each material so you can make an informed choice that brings your creative vision to life.
Key Takeaways
- Choose Your Mold Based on Your Design Goal: Use porous ceramic molds for slumping glass into detailed shapes, durable stainless steel for draping glass over simple curves, and carvable fiber molds when you want to create a completely custom form.
- Proper Mold Prep is Non-Negotiable: Always apply several thin, even coats of a separator like kiln wash before every use. This simple step creates the necessary barrier to prevent your glass from sticking, protecting both your project and your mold.
- Avoid Cracks by Using Compatible Materials: Ensure your project’s success by using glass with a matching COE to prevent thermal stress. Equally important, only use molds specifically made for kiln-forming, as household items will not survive the heat.
What is Glass Slumping? (And Why Molds are Essential)
If you’ve ever wanted to transform a flat sheet of glass into a beautiful, three-dimensional piece of art like a bowl, platter, or sculpture, then glass slumping is a technique you’ll want to get to know. Think of it as a creative partnership between heat, gravity, and a well-chosen mold. You’re essentially warming the glass just enough for it to become soft and flexible, allowing it to gently sag or “slump” into a new shape.
Without a mold, you’d just end up with a melted puddle. The mold is what gives your project structure and form, guiding the glass into the exact shape you envision. It’s the key that turns a simple piece of COE90 glass into a functional dish or an elegant, curved panel. This process opens up a whole new world of possibilities beyond flat panels, letting you create everything from custom dinnerware to intricate art pieces. It’s one of the most accessible and rewarding ways to get started with kiln-formed glass.
A Quick Look at the Slumping Process
The magic of slumping happens inside a kiln. The basic process is straightforward: you start by placing a sheet of glass on top of or inside a mold. Then, the mold and glass go into one of your kilns and are heated according to a specific firing schedule. As the temperature rises, the glass softens and gravity takes over, pulling it down to conform to the shape of the mold. Once the glass has taken its new form, it’s cooled down very slowly in a process called annealing. This slow cooling is critical because it relieves internal stress in the glass, making your final piece strong and durable.
How Molds Give Your Glass Its Shape
The mold is the true director of the slumping process. It dictates the final form of your artwork, whether you’re creating a shallow dish or a deep bowl. You can either slump glass into a concave mold to create a vessel or drape it over a convex mold to form a gentle curve. The molds themselves come in various materials, most commonly ceramic or stainless steel, each offering different benefits for your project. Many ceramic molds even include a small hole in the bottom. This isn’t a defect—it’s a vent that allows trapped air to escape as the glass sinks, ensuring a smooth, bubble-free surface on your finished piece.
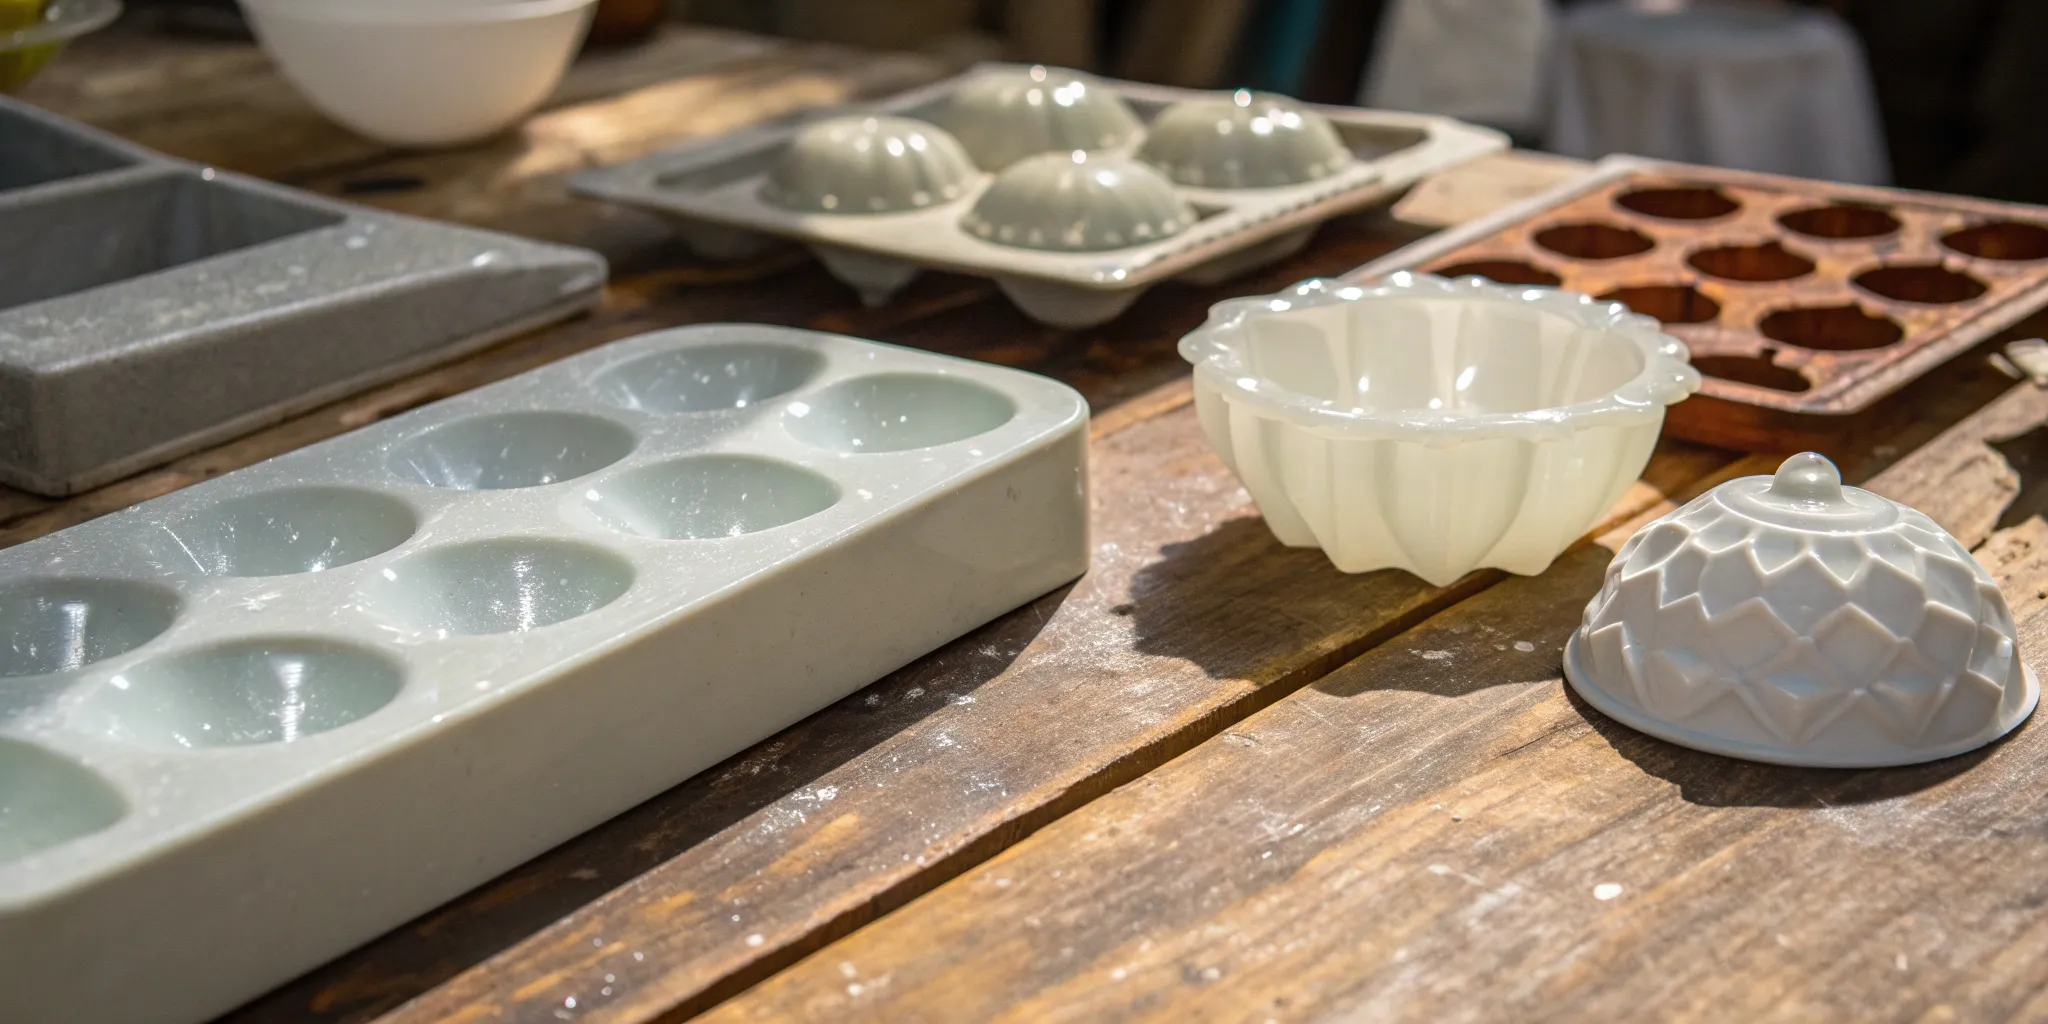
Common Materials for Glass Slumping Molds
When you start looking for slumping molds, you’ll quickly notice they come in a few different materials. Each one has its own personality in the kiln—some are sturdy and reliable, while others are flexible and perfect for custom work. Understanding the differences will help you pick the right partner for your project. Let’s break down the most common options you’ll find.
Ceramic
Ceramic is the workhorse of the glass slumping world. These molds are popular because they’re durable and porous, which is a huge advantage. The porosity allows air to escape from between the glass and the mold surface, preventing trapped bubbles and ensuring a smooth finish. Ceramic also expands and contracts less than glass during heating and cooling, which reduces the risk of thermal shock and cracking. This stability makes ceramic molds a reliable and excellent choice for most slumping projects, from simple bowls to intricate platters. They are a fantastic starting point for beginners and a staple for experienced artists.
Stainless Steel
If you need something incredibly durable, stainless steel is a great option. High-quality stainless steel molds won’t rust and can withstand countless firings. However, they come with a key consideration: metal heats up and cools down much faster than glass. This difference in timing can sometimes cause issues if the glass slumps into the mold too quickly or cools unevenly, potentially leading to stress fractures. You’ll need to adjust your firing schedule to account for this, but for artists seeking longevity and sharp, defined shapes, stainless steel is an excellent investment.
Fiber
For artists who love creating custom shapes, fiber materials offer incredible versatility. Materials like fiber board or a non-woven ceramic blanket (often called Silkemat) can be easily cut, carved, and shaped to create unique, one-of-a-kind molds. On their own, they are soft, but you can apply a liquid rigidizer to make them hard and more durable for multiple uses. This approach is perfect when you have a specific design in mind that you can’t find in a pre-made mold. It gives you complete creative control over the final form of your glass piece.
Other Options
Beyond the big three, artists use a variety of other materials to shape their glass. Metals like cold-rolled steel, brass, and copper can be used for slumping, each offering different properties and results. For a more hands-on approach, you can even use fire bricks to build and carve your own custom molds right inside your kiln. These bricks are designed to handle extreme heat, making them a perfect canvas for carving out negative spaces for your glass to slump into. Experimenting with these materials can open up new possibilities for your glass art.
Why Artists Love Ceramic Molds
Ceramic molds are a favorite in the glass fusing community for good reason. They are reliable, versatile, and deliver consistently beautiful results, making them a staple in both beginner and professional studios. If you’ve ever wondered why so many artists swear by them, it comes down to a few key characteristics that make the slumping process smoother and more predictable.
These molds are crafted from a porous stoneware material that has been bisque-fired, which gives them the strength to withstand repeated trips to the kiln. Their ability to handle high temperatures while being gentle on the glass is what makes them so popular. Whether you’re creating a simple dish or a complex artistic form, a ceramic mold provides a dependable foundation for your vision. Let’s look at exactly what makes these molds such a fantastic choice for your glass projects.
They Handle Heat Without Cracking
One of the biggest advantages of ceramic is how it behaves under heat. Ceramic molds expand and contract less than glass does during the heating and cooling cycle. This difference is crucial. As your glass piece cools and shrinks, it naturally pulls away from the mold’s surface. This separation helps prevent the glass from sticking or, even worse, cracking under stress. It’s a simple bit of physics that saves you a lot of potential frustration and ensures a cleaner release from the mold every time.
They Allow Air to Escape
The porous nature of bisque-fired ceramic is another unsung hero of the slumping process. This porosity allows tiny pockets of air trapped between the glass and the mold to escape as the glass softens and takes shape. For recessed molds, you’ll often see small, strategically placed holes that serve the same purpose. This ventilation is essential for preventing bubbles from getting trapped under your glass, which could ruin the final piece. It’s a small detail that makes a huge difference in achieving a flawless, professional-looking slump.
They Give You a Smooth Finish
When you want a perfectly smooth, glossy surface on your slumped glass, a ceramic mold is your best friend. The surfaces of these molds are incredibly smooth, which means your glass won’t pick up any unwanted textures as it melts. After applying a proper coat of kiln wash or separator, the glass will slump evenly over the mold, mirroring its clean surface. This quality is especially important when you’re making functional pieces like plates, bowls, or platters where a smooth finish is non-negotiable.
They’re Built to Last
Investing in good tools is part of being an artist, and ceramic molds are a durable, long-lasting investment. Made from strong stoneware that has been fired once (a process called bisque firing), these molds are designed to endure the extreme temperatures of a kiln over and over again. With proper care—like applying kiln wash before each use and storing them correctly—a single ceramic mold can help you create countless beautiful glass pieces. Their durability makes them a cost-effective and reliable choice for any glass studio.
Stainless Steel vs. Ceramic Molds
Choosing between stainless steel and ceramic molds can feel like picking a side in a great debate, but the truth is, both are fantastic tools that shine in different situations. It’s not about which one is better overall, but which one is right for your specific project. The main differences come down to how they handle heat, their physical durability, and the shapes they’re best suited for creating.
Ceramic molds are the go-to for many artists because they are porous and heat up slowly and evenly along with your glass. This makes them ideal for slumping glass into a form, allowing for deep, detailed shapes without putting too much stress on the glass. Stainless steel, on the other hand, is a super durable material that heats and cools very quickly. This property makes it perfect for draping glass over a form. Think of it this way: if you want to sink your glass into a detailed bowl shape, ceramic is your friend. If you want to bend a sheet of glass over a simple curve, stainless steel is your champion. Understanding these core differences will help you select the perfect mold every time you fire up the kiln.
Unmatched Durability and Strength
When it comes to sheer toughness, stainless steel is hard to beat. These molds are incredibly strong and won’t crack or break if you accidentally drop them, which is a huge plus in a busy studio. Just be sure to use a high-quality stainless steel to avoid any issues with rust over time. Ceramic molds are also quite durable and can last for many firings with proper care, but they are more brittle. A hard knock or a drop can easily lead to a chip or a full-on crack. As one expert from Swart Glass notes, “ceramic molds are popular because they are durable and porous, while stainless steel is often used for draping over the mold.” That porous nature of ceramic is a key feature, allowing air to escape from beneath the glass, but its strength is different from the ruggedness of steel.
They Heat and Cool Down Fast
The way a mold material interacts with heat is critical. Stainless steel heats up and cools down much faster than glass. This rapid temperature change can sometimes cause problems if you’re trying to slump glass into a steel mold. As the mold expands or contracts at a different rate than your glass, it can introduce stress and potentially lead to thermal shock or cracking. Ceramic, by contrast, heats and cools more slowly, staying more in sync with the glass. This gentle, even heating process is much safer for the glass, especially when you’re working with deep or intricate designs that require the glass to stretch significantly.
When to Choose Stainless Steel
So, when should you reach for a stainless steel mold? The general rule of thumb is that “stainless steel molds are usually better for slumping over, not into, unless they are shallow and open.” This process is often called draping. Imagine you want to create a simple, curved plate or a gently bent panel. You would place your sheet of glass on top of the steel mold and let gravity do the work as it softens in the kiln, draping over the form. Stainless steel is perfect for these applications because its smooth surface and durability create clean, simple lines. For shallow forms like a soap dish, it can also work well. But for deeper vessels like bowls or vases, a ceramic mold is almost always the better and safer choice.
The Versatility of Fiber Molds
Fiber molds are a fantastic choice when you want to break away from standard shapes and bring your own unique designs to life. Unlike their more rigid ceramic or stainless steel counterparts, fiber materials offer a level of flexibility that’s hard to match. These molds are typically made from refractory ceramic fibers that are pressed into boards or other forms, making them soft enough to carve yet durable enough to withstand high kiln temperatures. If you’ve ever had a specific vision for a slumped piece that you couldn’t find a mold for, fiber might just be the solution you’ve been looking for.
What makes them so special is the creative control they hand back to you, the artist. You’re no longer limited to the shapes available for purchase. Instead, you can become the designer of your own forms. This is especially valuable for creating signature pieces or a cohesive line of work with a distinct style. Beyond custom shapes, fiber molds have practical benefits, too. They are significantly lighter than other materials, which makes a real difference in the studio when you’re moving things around or loading the kiln. While they may seem less durable at first glance, they can be treated to become quite robust, allowing for repeated use. It’s this combination of customizability, ease of use, and surprising durability that makes fiber molds an essential tool for many glass artists.
Carve Your Own Custom Shapes
This is where fiber molds truly shine. You can use simple tools to carve any design you can imagine directly into a fiber board, creating a completely custom slump mold. This opens up a world of creative possibilities, allowing you to produce truly one-of-a-kind glass art. While you can make your own molds from clay, fiber materials offer a more direct and often simpler process for achieving detailed results. This gives you ultimate control over the final shape of your piece, from gentle, organic curves to sharp, geometric patterns, ensuring your artistic vision is perfectly translated into glass.
Easy to Handle and Move
One of the most practical advantages of fiber molds is how lightweight they are. If you’ve ever struggled with a heavy ceramic or steel mold, you’ll immediately appreciate the difference. Fiber molds are incredibly easy to handle, move around your studio, and position inside your kiln. This not only makes your workflow smoother but also reduces the risk of accidentally dropping and breaking a valuable mold or damaging your kiln’s interior. Their lightweight nature makes them an excellent option for artists working in smaller spaces or for anyone who prefers equipment that is easy to manage without extra help.
How to Make Them More Durable
While fiber molds are soft enough to carve, you might worry about their longevity. The good news is you can significantly increase their durability with a product called a rigidizer, or mold hardener. After you’ve finished carving your design, you simply apply the rigidizer to the fiber surface. Once it’s treated, you fire the mold in your kiln. This process hardens the material, creating a strong, usable mold that can withstand multiple firings. This simple step transforms your custom-carved piece into a reliable tool you can use again and again for your glass slumping projects.
Exploring Other Mold Materials
While ceramic, stainless steel, and fiber are the go-to materials for many glass artists, they aren’t your only options. If you’re the kind of artist who loves to experiment or you have a specific vision that standard molds can’t match, it’s time to look at some alternatives. Creating your own custom molds can open up a whole new world of design possibilities, giving you complete control over the final shape of your piece. This is where you can really let your creativity shine, moving beyond pre-made shapes to craft something that is truly yours.
Think of it as the next step in your glass art journey. Once you’ve mastered the basics of slumping with standard molds, venturing into custom mold-making allows you to translate complex ideas into glass. From carving your own designs into heat-resistant bricks to mixing your own mold material from scratch, these methods are perfect for bringing one-of-a-kind projects to life. You can even use different types of metal to achieve specific results. These materials might require a bit more prep work and a willingness to get your hands dirty, but the payoff is a truly unique piece of art that reflects your personal style. It’s a fantastic way to develop a signature look that sets your work apart. Let’s walk through a few materials that can help you push your creative boundaries and add some new techniques to your repertoire.
Using Fire Bricks
If you’re looking for a sturdy, carvable material, fire bricks are an excellent choice. As their name suggests, these bricks are designed to withstand extremely high temperatures, making them a perfect fit for use inside your kiln. You can use various tools to carve directly into the brick, creating negative space for the glass to slump into. This method is fantastic for crafting custom-shaped dishes, abstract forms, or textured tiles. Just remember to apply a quality kiln wash before firing to ensure your glass releases cleanly from your hand-carved design.
Mixing Plaster and Silica
For the ultimate DIY approach, you can make your own molds using a combination of plaster and silica. The process is straightforward: mix equal parts by weight of plaster, silica, and water until the consistency is like heavy cream. This simple recipe creates a surprisingly effective mold material. The plaster gives the mold its structure and support, while the silica has a high refractory quality, meaning it can handle a lot of heat without breaking down. This technique gives you total freedom to cast molds of nearly any shape you can imagine.
Other Metals That Work
Stainless steel isn’t the only metal you can use for slumping. Other metals like cold-rolled steel, brass, and copper can also be used to create durable and reusable molds. These materials offer different heat-transfer properties and can be shaped into various designs, from simple geometric forms to more complex, flowing shapes. While they may require some metalworking skills to fabricate, they provide another great option for artists looking to expand their toolkit. As with any mold, proper preparation with a kiln wash or separator is key to a successful slump.
How to Choose the Right Mold Material
Picking the right mold material can feel like a big decision, but it really comes down to three things: your kiln, your design, and your budget. There’s no single “best” material—the perfect choice depends entirely on what you want to create. A delicate bowl slumped into a detailed ceramic form requires a different approach than a free-form sculpture draped over a simple steel shape. Thinking through these factors ahead of time will help you narrow down the options and select a
Match the Mold to Your Kiln’s Temperature
The way a material behaves inside your kiln is the most critical factor. Ceramic molds are fantastic for slumping glass into because they expand and contract at a different rate than glass. As your piece cools, the glass naturally pulls away from the mold walls, which helps prevent it from getting stuck. On the other hand, stainless steel is often better for slumping over the mold, especially for deeper shapes. The temperatures your kilns can reach and your planned firing schedules will guide you toward a material that can handle the heat without causing cracks or stress in your finished piece.
Consider Your Project’s Design
What do you envision for your final piece? The shape and style of your project will point you toward the right mold. If you want to create a detailed plate or a shallow bowl with a specific pattern, a ceramic mold offers the precision you need. If you’re aiming for a more organic, draped effect for a vase or a decorative art piece, a stainless steel form might be the perfect tool. Think about whether you want the glass to slump into, over, or even through the mold. Each technique creates a different look, and the collection of molds available gives you endless possibilities for bringing your ideas to life.
Balance Your Budget with Durability
Your budget and how often you plan to use a mold are also important considerations. Ceramic molds are a popular and durable choice, making them a great long-term investment for your studio. High-quality stainless steel is also incredibly long-lasting and resistant to rust, but it can come with a higher initial cost. If you’re experimenting with a one-of-a-kind shape, a less expensive fiber mold might be the right call. By weighing the upfront cost against the mold’s reusability, you can make a smart purchase that supports your work with beautiful COE90 glass for years to come.
Prep and Care for Your Molds
Taking the time to properly prepare and care for your molds is one of the most important steps in glass slumping. A well-prepped mold ensures your glass releases cleanly without sticking, and good maintenance habits will help your molds last for years. Think of it as setting yourself up for success before you even turn on the kiln. Different materials might have slightly different needs, but the core principles of applying a separator and keeping the surface clean apply across the board. Getting this part right means you can focus on the creative side of your work, knowing your tools are ready to perform.
Applying Kiln Wash and Separators
Before you even think about placing glass on a new mold, you need to apply a separator. This is a non-negotiable step. The separator creates a crucial barrier that stops the hot, soft glass from fusing to the mold’s surface. Without it, you risk ruining both your project and your mold. The most common separator is kiln wash, a refractory coating that you apply in several thin layers. As one source puts it, you should always “prepare your mold by applying a few layers of kiln wash before using it to slump glass.” This simple preparation is the key to a clean release and a smooth finish on your final piece.
Prepping the Surface for a Clean Release
To get that perfect, clean release, you need to apply your separator correctly. If you’re using a dry primer powder, a good rule of thumb is to mix five parts water with one part powder. Using a fine-bristled brush, like a hake brush, apply five thin layers of this primer to every surface that will come into contact with the glass. Let each coat dry completely before applying the next one. This might feel tedious, but building up these thin layers creates a durable, even coating that is far more effective than one or two thick, gloppy coats. This careful preparation prevents glass from sticking and gives you a much better final result.
How to Clean and Store Each Mold Type
Proper maintenance will extend the life of your molds significantly. When it’s time to re-prime a mold, start by gently rubbing off the old primer with a soft, dry scrub pad. Make sure to wear a mask to avoid breathing in any dust. Before applying a fresh coat, check that any vent holes are clear of debris and remove any loose brush hairs from the surface. When you’re not using them, “store and handle primed molds carefully to keep the prepared surfaces in good condition.” I recommend keeping them on a flat shelf where they won’t be bumped or scraped. This protects the delicate primer coating and prevents chips or cracks.
Avoid These Common Mold Mistakes
Working with glass is a rewarding process, but it can be frustrating when a project doesn’t turn out as planned. Most issues with slumping come down to a few common, and thankfully avoidable, mistakes. Whether you’re firing up your kiln for the first time or have dozens of projects under your belt, building good habits is the key to getting consistent, beautiful results. By paying close attention to your materials and preparation, you can sidestep the most frequent problems and protect both your artwork and your tools. Let’s walk through a few simple steps that will make a huge difference in your glass slumping projects.
Stop Glass from Sticking
There’s nothing more heartbreaking than pulling a beautiful piece from the kiln, only to find it’s permanently fused to your mold. This happens when there isn’t a proper barrier between the hot glass and the mold surface. The solution is simple: always use a glass separator. Before you even think about placing glass on your mold, you need to apply a few even coats of kiln wash. Make sure each layer is completely dry before adding the next. For an extra measure of certainty, you can place the prepared mold in your kiln at around 200°F to bake off any remaining moisture. This single step is the most important part of mold prep for a clean release.
Prevent Cracks from Mismatched Materials
Unexpected cracks are often the result of thermal stress. Glass expands when heated and contracts when cooled, and different types of glass do this at different rates. This rate is measured by the Coefficient of Expansion, or COE. If you try to fuse glasses with different COE values, like mixing COE90 glass with COE96, you create immense internal stress. This can cause your piece to crack as it cools—sometimes immediately, sometimes weeks later. Always check that your glass is compatible. Additionally, your firing schedule is critical. Heating or cooling the glass too quickly can cause thermal shock and lead to cracks, even if your materials are perfectly matched.
Choose the Right Mold from the Start
The foundation of a successful project is using the right tools for the job. It might be tempting to use a ceramic dish from your kitchen, but these materials are not designed to withstand the extreme temperatures of a kiln and can easily crack or break. Always use molds specifically made for glass fusing. These are formulated to handle thermal cycling without failing. Starting with the right equipment is half the battle. From there, developing disciplined working habits, like always cleaning and prepping your molds before use, will set you up for success. Taking the time to do things correctly from the beginning saves you from disappointment later on.
Related Articles
- Slab Server Casting Mold | Art Glass Supplies – Colour De Verre
- Coaster Slumping Mold | Art Glass Supplies – Slumping & Draping Molds
- Large Round Slump Ring Mold | Art Glass Supplies – Slumping & Draping Mold
- Round Coaster Slumping Mold | Art Glass Supplies – Slumping & Draping Mold
- Maple Leaves with Slumper Casting Mold | Art Glass Supplies – Colour De Ve
Frequently Asked Questions
Do I really need to apply kiln wash every single time I use my mold? Yes, this is a step you never want to skip. Think of kiln wash as a necessary protective layer. Even if the previous coat looks intact, reapplying a fresh, thin layer ensures there are no invisible weak spots where the hot glass could stick. Taking a few extra minutes to do this before each firing is the best insurance you can get against a project fusing to your mold.
What’s the difference between slumping ‘into’ a mold versus draping ‘over’ one? This comes down to how you place the glass and the final shape you’re trying to achieve. When you slump into a mold, you are placing your glass inside a concave form, like a bowl, to create a vessel. When you drape over a mold, you lay the glass on top of a convex shape to form a gentle curve or arch. Draping is a great technique for stainless steel molds, while slumping into a form is a perfect job for ceramic.
My ceramic mold doesn’t have a hole in the bottom. Is it defective? Not at all! While many molds include a small vent hole to help trapped air escape, it isn’t essential for every design. The porous nature of the ceramic material itself allows a significant amount of air to pass through. Molds designed for shallower slumps or those with very gentle curves often work perfectly well without a dedicated vent hole and still produce a smooth, bubble-free finish.
How many times can I reuse a mold? The lifespan of your mold really depends on its material and how well you care for it. A high-quality stainless steel mold is a workhorse that can last for a lifetime of firings. Ceramic molds are also incredibly durable and can be used for hundreds of projects with proper preparation and careful handling. Fiber molds, especially when treated with a rigidizer, can also be used many times, though they may show wear sooner than their ceramic or steel counterparts.
Why did my glass crack even though I used a proper slumping mold? Cracking is almost always caused by stress within the glass itself, not an issue with the mold. The most common reason is using incompatible glass, like trying to fuse a piece of COE90 glass with COE96. Another frequent cause is an incorrect firing schedule. Heating or cooling the glass too quickly can create thermal shock, which leads to cracks. Always make sure your glass is compatible and that your firing schedule is right for the size and thickness of your project.