
If you’ve ever had to rent studio time, you know the drill. You’re rushing to finish your project, working on someone else’s schedule, and paying by the hour. That pressure can stifle creativity. Owning your own glass fusing kiln changes everything. It gives you the freedom to experiment on your own time, to test new techniques without worry, and to fire up a project whenever inspiration strikes. It’s the key piece of equipment that puts you in complete control of your artistic process. This guide is designed to help you claim that freedom. We’ll break down the top models and sift through glass fusing kiln reviews to help you choose the right machine for your space, your budget, and your creative independence.
Key Takeaways
- Choose a kiln that fits your art and your space: Before buying, check three things: size, power, and design. Buy the largest kiln you can afford to avoid outgrowing it, confirm its voltage matches your home’s electrical setup, and decide if a top-loading or clamshell model works best for you.
- Insist on features that guarantee success: Always opt for a digital controller to automate your firing schedules for perfect, repeatable results. Also, ensure the kiln has top heating elements, which are essential for radiating heat evenly across glass and preventing cracks.
- Plan beyond the purchase: Avoid the common mistake of buying a kiln that is too small or not deep enough for slumping projects with molds. When setting up, prioritize safety by ensuring proper ventilation and maintaining at least 18 inches of clearance around the kiln.
The Best Home Glass Fusing Kilns: Our Top Picks
Ready to find the perfect kiln for your home studio? It can feel like a huge decision, but I’ve got you. After years of working with glass and talking to countless artists, I’ve seen which models consistently deliver amazing results. These are the kilns that get people excited, the ones that balance performance, price, and ease of use. Think of this as a starting point to help you find the right fit for your creative goals. Let’s look at a few of our favorite kilns that are perfect for home artists, from jewelry makers to those creating large art pieces.
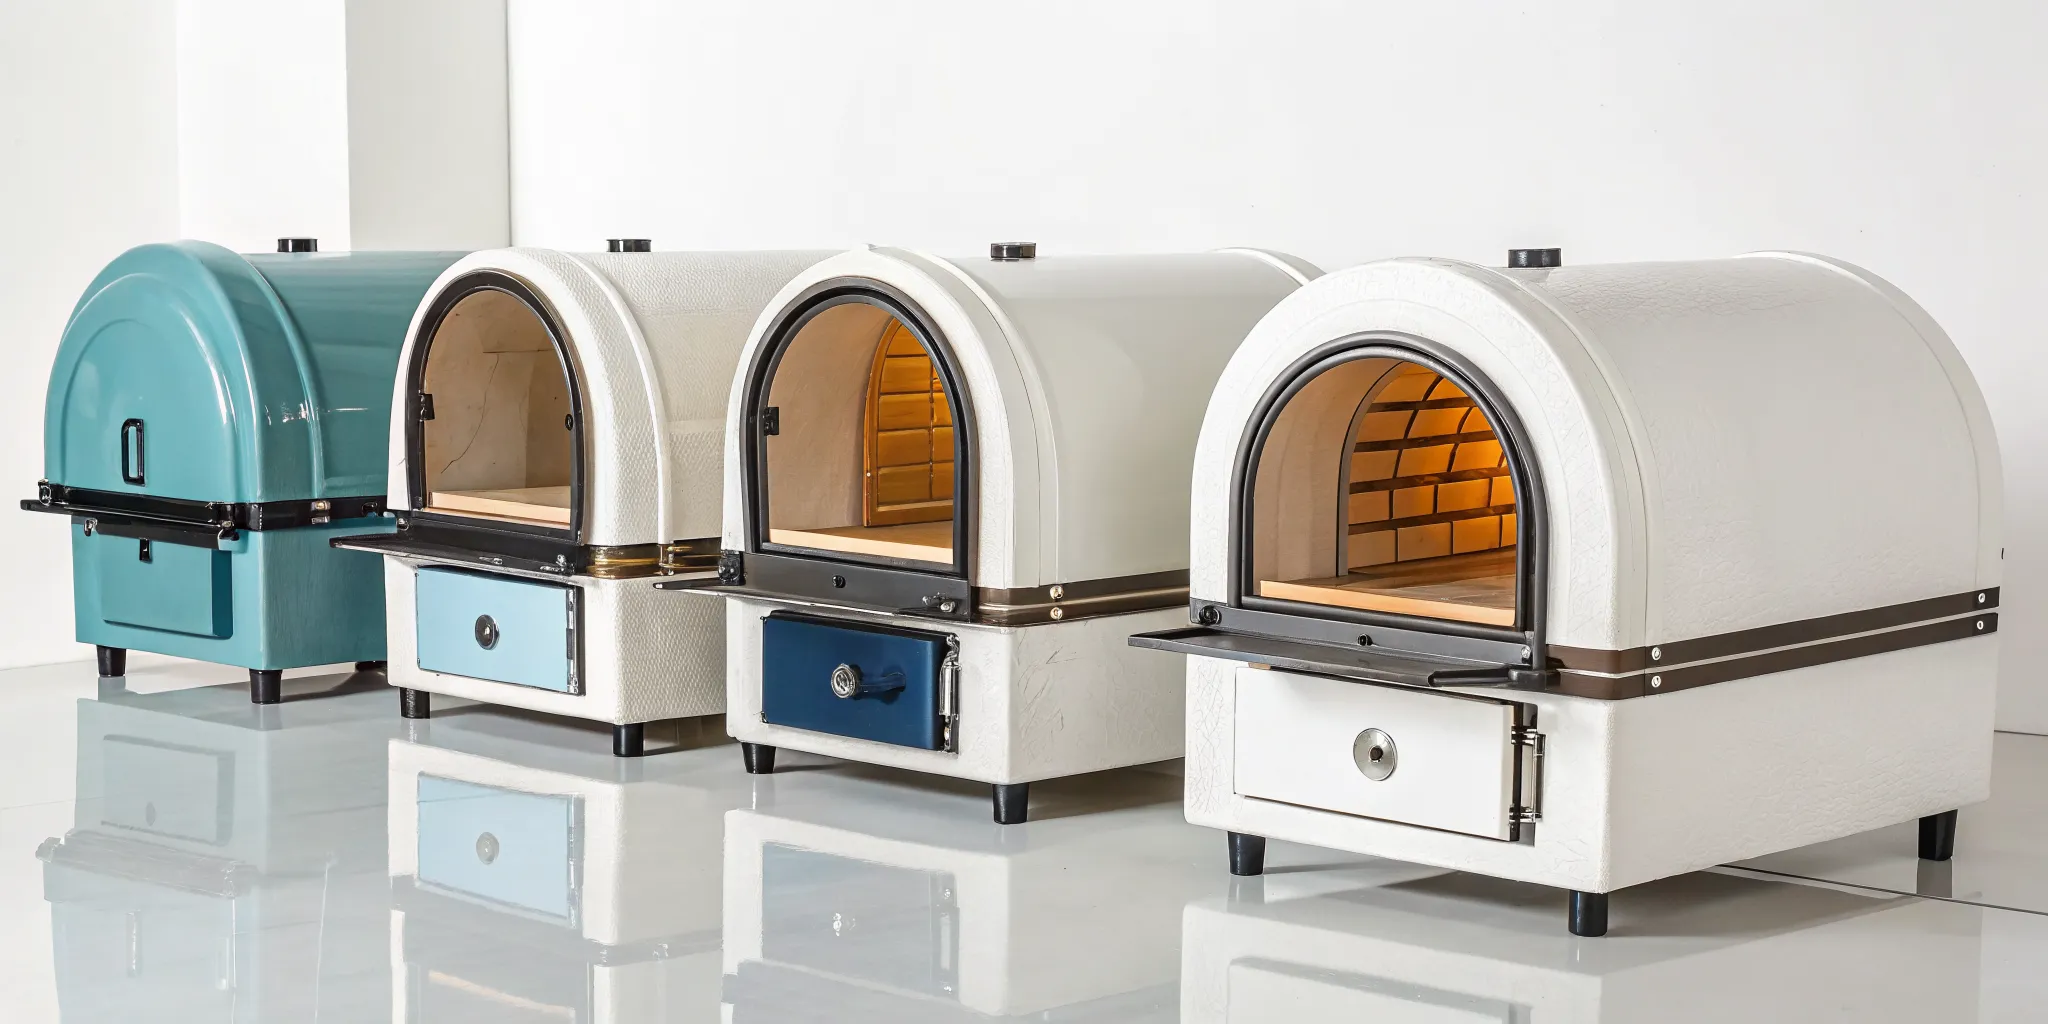
Evenheat Studio Pro 17
This is a real workhorse for a home studio and one of the most popular choices for a reason. As one of the largest kilns that can run on a standard 120V outlet, it gives you a generous 17″ x 17″ firing chamber without needing special wiring. It’s fantastic for artists who want to create larger plates, platters, or panels. The user-friendly touchscreen controller makes programming schedules a breeze, which is a huge plus for both beginners and seasoned artists who just want to get firing. It’s an incredible all-arounder.
Paragon Caldera Digital
If you’re just starting out or focusing on smaller pieces like jewelry, pendants, or coasters, this little kiln is a powerhouse. Its compact size makes it perfect for studios where space is tight, and it’s one of the most affordable digital kilns available. Don’t let its size fool you; it provides the same reliable, even heating you need for perfect results. It’s also a great option for artists who want a dedicated kiln for testing new techniques or firing small batches of COE90 glass components.
Hot Shot HS16 PRO Clamshell
Tired of carefully leaning over a hot, top-loading kiln to place your project? The clamshell design of the Hot Shot HS16 PRO is a game-changer. The lid lifts completely away, giving you full, easy access to the 16″ x 16″ floor. This makes it so much easier to assemble delicate projects directly on the shelf without bumping the sides. It’s an excellent choice for artists who do intricate frit work or want to prevent any shifting during setup. The special heating elements are also designed to prevent flaking, ensuring a clean firing environment.
Paragon CS-26 Clamshell
When you’re ready to create large-scale pieces and have the 240V electrical to support it, this is the kiln you dream about. With a massive 26″ x 26″ interior, the CS-26 gives you the space to think big. The clamshell design is especially helpful at this size, allowing you to safely place large or complex projects. This is the kind of kiln you invest in when you’re making large bowls with slumping molds or creating ambitious architectural art. It’s a professional-grade machine that opens up a whole new world of artistic possibilities.
What Is a Glass Fusing Kiln, and Do You Need One?
Think of a glass fusing kiln as a specialized, high-temperature oven designed specifically for glass artists. Its job is to heat pieces of glass until they melt, or fuse, together into a single, solid piece. This process requires incredibly precise temperature control. The kiln slowly ramps up the heat, holds it at a specific temperature (usually not hotter than 1700°F), and then cools down just as slowly. This careful cycle is what prevents the glass from cracking under thermal shock. Unlike a kitchen oven, a kiln provides the even, controlled environment that glass needs to transform safely.
So, do you really need one? If you’re serious about glass fusing, the answer is a definite yes. While you can rent kiln time at some studios, owning one gives you complete creative freedom. It’s the key piece of equipment that allows you to fuse layers of COE90 glass into colorful pendants, slump glass into custom-shaped plates, or drape it over molds to create beautiful bowls and sculptures. Without a kiln, you’re limited to techniques that don’t involve heat, like stained glass. Investing in one of your own kilns is the single most important step you can take to advance your craft and bring your artistic visions to life. It puts you in control of your projects from start to finish, allowing you to experiment with firing schedules and techniques on your own time.
How to Choose a Kiln: Key Features to Consider
Buying your first kiln is a huge step, and it’s completely normal to feel a little overwhelmed by all the options. Think of it less like a test and more like matching a tool to your creative vision. The right kiln will become your trusted partner in the studio, so it’s worth taking the time to understand what makes one different from another.
To make the process easier, I’ve broken down the most important features to look for. We’ll go through everything from size and power requirements to controllers and design styles. By the end of this section, you’ll have a clear checklist to help you find the perfect kiln for your space, your budget, and the beautiful glass art you want to create. Let’s get you ready to fire up your creativity.
Size and Firing Chamber Dimensions
One of the most common regrets I hear from artists is buying a kiln that’s too small. While a compact kiln is great for making jewelry, coasters, and other small trinkets, it can quickly limit your ambitions. Once you account for a kiln shelf and the space needed for glass to slump over a mold, you’ll find that a shallow chamber won’t work for bowls or draped vases.
My best advice is to buy the largest kiln you can comfortably afford and fit in your space. A kiln with an interior width of at least 16 inches gives you the flexibility to create larger pieces like plates, platters, and decorative panels. This way, your kiln can grow with you as your skills and project ideas expand.
Heating Elements: Top, Side, or Both?
How a kiln heats your glass is fundamental to getting a clean, even fuse. Glass kilns are specifically designed to heat from the top elements, which radiates heat downward onto the glass surface. Many also include side elements to ensure the chamber temperature is uniform from edge to edge. This combination is ideal for fusing, as it helps prevent thermal shock and ensures your entire piece heats and cools at the same rate.
In contrast, most ceramic kilns heat primarily from the sides. While great for pottery, this can cause uneven heating in glass projects, where the center may not reach the same temperature as the edges. For the best results in glass fusing, always choose a kiln with top heating elements.
Controller: Digital vs. Manual
This one is simple: always choose a digital controller. Manual controllers, which operate with dials and switches, require you to be physically present to adjust the temperature throughout the entire firing process. For glass, which demands precise temperature ramps and holds, this is incredibly tedious and leaves a lot of room for error.
A digital controller is your set-it-and-forget-it solution. You can program a complete firing schedule with multiple steps, and the kiln will execute it perfectly while you do something else. Modern digital controllers are user-friendly and give you the consistency you need for successful firings every time. You can browse a variety of kilns with advanced digital controllers to see how they work.
Design: Clamshell vs. Top-Loading
Kilns generally come in two main styles: top-loading and clamshell. A top-loading kiln opens from the top like a chest, and you lower your projects into the chamber. This is a very common and effective design for most fusing and slumping projects.
A clamshell kiln, on the other hand, has a hinged design where the entire top half lifts up and away from the base. This gives you unobstructed access to the kiln floor, which is a huge advantage if you plan to try advanced techniques like glass combing or raking. If you see yourself wanting to manipulate hot glass inside the kiln, a clamshell design is definitely the way to go.
Power: Match the Kiln to Your Home’s Electrical
Before you fall in love with a kiln, you need to check your electrical setup. Kilns are powerful tools, and they need the right power source to operate safely. Smaller kilns, typically those under 15 inches wide, are often designed to run on a standard 120-volt household outlet. This makes them a convenient plug-and-play option for many home studios.
However, larger kilns require a more powerful 240-volt circuit, similar to what an electric stove or clothes dryer uses. If your studio space doesn’t already have one, you’ll need to hire an electrician to install it. Always confirm a kiln’s voltage and amperage requirements before you buy to avoid any costly surprises.
Safety Features and Overall Build Quality
Finally, let’s talk about safety and construction. Your kiln will be generating intense heat, so proper placement and ventilation are non-negotiable. It should be placed in a well-ventilated area, like a garage or a workshop with an open window, and you must maintain at least 18 inches of clearance from any walls or flammable materials.
Look for a kiln from a reputable brand known for quality construction. A sturdy frame, well-insulated walls, and reliable components will ensure your kiln lasts for years. Investing in a well-built kiln not only protects your home but also gives you the peace of mind to focus on what really matters: creating beautiful art with your favorite COE90 glass.
Reviewing Our Top 5 Glass Fusing Kilns
Alright, let’s get to the good stuff. Choosing a kiln can feel like a huge decision, but I’m here to walk you through some of the best options available. I’ve picked five standout models that cater to different studio sizes, project types, and budgets. Whether you’re making your first piece of jewelry or designing a large-scale art installation, there’s a kiln on this list for you. We’ll look at what makes each one special so you can feel confident picking the one that will become the new heart of your studio.
1. Evenheat Studio Pro 17
If you’re looking for the biggest kiln you can get without needing special electrical work, the Evenheat Studio Pro 17 is your answer. As the largest 120-volt kiln on the market, it plugs into a standard household outlet while still offering a generous 17-by-17-inch interior. This makes it a fantastic choice for home studios where space and wiring are concerns. The user-friendly touchscreen controller takes the guesswork out of programming your firing schedules, and its design ensures excellent heat distribution. This is critical for achieving consistent, successful fuses without frustrating cracks or uneven melting. It’s a reliable workhorse from a great lineup of kilns.
2. Evenheat Studio Pro 28
When your artistic vision outgrows a smaller kiln, the Evenheat Studio Pro 28 is ready for the challenge. This model is a significant step up in size, providing a massive 28-by-28-inch space for ambitious projects. What really makes it stand out is its ‘Dual Access Design,’ which allows you to open it from the top like a traditional kiln or from the front like a clamshell. This versatility is a game-changer for loading large, heavy, or intricately arranged pieces of COE96 glass without risking a shift. It’s an investment for the serious artist who needs the space and flexibility to create large-scale fused glass art.
3. Paragon Caldera Digital
The Paragon Caldera Digital is a small but mighty kiln, perfect for artists focusing on jewelry, beads, or other small treasures. Its compact 8-by-8-inch chamber is ideal for detailed work, and its best feature is its simplicity. You can plug it directly into any standard wall outlet, making it incredibly accessible for beginners or anyone with a small studio space. Don’t let its size fool you; the digital controller provides precise temperature control, which is essential when working with delicate materials. This is an excellent entry-level kiln or a wonderful secondary kiln for an established artist who wants to fire small batches of COE90 glass efficiently.
4. Paragon CS-26
For artists who need both size and easy access, the Paragon CS-26 is a fantastic clamshell option. The clamshell design means the entire lid lifts up, giving you unobstructed access to the 26-by-26-inch kiln floor. This is incredibly helpful when you’re carefully placing glass on molds for slumping or arranging delicate components that can’t be disturbed. You can work on your piece directly on the kiln shelf without having to awkwardly reach into a top-loading chamber. This model provides the space needed for large decorative pieces, bowls, and platters while making the setup process smoother and more precise.
5. Hot Shot HS16 PRO Clamshell
The Hot Shot HS16 PRO Clamshell offers a perfect middle ground for many artists. At 16-by-16 inches, it’s spacious enough for plates and decorative panels but still manageable for most home studios. Like other clamshells, it opens wide for easy loading, which helps protect your carefully crafted designs. A key feature of this kiln is its specialized heating elements, which are designed to prevent flaking and contamination inside the chamber over time. This focus on reliability and clean firings makes it a trustworthy choice for artists who prioritize efficiency and consistent results. It’s a solid, dependable kiln that balances size, convenience, and performance beautifully.
Kiln Comparison: A Side-by-Side Look
Okay, let’s lay it all out. Seeing the specs side-by-side can make your decision much clearer. To help you compare, I’ve grouped some of the best kilns by their power requirements. This is often the first big decision you’ll make, as it determines whether you can plug it straight into the wall or need to call an electrician. Choosing the right model depends entirely on the projects you envision, from small pendants to large, flowing bowls.
120V Kilns (Standard Household Outlet)
These kilns are fantastic for home studios because they run on a standard outlet, no electrician needed. The Evenheat Studio Pro 17 is a popular choice, offering a generous 17-by-17-inch space and a user-friendly touchscreen that makes programming a snap. If you want even easier access for placing delicate pieces, the Hot Shot HS16 PRO Clamshell has a similar 16-by-16-inch area and a clamshell design that lifts the lid completely out of the way. For artists focused on jewelry or small components, the Paragon Caldera Digital is a compact and affordable powerhouse. Its 8-by-8-inch chamber is perfect for getting started without a huge commitment.
240V Kilns (Requires Special Wiring)
If you have the electrical setup and bigger ambitions, a 240V kiln opens up a world of possibilities. These kilns can handle larger projects and more complex firing schedules. The Paragon CS-26 is a massive 26-by-26-inch clamshell kiln, giving you full, unobstructed access to the kiln floor, which is ideal for delicate setups. Similarly, the Evenheat Studio Pro 28 boasts a 28-by-28-inch interior and a clever “Dual Access Design” for loading from the top or front. For artists who need versatility for slumping, casting, and fusing large pieces, the Hot Shot HS24-PRO Clamshell offers a 24-by-24-inch space and is built to handle a variety of warm glass techniques using different molds and materials.
What Kiln Size Do You Need?
Choosing the right kiln size is one of the most important decisions you’ll make for your home studio. The size of your kiln directly impacts the scale and type of projects you can create. Thinking about your artistic goals now will help you invest in a kiln that supports your craft for years to come, preventing you from buying a second one sooner than you’d like. Let’s walk through the common sizes to find the perfect fit for you.
Small Kilns: For jewelry and small projects
If you’re just starting out, a small kiln can feel like the perfect entry point. These compact models, often with an interior around 8 to 10 inches, are great for making jewelry, small suncatchers, or coasters. They are budget-friendly and don’t take up much space in your studio. However, many artists find they outgrow a small kiln faster than they expect. The limited interior, especially the depth, can be a real constraint. Once you place a shelf inside, you might not have enough height left for slumping a piece into even a small bowl or draping it over a form. Think carefully about your future goals before committing to a small size that might limit your creativity down the road.
Mid-Size Kilns: For plates and decorative pieces
For many home studio artists, a mid-size kiln is the sweet spot. With an interior of at least 15 to 17 inches, these kilns give you the freedom to create a much wider range of projects. You can easily fire dinner plates, decorative platters, and medium-sized art panels. This size also allows for more complex projects that require slumping and draping over various molds. While it’s a bigger investment upfront, a mid-size kiln provides room to grow your skills without feeling restricted. It’s a practical choice that balances capability with the space and power limitations of a typical home studio, letting you explore more ambitious designs.
Large Kilns: For bowls and ambitious artwork
When you’re ready to create large-scale pieces or produce work more efficiently, a large kiln is the answer. These kilns open the door to making oversized bowls, substantial platters, and ambitious sculptural art. You can also fire multiple smaller projects at once, which is a huge time-saver. The main thing to remember is that most large kilns require a 240V electrical circuit, similar to an electric stove or dryer, so you’ll likely need to have an electrician install the proper outlet. These kilns also take up more floor space and have longer heating and cooling cycles, so be sure to factor those practical considerations into your studio workflow and setup.
What to Expect: Kiln Pricing Tiers
Let’s talk about the investment. Buying a kiln is a big step, and the price tag can range quite a bit. Think of it like buying a car; you can find a reliable starter model, a feature-packed daily driver, or a high-performance machine. The price depends on the size, power, and features you need for your creative goals. Breaking it down into tiers can help you find the perfect fit for your studio and your budget, ensuring you get the right tool for the art you want to create.
Entry-Level Kilns ($1,200–$2,000)
If you’re just starting your glass fusing journey or focusing on smaller pieces like jewelry and coasters, an entry-level kiln is your best friend. These compact models are fantastic because they usually plug right into a standard 120V wall outlet, so you don’t need to call an electrician. They are perfect for learning the fundamentals of firing schedules without a huge upfront cost. While they won’t fit a large platter, they offer plenty of room to experiment with pendants, earrings, and small suncatchers. It’s a wonderful way to explore the craft and find your style before committing to a larger setup.
Mid-Range Kilns ($2,000–$3,500)
Ready to move beyond small pendants and create larger, more complex pieces? A mid-range kiln is the perfect step up. These kilns offer more space, allowing you to make plates, shallow bowls, and larger decorative panels. You’ll also find more advanced features, like clamshell designs for easier loading and sophisticated digital controllers that give you precise control over your firing. Many of these models still run on 120V power, but they are larger and more powerful, so always check the electrical requirements. This is the sweet spot for serious hobbyists and artists who are beginning to sell their work.
Professional Kilns ($3,500+)
For the full-time artist or the ambitious hobbyist with big ideas, a professional kiln is a game-changer. These are the largest and most powerful kilns available for a home studio, offering enough space for large-scale sculptures, architectural pieces, and production-level work. You’ll find top-of-the-line features like dual-access designs and heavy-duty heating elements. These kilns almost always require a dedicated 240V circuit installed by an electrician, but the creative freedom they provide is unmatched. They open up a world of possibilities, from intricate slumping with complex molds to creating gallery-worthy masterpieces.
First-Time Buyer? Avoid These Common Mistakes
Buying your first kiln is a huge step, and it’s easy to get overwhelmed by all the options. It’s a major investment in your art, so you want to get it right the first time. I’ve seen many artists make the same few mistakes when they’re starting out. A little bit of planning can save you from buyer’s remorse and help you choose a kiln that will support your creative goals for years to come. Let’s walk through the most common pitfalls and how you can sidestep them.
Buying a kiln that’s too small
When you’re looking at prices, it’s tempting to go for a smaller, more affordable kiln. But this is one of the most common regrets for new kiln owners. A compact kiln, maybe one with an 8-by-8-inch shelf, is great for making jewelry, coasters, or small suncatchers. If you have any ambition to create larger pieces like plates, bowls, or draped vases, you’ll outgrow it almost immediately. Remember to account for the kiln shelf itself and the necessary clearance around your glass. My advice is to think about the projects you dream of making a year from now and choose a size that gives you room to grow.
Skipping digital controls to save money
Another common way artists try to cut costs is by choosing a kiln with a manual controller. While the lower price tag is appealing, you’ll pay for it with your time. Manual kilns require you to be present to turn dials and make adjustments throughout the entire firing schedule, which can take hours. A kiln with a digital controller, on the other hand, lets you program your firing schedule and walk away. The kiln does all the work for you, ensuring precise and repeatable results every time. That reliability and freedom are well worth the extra investment, letting you focus on designing your next piece instead of babysitting your kiln.
Overlooking kiln depth for slumping projects
If you plan to make three-dimensional pieces like bowls or draped vases, the kiln’s depth is just as important as its width. Many first-time buyers focus only on the shelf size and forget to check the height. For slumping projects, you need enough space for your glass to drop into a mold without hitting the top of the kiln. A good rule of thumb is to have at least two inches of clearance above your project at its tallest point. A kiln with only six inches of depth might not be enough once you factor in the height of your mold and the glass on top. Before you buy, measure your tallest
Ignoring your home’s electrical setup
This is a big one. Nothing is more frustrating than getting your beautiful new kiln home only to realize you can’t plug it in. It’s essential to match your kiln’s power requirements to your home’s electrical system. Generally, smaller kilns with firing chambers under 15 inches wide can run on a standard 120-volt household outlet. Larger kilns often require a 240-volt circuit, similar to what an electric stove or dryer uses. Before you even add a kiln to your cart, check your breaker box and the outlets in your studio space. If you need a 240-volt outlet installed, you’ll have to hire an electrician, so be sure to factor that potential cost into your budget.
Forgetting about long-term maintenance
Your relationship with your kiln doesn’t end after you buy it; it’s a long-term commitment. Over time, parts like heating elements can wear out, or accidents can happen that damage the soft firebricks inside. When you’re comparing models, take a moment to think about future repairs. How easy is it to find and order replacement parts for that brand? Some kilns are designed for easier element replacement than others. Thinking about maintenance now can save you a lot of time and stress down the road, ensuring your kiln remains a reliable partner in your studio for many years.
Get Ready to Fire: Setting Up Your Home Studio
Bringing a kiln into your home is a game-changer for any glass artist. Once you’ve picked the perfect model, the next step is creating a safe and functional space for it. Setting up your studio correctly from the start will help you fire with confidence and focus on what really matters: bringing your creative ideas to life. A well-planned studio not only keeps you safe but also makes the creative process smoother and more enjoyable. Think of it as building the foundation for years of artistic exploration. We’ll walk through exactly what you need to do to get your space ready for its new fiery centerpiece, from finding the ideal location to gathering the essential supplies and choosing the right glass for your first firing.
Find the perfect spot for your kiln
Finding the right home for your new kiln is your first and most important step. Good airflow is non-negotiable, so look for a spot in a garage or near a window you can open. Your kiln needs some breathing room, so make sure there are at least 18 inches of clear space around it for safety and ventilation. A concrete floor is your best friend here, as it’s non-combustible and easy to clean.
It might seem obvious, but it’s worth repeating: keep anything flammable far away from your setup. This includes curtains, paper, and cleaning chemicals. Taking the time to prepare a dedicated, safe space for your new equipment will give you peace of mind every time you fire up one of your kilns.
Gather your must-have supplies
Your kiln is the star of the show, but it needs a supporting cast to work its magic. Kiln shelves are essential. They create a flat, stable surface for your glass and protect your kiln’s floor from any accidental drips. You’ll also need kiln posts. These small pillars lift the shelves, letting hot air circulate freely around your pieces for a perfect, even firing. You can often find these items bundled in a furniture kit, which can be a great way to get started.
Beyond the basics, think about the projects you want to make. If you’re interested in creating bowls, plates, or other three-dimensional pieces, you’ll need a collection of molds for slumping and draping.
Choose the right glass for your new kiln
Now for the fun part: picking out the glass! The type of art you want to create will guide your choices. Before you buy, it’s critical to understand the Coefficient of Expansion, or COE. Think of it as the rate at which glass expands and contracts when heated. For a project to be successful, all the glass you use in it must have the same COE. Mixing COEs is a recipe for stress fractures and cracked, unhappy projects.
Most glass fusers work with either COE90 glass or COE96 glass. Neither is better than the other; they just behave differently and come in different color palettes. Pick a lane to start, and remember that your kiln’s digital controller can be programmed with specific firing schedules to get the best results for the glass you’re using.
Related Articles
- The Ultimate Glass Fusing Kiln Guide for Artists
- Best Glass Kiln for Beginners: A Buyer’s Guide
- How to Choose the Best Glass Kiln for Your Art
Frequently Asked Questions
I’m not sure what kind of outlet I have. How can I tell if I need an electrician? This is a great question, and it’s smart to figure this out first. Look at the outlets in your studio space. A standard 120-volt outlet, the kind you plug a lamp into, usually has two vertical slots and a round hole for the ground. Most larger, 240-volt outlets look very different; they are bigger and have a unique pattern of slots, often round or angled. If you see one of these, you’re likely set for a larger kiln. If you only see standard outlets, you’ll need to stick with a 120-volt kiln or hire an electrician to install a dedicated 240-volt circuit.
Besides the kiln itself, what other costs should I budget for to get started? It’s wise to think about the whole setup. Your kiln will need a kiln shelf to protect the floor and kiln posts to hold it up. You can often buy these together in a “furniture kit.” You’ll also need kiln wash to coat the shelf, which prevents glass from sticking. Beyond that, you’ll need glass, of course, and a good glass cutter and breaking pliers. If you plan on making bowls or plates, you will also want to invest in a few basic slumping molds to shape your glass.
Is a clamshell kiln really worth the extra cost compared to a top-loader? This really depends on the kind of work you want to do. For many projects, a top-loading kiln works perfectly well. The clamshell design becomes a huge advantage when you are assembling delicate projects with lots of small pieces, like frit paintings, directly on the kiln shelf. The full access makes it much easier to place everything without bumping the kiln walls. If you see yourself doing that kind of intricate work or want the most ergonomic option for loading, then yes, the convenience of a clamshell is often worth it.
I’m nervous about my first firing. What’s a good, simple project to start with? Everyone feels that way at first, so you’re in good company. I always suggest starting with something small and simple, like a set of 4-inch coasters. This allows you to learn how your kiln fires without using a lot of expensive glass. Just cut two identical squares of compatible glass (like COE90), stack them, and fire them using a basic full-fuse schedule. It’s a low-stakes way to get a feel for the process and build your confidence for more ambitious projects.
Can I use my glass fusing kiln for other crafts, like ceramics or metal clay? While it might seem like a hot box is a hot box, it’s best to stick to the script. Glass kilns are specifically designed with heating elements in the top to radiate heat down onto the glass. Ceramic kilns, in contrast, usually have elements on the sides. Using a glass kiln for pottery can lead to unevenly fired pieces. While some people do use them for metal clay, you must follow very specific guidelines to avoid contaminating your kiln, which could ruin future glass projects. For the best results, I recommend using your kiln for what it was made for: beautiful fused glass.