
You’ve mastered cutting and fusing flat glass panels. Now what? If you’re ready to create beautiful, three-dimensional pieces, it’s time to get into glass slumping. And it’s easier than you think. The secret is having the right slumping molds for glass. This simple tool is the foundation for turning flat panels into everything from small bowls to large platters. But with so many options, choosing the right one can be confusing. We’ll break down exactly what to look for in quality glass molds, helping you find the perfect glass mold to bring your vision to life.
Key Takeaways
- Your Mold Dictates the Outcome: The shape, material, and quality of your mold directly influence your final piece. Choosing a durable mold that fits your kiln and matches your artistic vision is the first step toward creating successful, three-dimensional glass art.
- Success Lies in the Preparation: A flawless finish starts before the kiln is even turned on. Properly applying a separator like kiln wash is non-negotiable to prevent sticking, while cleaning your glass ensures no blemishes are fired permanently into your work.
- Control the Heat, Control the Results: Your firing schedule is your recipe for success. A slow, deliberate heating and cooling (annealing) process is essential for allowing the glass to slump evenly and preventing thermal shock that can cause stress cracks.
What Is a Glass Slumping Mold?
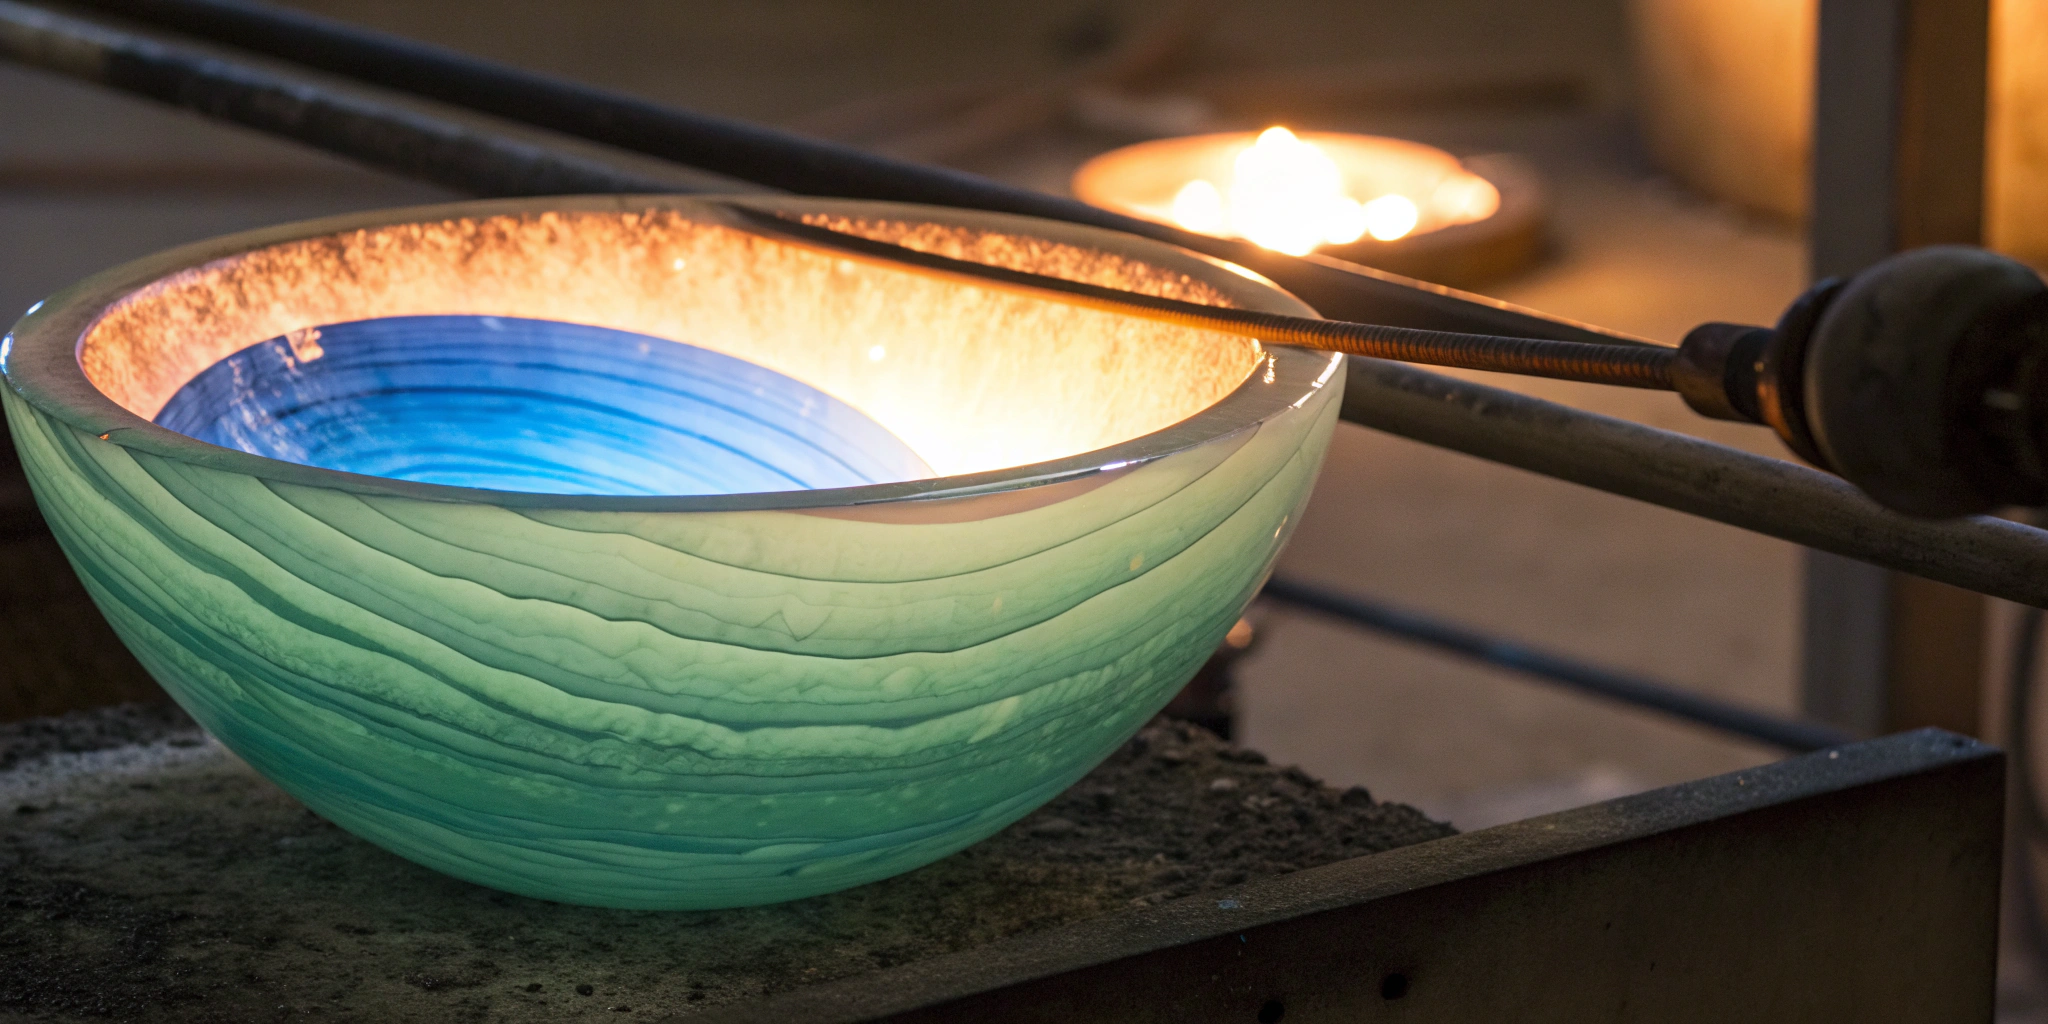
Think of a glass slumping mold as the secret to transforming a flat sheet of glass into a three-dimensional piece of art, like a bowl, a platter, or a decorative wave. The process itself, called slumping, is beautifully simple. You place your glass over or into a mold and then place the entire setup into a kiln. As the kiln heats up to temperatures between 1200 and 1300 degrees Fahrenheit, the glass softens and gravity gently pulls it downward, causing it to “slump” and take on the exact shape of the mold beneath it.
The mold is your guide in this process. It dictates the final form, from the gentle curve of a plate to the deep walls of a bowl. Without it, your glass would just melt into a puddle. Molds are designed to withstand extreme temperatures repeatedly, making them a reusable and essential tool for any glass fusing artist. Whether you’re working with COE90 glass or COE96, the right mold is what turns your creative vision into a tangible, functional object. It’s a foundational piece of equipment that opens up a whole new world of shaping possibilities beyond flat panels.
Ceramic vs. Steel: Which Mold Material Is Right for You?
When you start shopping for molds, you’ll quickly notice two main materials: ceramic and stainless steel. Ceramic molds are the most common choice for artists. They’re typically made from a porous, bisque-fired earthenware that readily absorbs water-based kiln washes. This makes prepping them a straightforward process. Stainless steel molds, on the other hand, are usually reserved for simpler, more geometric shapes like gentle curves, drapes, and basic bowls. Since steel isn’t porous, water-based washes don’t adhere well, so you’ll need to use a boron nitride spray as a separator instead. Your choice often comes down to the shape you want and your preferred prep method.
Picking the Perfect Shape and Size
One of the most exciting parts of glass slumping is choosing your form. The variety of molds available is incredible, allowing you to create everything from square, round, or ruffled bowls to elegant platters and unique decorative pieces. Before you buy, think about what you want to make. Are you designing a set of small dipping bowls or a large statement centerpiece? The size and shape of your project will determine the mold you need. Always check the mold’s dimensions—both the interior and exterior—to ensure your glass will fit properly and that the mold itself will fit inside your kiln. Starting with a clear project in mind makes finding the perfect mold much easier.
Why Surface Quality and Heat Distribution Matter
Two technical details you can’t ignore are the mold’s surface quality and its ability to handle heat. First, your glass should never touch the mold directly during firing. You must always apply a separator, like a kiln wash, to the mold’s surface. This fine coating creates a barrier that prevents the hot, soft glass from sticking permanently. Second, a good mold must be able to heat and cool evenly without cracking or exploding from thermal shock. This stability is crucial because it ensures the glass slumps uniformly and doesn’t crack from uneven temperature changes. Investing in a well-made mold from a reputable brand ensures it will perform reliably and last through many firings.
Beyond Slumping: Exploring the Variety of Glass Molds
Once you’re comfortable creating bowls and platters, you can start exploring the wider world of glass forming. Standard slumping is just the beginning. A variety of specialized molds are available that allow you to create entirely different forms, from solid, sculptural objects to deep, elegant vessels. These advanced tools open up new creative pathways, letting you move beyond functional tableware and into more complex artistic expressions. Understanding the different types of molds available is the key to expanding your skills and bringing more ambitious projects to life in the kiln.
Casting Molds for Solid Objects
If you want to create solid glass objects, you’ll need to move from slumping to casting. While slumping involves shaping a single sheet of glass over a mold, casting is the process of melting crushed glass (frit) or scrap glass inside a mold to form a solid piece. This technique allows you to create things that aren’t possible with slumping, like sculptural figures, thick suncatchers, or custom paperweights. Casting molds are designed to contain the molten glass completely, acting as a vessel rather than just a surface. They are perfect for using up scrap COE90 glass and transforming it into a brand-new, substantial piece of art.
Specialty Molds for Unique Projects
When you have a specific, unique project in mind, a specialty mold is often the answer. These molds are designed to create distinct shapes that go beyond simple circles and squares. You can find molds for making everything from wavy art panels and soap dishes to custom jewelry components and intricate tiles. These tools help you achieve consistent, professional results for more complex designs. Instead of trying to hand-craft a complicated form, you can rely on a specialty mold to provide the perfect foundation, letting you focus on the color and design of your glass.
Drop-Out Molds for Vases and Deep Vessels
For creating stunning vases and other deep vessels, drop-out molds are a game-changer. Unlike a standard slumping mold, a drop-out mold has an opening in the bottom. You place your sheet of glass on top of the mold, which is elevated on kiln posts. As the glass heats and softens, the center stretches downward and “drops” through the hole, using gravity to form a deep, vessel-like shape. The depth of the drop is controlled by the height of the mold and your firing schedule. This technique is a fantastic way to create elegant, flowing forms that have a real “wow” factor, turning a flat sheet of glass into a beautiful three-dimensional centerpiece.
How Much Do Glass Molds Cost?
One of the first questions you’ll likely ask when exploring glass slumping is, “How much do the molds cost?” The great news is that there’s a wide range of options to fit any budget, from simple, affordable shapes to intricate, high-end designs. The price of a slumping mold depends on its size, complexity, and the material it’s made from. Whether you’re just starting out or you’re a seasoned artist looking to add a signature piece to your collection, understanding the different price tiers will help you find the perfect mold for your next project. Let’s break down what you can expect to spend.
Budget-Friendly Finds: Molds Under $28
You don’t have to break the bank to start creating beautiful, three-dimensional glass art. If you’re just dipping your toes into slumping or want to expand your collection without a huge investment, there are plenty of high-quality, budget-friendly molds available. For under $28, you can find a fantastic variety of shapes perfect for making small bowls, coasters, soap dishes, and even jewelry pendants. Many suppliers, like Creative Paradise Glass and Glass House Store, offer simple, durable ceramic molds starting as low as $9. This price point makes it easy to experiment with different forms and find what you enjoy creating most. We carry a wide selection of affordable molds that are perfect for getting started or adding new shapes to your studio.
Starting Out: Molds from $28–$75
If you’re new to glass slumping or just want to experiment with a new shape, entry-level molds are the perfect place to start. Typically priced between $28 and $75, these molds are a fantastic, low-cost way to get your feet wet without a major financial commitment. You can find a variety of basic shapes like bowls, plates, and simple platters in this price range. They allow you to learn the fundamentals of slumping—like firing schedules and how glass behaves—before moving on to more complex pieces. These affordable molds are workhorses that let you play and build your skills with confidence.
The Sweet Spot: Molds from $75–$150
Ready to move beyond the basics? Mid-range molds, which generally fall between $75 and $150, offer more intricate designs and sophisticated shapes. In this category, you’ll find molds with more detail, like fluted edges, textured bottoms, or unique asymmetrical forms. These are ideal for artists who have a good handle on the slumping process and want to create more distinctive, professional-looking pieces. The materials are often more durable, allowing for more frequent use. Keep an eye out for sales, as you can often find high-quality molds from great brands at a reduced price, giving you even more value for your money.
For the Pros: Molds Over $150
For the dedicated glass artist, high-end molds priced at $150 and up are a true investment in your craft. These molds are typically crafted from specialized ceramic or stainless steel materials designed for maximum durability and longevity. They can withstand countless firings in your kiln and provide an exceptionally smooth surface, which translates to a flawless finish on your glass. The designs in this tier are often complex, large-scale, or created by well-known artists. If you’re producing work for galleries or high-end craft markets, investing in a premium mold ensures consistent, top-quality results every time you fire up your kiln.
What Determines the Cost?
So, what makes one mold more expensive than another? Several factors come into play. The complexity of the design is a major driver; a simple round bowl mold will naturally cost less than one with intricate textures and an unusual shape. The material is also crucial. Molds must be made from materials that can handle extreme temperatures without cracking or melting, and higher-quality, more durable materials cost more to produce. Finally, brand reputation and the size of the mold contribute to the final price tag. Understanding these factors helps you appreciate the craftsmanship that goes into each mold and choose the right one for your artistic goals.
Where to Find the Best Glass Molds for Slumping
Finding the perfect slumping mold can feel like a treasure hunt, but knowing where to look makes all the difference. The right supplier not only has the shape you need but also offers quality products that will last through many firings. You can find molds at specialized online retailers, directly from manufacturers, and even from independent artists. Your best bet is usually a supplier that focuses specifically on glass art, as they’ll have the expertise and selection to match your project’s needs. Let’s walk through some of the best places to find high-quality slumping molds for your studio.
My Go-To Online Store: ArtGlassSupplies.com
When you want a huge selection and the convenience of getting everything in one order, a comprehensive supplier is the way to go. We pride ourselves on being a leading provider of slumping and draping molds in countless shapes and sizes. Whether you’re looking for simple geometric forms, intricate floral patterns, or even fun animal shapes, you can find them here. Think of it as your home base for all things glass art. You can pick up a new mold, grab the compatible COE 90 or COE 96 glass sheets, and stock up on kiln wash, all in the same cart. This saves you time and shipping costs, letting you focus more on your creative work.
Top Brands to Know: Bullseye and Creative Paradise
If you’re loyal to a specific brand or have heard great things about a particular manufacturer, going straight to the source or a licensed distributor is a solid option. Brands like Bullseye Glass and Creative Paradise are well-known in the glass community for their high-quality and innovative mold designs. Bullseye, for example, offers a range of durable casting and slumping molds designed to work perfectly with their glass. Shopping by brand can be helpful when you need to guarantee compatibility or are looking for a very specific, signature shape that a certain company is known for. Many large suppliers, including ArtGlassSupplies.com, carry these top-tier molds, so you can often find them alongside other essentials.
Where Else to Shop for Glass Molds Online
Beyond the major suppliers, the internet is full of hidden gems. Other specialized online stores often carry unique stainless steel or ceramic molds that can help you create stunning three-dimensional pieces. These shops are great for finding specific items like platter, bowl, or plate molds. You can also find independent artists on platforms like Etsy who design and create their own small-batch molds. These can be perfect for one-of-a-kind projects where you want a shape that no one else has. While you might have to shop around a bit more, exploring these alternative sources can introduce you to new tools and inspire your next piece.
How to Score a Great Deal
Who doesn’t love saving a little money on supplies? Finding a great deal on slumping molds is easier than you think if you know where to look. Many online retailers have a dedicated sales or clearance section where you can find discontinued or overstocked items at a deep discount. It’s not uncommon to see prices slashed by 50% or more. Another great tip is to sign up for newsletters from your favorite suppliers. This is often the first place you’ll hear about upcoming sales, holiday promotions, and exclusive coupon codes. Buying molds during off-peak seasons can also sometimes lead to better prices.
Buying from a Distributor vs. Direct
You have two main options when buying molds: directly from the manufacturer or through a distributor. While going direct might seem straightforward, purchasing from a specialized distributor like ArtGlassSupplies.com is often the smarter move. We curate a massive selection from various top brands, giving you more choices in one place. Instead of hopping between different manufacturer websites, you can compare shapes, sizes, and prices all in one cart. This not only saves you a ton of time but can also cut down on shipping costs, since you’re bundling everything into a single order.
Looking for Volume Discounts
If you’re planning to produce a series of pieces or teach a class, keep an eye out for volume discounts. Many suppliers offer a lower price per item when you buy several of the same mold at once. This is a fantastic way to stock your studio with essential shapes you know you’ll use frequently, like a classic bowl or platter mold. Before you check out, see if there are any bulk pricing options available. It’s a simple strategy that can make a real difference in your supply budget, allowing you to invest those savings back into other materials, like beautiful sheets of COE90 glass.
Understanding Special Handling Fees
Don’t be surprised if you see a special handling fee appear in your cart, especially if you’re ordering large items. This is most common when you purchase oversized sheets of glass alongside your molds. This extra charge isn’t just a random fee; it covers the cost of the specialized packaging required to make sure your fragile materials arrive in one piece. Think of it as insurance for your supplies. Proper packing prevents cracks and breaks during transit, so while it’s an added cost, it’s essential for protecting your investment and ensuring your materials arrive ready for the kiln.
What to Look for When Buying a Slumping Mold
Choosing the right slumping mold is about more than just picking a shape you like. It’s an investment in your craft, and the right one can be a reliable partner in your studio for years. When you’re browsing for your next mold, think beyond the initial design and consider the practical features that will make or break your projects. A great mold is durable, fits your artistic goals, works with your equipment, and is easy to care for. Keeping these four key areas in mind will help you select a tool that not only produces beautiful results but also stands the test of time and temperature.
How Long Will Your Mold Last?
You want a mold that can handle repeated trips to the kiln without warping or breaking down. Think of it as a long-term investment. While ceramic molds are a popular choice, stainless steel molds are exceptionally strong and can withstand countless firings, making them a very cost-effective option over time. Investing in durable molds means you can count on consistent results for many projects to come. A well-made mold won’t just survive the heat; it will maintain its shape and surface integrity, giving you a reliable foundation for your work.
Does the Mold Fit Your Project?
The mold you choose directly dictates the final form of your piece. Are you hoping to create a shallow, elegant platter or a deep, functional bowl? The size and contour of the mold are everything. Before you buy, take a moment to visualize your finished project. Consider the dimensions of the glass you plan to use and ensure it’s a good fit for the mold. Choosing a mold that aligns with your artistic vision is the first step in transforming a flat sheet of glass into a three-dimensional piece of art you can be proud of.
Why You Should Measure Handmade Molds
Here’s a pro tip that can save you a lot of frustration: always measure your mold before you cut your glass. Many of the best ceramic molds are handmade, which is part of their charm, but it also means their dimensions can vary slightly from one to the next. The measurements listed online are a great guide, but the specific mold sitting in your studio might be a fraction of an inch different. Taking a moment to measure it yourself ensures your glass will fit perfectly, preventing gaps or awkward overhangs. This simple step is crucial for getting a clean, professional result and avoids wasting a beautiful sheet of COE90 glass on a piece that doesn’t quite work.
Is It Compatible with Your Kiln and Glass?
This might seem obvious, but it’s a critical checkpoint. First, your mold must physically fit inside your kiln with enough clearance for proper air circulation. Second, the mold material must be able to handle slumping temperatures, which typically range from 1200 to 1300°F. Most slumping molds are made from ceramic or stainless steel, both of which are designed for high heat. It’s also wise to consider the type of glass you’re using. The mold’s shape can affect how the glass heats and cools, so pairing the right design with the right glass is key to a successful slump.
Checking for Product Incompatibility
Before you finalize your purchase, a quick compatibility check can save you from a frustrating firing. First, measure the inside of your kiln and compare it to the mold’s exterior dimensions. Don’t just make sure it fits—you need at least an inch or two of clearance on all sides for proper air circulation and even heating. Next, verify the mold is made from a material that can handle slumping temperatures, which are usually between 1200 and 1300°F. Finally, consider the glass you plan to use, whether it’s COE90 or COE96. While the mold itself doesn’t have a COE, its design influences how the glass behaves. A deep, complex mold might require a different firing schedule or glass thickness than a simple, shallow one to prevent cracks or bubbles.
How Easy Is It to Prep and Clean?
A great mold shouldn’t create extra work for you. Look for molds with smooth surfaces that are easy to prepare. Before every firing, you’ll need to apply a separator like kiln wash to prevent the glass from sticking. A smooth, simple shape makes this process quick and ensures an even coat for a clean release. Proper maintenance and a slow, controlled annealing schedule will also help you get the best finish from your glass and prevent stress cracks. A mold that’s easy to prep and care for will make your slumping process much more enjoyable.
How to Use Your Slumping Mold for Great Results
Once you’ve chosen the perfect slumping mold, the real fun begins. Turning a flat piece of glass into a beautiful, three-dimensional object is a magical process, but it requires a bit of technique. Think of it as a partnership between you, your glass, and your kiln. Getting a great result isn’t about luck; it’s about setting yourself up for success with careful preparation and a solid plan.
From prepping your mold to programming your kiln, every step plays a vital role in the final outcome. A little attention to detail goes a long way in preventing cracks, sticking, or an uneven slump. We’ll walk through the essential steps to get a clean, professional finish every time. By understanding the fundamentals of how the glass will behave and what your mold needs, you can avoid common frustrations and create stunning slumped pieces you’ll be proud of. Let’s get your next project ready for the kiln.
Prep Your Mold Like a Pro
Before you even think about placing glass on your mold, you need to prepare its surface. This is the single most important step to prevent your beautiful glass piece from permanently fusing to the mold during firing. The solution is a separator, most commonly kiln wash. Think of it as a release agent that creates a micro-thin barrier. For the best results, apply several thin, even coats of kiln wash to your mold, allowing each layer to dry completely before applying the next. A smooth, consistent coating is key to a smooth, flawless finish on your glass. Don’t rush this part—a properly prepped mold can be used over and over again.
Nailing Your Firing Schedule
Your firing schedule is the recipe that tells your kiln exactly how to heat and cool your glass. A successful slump depends on a slow, controlled process. You’ll need to program a schedule that gently heats the glass to its slumping temperature, allows it to soften and take the shape of the mold, and then cools it down very slowly. This final cooling stage, known as annealing, is critical. A slow, controlled annealing schedule helps prevent thermal shock and stress cracks, ensuring your finished piece is strong and stable. While there are many sample schedules available online, it’s a great idea to keep a log of what works for your specific kiln and projects.
Common Mistakes (and How to Avoid Them)
Every glass artist has a few “learning experiences” under their belt. One common issue is using incompatible glass. Always make sure your glass pieces have the same Coefficient of Expansion (COE), whether you’re working with COE90 or COE96 glass. Mixing them will cause stress and cracking as the piece cools. Another frequent problem is the glass slumping over the sides of the mold and getting stuck. This can happen if your glass is too large or your firing temperature is too high. To avoid this, carefully measure your glass and follow a tested firing schedule. Finally, always make sure your glass is perfectly clean before firing—fingerprints and dust can leave permanent marks.
How to Prep Your Glass for Slumping
The way you prepare your glass is just as important as how you prepare your mold. Start by cutting your glass to the correct size. A good rule of thumb is to cut your glass blank just slightly larger than the top of your mold. This ensures it has enough room to slump fully into the shape without the edges folding over the outside, which can cause it to get stuck. After cutting, make sure to clean your stained glass thoroughly with a quality glass cleaner to remove any oils or residue. Finally, consider smoothing the edges of your glass blank. Sharp edges can create stress points during firing, so a quick pass with a grinder can help ensure a smooth, even slump.
Advanced Techniques and DIY Options
Once you’re comfortable with the basics of slumping, you might feel the pull to create something truly unique—a shape that doesn’t exist in any catalog. This is where advanced techniques and even making your own molds come into play. Creating custom forms opens up a new level of artistic freedom, allowing you to translate a specific vision into a three-dimensional glass piece. While it requires more effort and different materials than using a pre-made mold, the results can be incredibly rewarding. From casting intricate designs to shaping glass without a traditional kiln, exploring these methods can add a new dimension to your work.
Making Your Own Molds at Home
For the truly adventurous artist, making your own molds is the ultimate way to customize your work. Instead of relying on commercially available shapes, you can create forms that are entirely your own. This process involves using materials like plaster and silica mixtures to build a mold around a master form you’ve sculpted. It’s a hands-on approach that gives you complete control over the final shape of your glass. While it takes practice to perfect, learning to make your own molds is a skill that can set your art apart and allow for endless creativity.
Lost Wax Casting
Lost wax casting is a classic technique used to create detailed, solid glass objects. The process starts with creating a model out of wax. This wax model is then encased in a special mold material. When you fire it in the kiln, the wax melts and burns away, leaving a perfectly hollow cavity in its place. You can then fill this cavity with glass frit or billets, which will melt and take on the intricate shape of your original wax sculpture. It’s an ideal method for creating detailed figures or complex patterns.
Open-Faced Molds with Plaster and Silica
If you want to create your own shallow forms like plates, bowls, or textured tiles, an open-faced mold is a great option. You can make these yourself using a mixture of plaster and silica. You simply create your desired shape or texture, and the glass is placed on top or inside. As the glass heats in the kiln, it softens and slumps into the contours of your custom mold. This technique is fantastic for creating unique surface textures that you can’t find in commercial molds.
Sand Casting
Sand casting is a more rustic and immediate method, often used for larger, more sculptural pieces. It involves pressing a form into a bed of special casting sand to create a negative space. Hot, molten glass is then poured directly into this sand impression. The texture of the sand imparts a unique, slightly rough finish to the glass surface. This technique is less about precision and more about creating organic, free-form shapes, making it a great choice for abstract or large-scale art.
Melting Glass Without a Kiln
While a kiln provides the most controlled environment for slumping and fusing, it is possible to melt glass without one for certain small-scale applications. Techniques like torchworking (lampworking) use a high-temperature torch to melt and shape glass rods into beads, small sculptures, or other detailed components. For larger projects, some artists build backyard furnaces. However, these methods require specialized safety equipment and don’t offer the precise temperature control needed for annealing, which is critical for creating durable, stress-free slumped pieces. For slumping bowls and platters, a kiln remains the essential tool.
A Look at Commercial Custom Molds
For artists and businesses looking to produce a unique product line or a large volume of a specific design, creating a commercial custom mold is the next step. This process moves beyond the DIY methods of the home studio and into the world of professional manufacturing. It’s the perfect solution when you have a signature design that you want to replicate perfectly every time, ensuring consistency and quality across your entire collection. While it represents a significant investment, a custom commercial mold can be the key to scaling your glass art business and creating a truly exclusive product.
The Professional Mold-Making Process
When you’re ready to turn your signature design into a repeatable product, you’ll work with a professional mold manufacturer. The process typically starts with your concept, which can be a detailed drawing or a physical prototype. The manufacturer then uses this to create a master mold, often with the help of computer-aided design (CAD) for precision. This master is then used to produce your final, durable molds. Companies that specialize in this service can help you materialize your wildest ideas, turning a unique concept into a tangible tool for production.
Costs and Minimum Orders for Businesses
Creating a professional custom mold is a serious investment geared toward businesses, not casual hobbyists. The cost for the mold itself can range anywhere from $15,000 to $75,000, depending on the complexity of your design and the manufacturer you work with. This price reflects the precision engineering, durable materials, and expert craftsmanship required. In addition to the upfront cost of the mold, manufacturers often have minimum order requirements for the glass pieces produced from it. This option is best suited for established artists or brands with a clear plan for producing and selling a specific design at scale.
Related Articles
- Glass Slumping 101: A Complete Beginner’s Guide
- Glass Casting 101: A Complete Beginner’s Guide
- Mastering the Art of Casting Molds Guide
- How to Make Slumped Bottles: A Simple DIY Guide
Frequently Asked Questions
Do I really need to apply kiln wash before every single firing? Yes, this is a step you never want to skip. Think of kiln wash as your insurance policy. It creates that essential barrier that prevents your glass from permanently sticking to your mold. While a perfectly applied, thick coat might survive a couple of firings, it’s best practice to inspect the surface before each use. If you see any flakes, thin spots, or glass residue, you should reapply a fresh coat to guarantee a clean release and protect both your project and your mold.
What’s the difference between slumping and draping? While the terms are often used together, they describe two slightly different ways of shaping glass with gravity. Slumping is when you place glass inside a concave mold, and it softens and sinks into the form, like making a bowl or a plate. Draping is the opposite; you place glass over a convex mold, and it melts down and around the form, like shaping a piece over a wave or a dome. Both techniques use the same type of heat-resistant molds to create three-dimensional shapes.
Why did my glass piece crack during cooling? Cracking is almost always caused by stress in the glass, and there are a few common culprits. The most frequent reason is an improper annealing schedule, meaning the glass was cooled too quickly, which doesn’t allow the internal stresses to release evenly. Another major cause is mixing glass with different Coefficients of Expansion (COE). If you combine COE90 and COE96 glass in one project, they will shrink at different rates and the piece will crack apart.
How many times can I reuse a ceramic mold? With proper care, a high-quality ceramic mold can be a long-lasting tool in your studio, often good for dozens of firings. Its lifespan really depends on how you treat it. This means always applying a good coat of kiln wash, handling it carefully to avoid chips, and heating and cooling it slowly to prevent thermal shock. A well-maintained mold will be a reliable partner for many projects to come.
Can I use the same mold for both COE90 and COE96 glass? Absolutely. The mold itself doesn’t care what type of glass you’re using. Its job is simply to provide the shape. The critical rule is that all the glass within a single project must have the same COE. You can slump a COE90 project in a mold one day and a COE96 project in the exact same mold the next day without any issues, as long as you never mix the two types of glass together in one piece.