
That collection of empty glass jars and wine bottles under your sink has potential. Instead of tossing them in the recycling bin, you can transform them into beautiful, functional art. Glass painting is an incredibly rewarding and accessible craft that lets you turn everyday objects into custom decor, from chic vases to colorful storage containers. It’s a fantastic way to practice upcycling while adding a personal touch to your home. This guide is packed with creative glass painting ideas and the essential techniques you’ll need to get started, showing you how to properly prep your surface, choose the right paints, and create a lasting finish.

Choosing the Right Paint
The first step in any glass painting project is selecting the right paint for the job. Your choice will depend on what you’re making and how it will be used. For a durable, long-lasting finish, specialized glass paints or enamels are your best bet. These are formulated to bond permanently with the glass surface, especially after being properly cured. However, if you’re working on a purely decorative piece that won’t be handled often, you can also get great results with standard acrylic paints. The key is to match the paint’s properties—like its permanence and finish—to the purpose of your final art piece.
Enamel vs. Acrylic Paint
When deciding between enamel and acrylic paint, think about durability. Enamel paint is the go-to for projects that need to be permanent and scratch-resistant, like wine glasses or serving dishes that will be used and washed. Once cured, often by baking in an oven, it creates a hard, resilient surface. On the other hand, standard acrylic paint is a great option for decorative items that won’t be touched frequently, as it can scratch off more easily. While you can add a sealant over acrylics for extra protection, enamel paint provides a more integrated and robust finish for functional glassware.
Essential Tools and Brushes
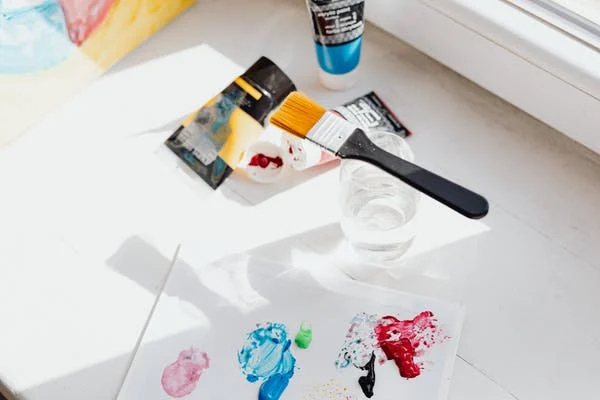
Once you have your paint, it’s time to gather the rest of your supplies. You don’t need a lot to get started, but having the right tools makes the process much smoother. First, you’ll need the glass object you plan to paint and rubbing alcohol to clean its surface thoroughly. For applying the paint, a set of soft-bristled brushes in various sizes—like a flat brush for broad strokes, a round one for details, and a liner for fine lines—is essential. You’ll also want a palette for mixing colors, paper towels for quick clean-ups, and some newspaper or a drop cloth to protect your work area.
Creating Textures and Patterns
Painting on glass isn’t just about color; it’s also about texture and design. You can move beyond simple brush strokes by using different tools to create unique effects. For a smooth, even coat without any brush marks, try applying your final layer of paint with a sponge. This technique is also great for creating a soft, stippled look. For intricate patterns, you can use painter’s tape to create crisp, clean lines or stencils for repeating shapes. Don’t be afraid to experiment with everyday items, too—a cotton swab is perfect for making uniform dots, which is a simple way to add fun designs to your project.
How to Prepare Your Glass for Painting
A great glass painting project starts long before you dip your brush in the paint. Proper preparation is the secret to getting a smooth, professional finish and ensuring your design lasts. Skipping this can lead to paint that peels, chips, or just doesn’t stick right. Taking a few extra minutes to prep your surface correctly will save you a lot of frustration and make the entire painting process more enjoyable. Think of it as creating the perfect blank canvas for your masterpiece.
Cleaning the Surface
First things first, you need to get your glass squeaky clean. Any dust, dirt, or oils from your fingerprints can prevent the paint from adhering properly. The easiest way is to wash your item thoroughly with warm, soapy water and let it dry completely. For a quicker method, a wipe-down with rubbing alcohol on a lint-free cloth also works wonders to remove residue. This step is crucial whether you’re working on a recycled jar or a beautiful sheet of art glass. A pristine surface ensures your paint goes on smoothly and stays put.
Applying a Primer for Better Adhesion
Glass is a super smooth, non-porous surface, which can make it tricky for some paints to grab onto. To give your paint a helping hand, consider using a primer. You don’t need a thick coat; a light misting of a spray primer designed for glass or even a matte white spray paint will do the trick. The goal isn’t to cover the glass completely but to create a fine, textured layer for the paint to bond with. This simple step dramatically improves the durability of your finished piece, making it more resistant to scratches and chipping over time.
Keeping it Clean While You Work
After all that careful cleaning, the last thing you want is to add new fingerprints to your canvas. The natural oils on your skin can easily transfer to the glass and interfere with paint adhesion, creating smudges or uneven spots in your final design. A simple trick is to hold the glass with a paper towel or wear thin cotton gloves while you paint. This creates a barrier between your hands and the surface, ensuring your glass stays perfectly clean from the first brushstroke to the last. It’s a small habit that makes a big difference in the quality of your work.
5 Fun DIY Glass Painting Ideas to Try
- Glass Windows – Why need an interior decorator when you can do it yourself? Paint beautiful motifs or designs on your house’s glass windows. It brings a change to the monotonous windows. It is recommended to use temporary art glass paints so you can remove or change the art anytime you want.
- Glass Boxes or Jars – Elevate your transparent storage boxes and jars with unique paint designs. You can even color code or write product names on the outer of the jar with glass paint. This brings a quirky touch to your kitchen accessories and storage.
- Art Glass Showpieces – Did someone gift you a boring showpiece? Well, you can change the look or add some colors to make it more beautiful. You can even modify old showpieces to make them look different and new. Glass painting frames are one of the most DIYed wall pieces.
- Art Glass Jewelry – Painting your old glass or mirror jewelry can be the best holiday activity for you. Make the best out of waste jewelry from the ones you abandoned using the latest art glass supplies available out there.
- Wine Bottles and Glasses – Wine bottles are found in every household. Next time when you are throwing the bottles away, Stop! Go and buy some good-quality glass paints and brushes. You can paint these bottles and place some led lights inside them.
You can even paint wine glasses and make them look aesthetically pleasing. Give these plain transparent glasses a retro look by painting them.
The Benefits of Painting on Glass
Painting on glass is more than just a fun way to spend an afternoon; it’s an activity with real benefits for creators of all ages. Whether you’re looking for a creative outlet for your kids or a relaxing new hobby for yourself, the unique process of applying paint to a transparent surface offers a rewarding experience. It’s a simple craft that doesn’t require a lot of specialized equipment to start, but it provides a wonderful sense of accomplishment when you see your colorful design come to life. From developing important skills in children to offering a mindful escape for adults, glass painting is a versatile art form with something for everyone.
For Kids: Developing Skills
Glass painting is a fantastic way to get kids engaged in a creative project that feels a little more special than just drawing on paper. The activity helps young children develop crucial fine motor skills and hand-eye coordination as they learn to control their brush on a smooth surface. It’s a wonderful outlet for their imagination, encouraging them to think about color and light in a new way. When they finish painting a suncatcher or decorating a simple glass jar, they feel a huge sense of pride. Seeing their own artwork displayed in a window, with sunlight streaming through their design, is a truly magical experience that builds confidence and a love for creating.
For Adults: A Mindful Hobby
For adults, painting on glass can be an incredibly therapeutic and mindful activity. The focus it requires helps quiet the mind, making it a perfect way to de-stress after a busy day. This creative process can improve focus and offers a fulfilling way to express yourself without pressure. You can make it a relaxing solo activity or turn it into a fun night with friends, complete with some snacks and your favorite drinks. As you get more comfortable, you might even explore how painted pieces can be incorporated into larger projects using different types of COE90 glass. It’s a hobby that allows you to create beautiful, functional art for your home while giving your mind a much-needed break.
What Supplies Do You Need for Glass Painting?
- Glass Paint – First, decide on which glass paint you need for your project. Most of the glass paints have an acrylic base. Each type of paint solves a different purpose in your project. You can purchase any of the following glass paints;
- Acrylic Enamel Paint
- Acrylic Glass Paint
- Solvent-Based Paint
- Markers and Pens
- Brushes – The kind of tool you use in an arts project is more important than the paint you use. Even if the glass paints are of good quality, poor tools can spoil your game. Soft-bristle, foam and flexible brushes are a great choice for glass painting.
- Sponges – Sponges are commonly used in painting projects. It gives depth and texture to the otherwise plain canvas.
1. Faux Finishes: Mercury Glass and Sea Glass
If you love the look of vintage decor, you can easily recreate it on plain glass. To get the elegant, reflective appearance of mercury glass, all you need is a special type of spray paint designed to create that antique, mottled silver effect. It’s a fantastic way to turn a simple vase or candle holder into a statement piece. For a more coastal, beachy vibe, you can use sea glass paint, which is also typically a spray paint. This will give any clear bottle or jar that beautiful frosted, tumbled look as if it’s been worn smooth by the ocean waves. Both techniques are incredibly simple and offer a high-impact transformation for thrift store finds or plain glassware you already have at home.
2. Illuminated Bottles with Alcohol Inks
For a truly stunning pop of color, alcohol inks are a wonderful choice. Their transparent nature allows light to shine through, creating a vibrant, stained-glass effect. You can apply different colors to a clear glass bottle, letting them blend and swirl together to form unique, organic patterns. The real magic happens when you’re done painting. Once the ink is dry, try feeding a string of battery-powered twinkle lights or fairy lights inside the bottle. When you turn them on, the bottle will glow from within, illuminating the colors and turning your painted creation into a beautiful, eye-catching lamp or piece of decor that adds a warm ambiance to any room.
3. Hydrodipped Swirls and Patterns
Ready for a little bit of creative chaos? Hydrodipping is a super fun painting method that produces mesmerizing, one-of-a-kind results every single time. The process involves spraying paint onto the surface of water in a container and then dipping your glass object into it. As you pull the item out, the paint adheres to the surface, creating incredible swirly, marbled, and almost tie-dye-like patterns. You can experiment with different color combinations to match your decor or create a bold, artistic piece. It’s an unpredictable and exciting way to decorate vases, jars, or any other glass item with a smooth surface, ensuring that no two pieces will ever be exactly alike.
4. Themed Designs: Florals, Fruits, and More
Sometimes, the best project is one that lets you add a personal, hand-painted touch. Painting themed designs is a perfect way to customize glassware for yourself or as a thoughtful gift. You can paint delicate floral bouquets on wine glasses for a spring brunch, or cover a set of drinking glasses with zesty citrus fruits like lemons and oranges for a fun summer vibe. If you’re drawn to nature, an ocean scene with sea turtles and floating bubbles can turn a simple glass jar into a miniature aquarium. This approach allows for endless creativity, whether you’re an experienced artist or just starting out with a simple pattern.
5. Two-Tone Jars and Vases
For a look that is both simple and incredibly chic, try the two-tone painting technique. This method adds a surprising amount of depth and sophistication to any glass jar or vase. The trick is to paint both the inside and the outside of the glass using two different colors. For example, you could paint the inside a bright, metallic gold and the outside a soft matte white. The color on the inside peeks through, creating a beautiful, layered effect that looks far more complex than it actually is. It’s a simple way to give an ordinary glass container a high-end, custom feel with just a couple of coats of paint.
Glass Painting Techniques for a Flawless Finish
Once you have an idea in mind, the next step is making sure it comes to life just as you imagined. The right technique can make all the difference between a project that looks homemade and one that looks truly professional. A little bit of prep work and patience during the painting process will ensure your design is smooth, clean, and durable enough to last. These simple but effective tips will help you get a flawless finish on your glass painting projects, setting you up for success before you even dip your brush in the paint. Following these guidelines will help your artwork look its best and stand the test of time.
Applying Paint in Thin Layers
It can be tempting to apply a thick coat of paint to get quick, opaque coverage, but patience is key for a lasting finish. The best practice is to apply your paint in several thin, even layers, allowing each one to dry completely before adding the next. A thick coat of paint is much more likely to peel, lift, or chip off the smooth glass surface over time. Thin layers, on the other hand, adhere much better to the glass and build up to a stronger, more durable finish. This method requires a bit more time, but the professional-looking and long-lasting result is well worth the extra effort.
How to Transfer a Design onto Glass
If you’re not confident in your freehand drawing skills, don’t worry—there’s an easy way to get your design onto the glass perfectly. Simply find or create the design you want on your computer, print it out, and tape it to the inside of your glass object. You can then see the design through the glass and use it as a perfect template to trace over with your paint. For painting on a curved surface like a wine glass, here’s a pro tip: cut small, vertical slits or notches around the edges of the paper. This will allow the paper to lay flat against the curve without buckling, giving you a clean and accurate guide to follow.
How to Make Your Painted Glass Permanent
After you’ve finished painting your beautiful design, the final step is to make sure it stays put. Glass is a non-porous surface, so paint can easily scratch or wash off if it isn’t properly set. Fortunately, there are a couple of simple methods you can use to cure the paint, making your creation permanent and much more durable. Depending on the type of paint you’ve used, you can either cure it with heat in your oven or protect it with a top-coat sealant. Both methods work well to protect your artwork so you can enjoy it for years to come.
Curing Paint in the Oven
Many acrylic enamel paints are designed to be cured with heat, which permanently bonds them to the glass surface. It’s crucial to follow the instructions carefully to prevent the glass from cracking due to sudden temperature changes. Place your painted glass item in a *cold* oven—do not preheat it. Then, set the oven to the temperature recommended on your paint bottle, typically around 275°F. Once the oven has reached the correct temperature, let the glass bake for the specified time, usually about 20 minutes. Afterward, turn the oven off and let the glass cool down completely inside the oven before taking it out. This gradual heating and cooling process is the key to a durable, crack-free finish.
Using a Sealant for Protection
An alternative to heat curing, or an additional step for extra protection, is to apply a sealant. This is a great option for paints that aren’t bake-able or for glass pieces you’d rather not put in the oven. After your paint has completely dried and cured according to its instructions (which can sometimes take several days), you can apply a clear, non-yellowing sealant. A spray-on polyacrylic sealer is an excellent choice, as it provides a durable, even coating without brush strokes. This final layer will protect your painted design from scratches, moisture, and general wear and tear, keeping your artwork looking fresh and vibrant.
A Quick Note on Food Safety
When you’re painting items that might be used for eating or drinking, like wine glasses, mugs, or plates, it’s extremely important to think about food safety. The vast majority of craft paints are not food-safe and should never come into direct contact with your mouth or any food you’re eating. To be safe, always leave a clear margin at the top of any drinking glass—about an inch from the rim—where no paint is applied. Similarly, if you’re painting a plate, only decorate the underside or the outer rim, ensuring the central surface where food will sit remains unpainted. Always check the paint label for any food-safety information, but the best rule of thumb is to keep the paint purely decorative and away from any surface that touches food or drink.
Where to Find the Best Art Glass Supplies
Frequently Asked Questions
What’s the best type of paint to use if I’m a complete beginner? If you’re just starting out, I recommend using acrylic paints that are specifically made for glass. They are water-based, which makes cleanup much easier, and they often come with simple instructions for curing the paint in your home oven. This process makes your design permanent without requiring any extra products, so it’s a great, straightforward way to get a durable finish on your first project.
Can I wash my painted glasses in the dishwasher? Even when you properly cure or seal your painted glassware, it’s always best to hand-wash it gently. The high heat and harsh detergents in a dishwasher can be tough on your artwork over time, potentially causing it to fade or chip. A quick wash by hand is the safest way to make sure your beautiful design lasts as long as possible.
What’s the easiest way to fix a mistake while I’m painting? Mistakes happen to everyone! If the paint is still wet, you can easily wipe it away with a cotton swab dipped in a little rubbing alcohol. If the paint has already dried, you can carefully scrape it off with the tip of a craft knife or a razor blade. Just be gentle so you don’t scratch the glass underneath.
Do I really need to use a primer on the glass before I start? While you don’t always have to use a primer, it’s a great idea if you want your design to be extra durable, especially on items that will be handled often. Glass is very smooth, and a light coat of primer creates a slightly textured surface for the paint to grip onto. This simple step can make a big difference in preventing your artwork from scratching or peeling later on.
How can I avoid getting visible brush strokes in my final design? For a super smooth, professional look, the key is to apply your paint in several thin layers instead of one thick one. Let each layer dry before adding the next. Using a high-quality, soft-bristled brush also helps minimize streaks. For a completely texture-free finish on larger areas, you can even try dabbing the paint on with a small sponge.
Key Takeaways
- Start with a perfectly clean surface: Before painting, wash your glass with soap and water or wipe it with rubbing alcohol to remove any oils, which helps the paint adhere for a smooth, durable finish.
- Match your paint to the project’s purpose: Select durable, heat-cured enamel paints for functional items that will be washed, and use standard acrylics for decorative pieces that won’t be handled often.
- Cure or seal your work to make it last: Protect your finished design from scratches by either baking the piece in an oven as directed by the paint manufacturer or by applying a clear spray sealant for a protective top coat.
Related Articles
- Floral Illustration Pattern – ArtGlassSupplies.com – COE90 & 96 Freestyle
- Unique Bouquet Pattern – ArtGlassSupplies.com – COE90 & 96 Freestyle Etche
- Fanta Sea Pattern Glass – ArtGlassSupplies.com – COE90 & 96 Freestyle Etch
- Get Beautiful Etched Tree Silhouette Pattern | Thin COE96 Glass – COE96 Et
- ArtGlassSupplies.com Etched Flowering Vine Pattern on Thin Glass COE96 – C