
You’ve spent hours carefully cutting and grinding your glass, and your design is laid out perfectly. Now, it’s time for the step that brings it all to life: soldering glass. More than just an adhesive, your solder lines are a critical structural and aesthetic element of your final piece. Mastering the art of stained glass soldering is what transforms a collection of cut pieces into a durable, professional-looking work of art. This guide shows you exactly how to solder stained glass, from choosing the right solder for stained glass to the final polishing techniques that make your project shine.

If you have got your hands on some beautiful stained art glass supplies, then this is your read. In this blog, we will guide you through the top three ways of soldering stained glass. For a newbie, it is necessary to be careful during the whole process.
Three Ways to Solder Stained Glass
You can solder pieces of stained glass together and make a beautiful piece of it. Attaining a stained glass design for your personal space is not a tough ride. But, it definitely needs some expertise and care with the soldering equipment.
Essential Tools and Materials
Before you can create those smooth, perfect solder lines, you need to gather the right gear. Having the correct tools and materials on hand not only makes the process easier but also significantly impacts the quality of your finished piece. From the soldering iron itself to the type of solder and the flux that makes it all flow, each component plays a crucial role. Think of it like cooking—you can’t bake a great cake without the right ingredients. We’ll walk through exactly what you need to set yourself up for success and create strong, beautiful joints for your stained glass projects.
Choosing the Right Soldering Iron
Your soldering iron is the star of the show, so it’s worth investing in a good one. The key feature to look for is temperature control. An iron that gets too hot can melt the lead came or even crack your glass, while one that’s too cool will result in lumpy, uneven solder beads. Many artists recommend an iron with an internal temperature control, like the Hakko FX-601, because it allows you to set a consistent heat level. This consistency is what helps you achieve those smooth, professional-looking lines. A good starting point for stained glass is around 700°F (370°C), but having the ability to adjust it gives you the flexibility to work with different types of solder and foil.
Soldering Iron Specifications
When you’re shopping for an iron, pay attention to its wattage, which typically ranges from 60 to 100 watts for stained glass work. Higher wattage means the iron can heat up faster and maintain its temperature more effectively, especially when you’re working on long seams that draw heat away from the tip. Also, consider the tips that are compatible with the iron. Different tip shapes (like chisel or conical) can be used for different tasks, from tacking pieces together to running a final bead. A comfortable, heat-resistant grip is another small detail that makes a big difference during long soldering sessions.
Types of Solder for Stained Glass
Solder is the metal alloy that joins your copper-foiled glass pieces together. For stained glass, solder is typically a mix of tin and lead. The ratio of these two metals determines the solder’s melting point and how it behaves when molten. There are three main types you’ll encounter, and each has its own ideal use case. Choosing the right one depends on whether you’re aiming for a flat seam or a high, rounded bead. Don’t be afraid to experiment with different types to see which one you prefer for your artistic style.
60/40 Solder
This is the most common and versatile type of solder, containing 60% tin and 40% lead. It’s a fantastic choice for beginners because it has a relatively wide melting range, meaning it stays workable for a bit longer before solidifying. This gives you more time to create a smooth, rounded bead on your copper foil lines. Its ability to flow easily makes it great for general-purpose soldering, and it polishes up to a nice, bright silver finish. If you’re just starting out and aren’t sure what to get, 60/40 is a reliable and forgiving option for most projects.
50/50 Solder
As the name suggests, 50/50 solder is made of 50% tin and 50% lead. This composition gives it a higher melting point and causes it to set much faster than 60/40 solder. Because it solidifies so quickly, it’s not ideal for creating the high, rounded beads that are popular in copper foil work. Instead, its strength lies in creating flat seams, making it the preferred choice for assembling projects made with lead came. If you’re working on a traditional leaded panel, 50/50 solder will give you the strong, flat joints you need for a sturdy final piece.
63/37 Solder
This solder, with 63% tin and 37% lead, is known as a eutectic solder. This means it has a single melting and freezing point, transitioning from solid to liquid almost instantly. There’s very little “pasty” stage, which can be both a pro and a con. While it creates a very strong bond and a shiny finish, its rapid solidification can make it challenging for beginners to work with when trying to build up a bead. However, some experienced artists love it for decorative soldering or for tacking pieces together quickly and precisely due to its immediate setting time.
The Purpose of Flux
If you’ve ever tried to solder without flux, you know it’s a frustrating mess. Flux is a chemical cleaning agent that is absolutely essential for the soldering process. When you heat the copper foil, it begins to oxidize, which prevents the solder from sticking to it. You need to apply a special liquid called flux to help the solder flow smoothly and bond properly with the metal. It cleans the surface, removes oxides, and allows the molten solder to spread evenly across the foil, creating a strong, seamless connection between your glass pieces. Just remember to apply it only to the areas you’re about to solder, as it can be corrosive.
Essential Accessories
Beyond the iron and solder, a few key accessories will make your soldering experience safer, cleaner, and more efficient. These items might seem small, but they play a big part in protecting you and your workspace while helping you achieve a high-quality finish. Setting up your station with these tools from the start will help you build good habits and keep your focus on the creative process. Think of them as your trusty sidekicks in the stained glass journey.
Soldering Iron Stand and Tip Cleaner
A hot soldering iron can’t just be set down on your workbench. A soldering stand is a non-negotiable safety tool that holds your hot iron securely when you’re not using it. Most stands are made of metal and include a coiled holder that keeps the hot tip away from flammable surfaces. Equally important is a tip cleaner. A clean tip transfers heat more efficiently and allows the solder to flow smoothly. You can use either a wet sponge or, even better, a container of brass wool to clean the tip. The brass wool is often preferred because it doesn’t cause a sudden temperature drop like a wet sponge can.
Copper Foil and Burnishing Tools
Before you can even think about soldering, you need to wrap the edges of your glass pieces in copper foil. This adhesive-backed tape is what the solder will stick to. After applying the foil, you must press it down firmly against the glass using a burnishing tool, often called a fid. This step is critical because it removes any wrinkles or bubbles and ensures a tight seal. If the foil isn’t properly burnished, flux can seep underneath and weaken the adhesive, causing the foil to lift away from the glass during soldering and creating a weak joint.
Critical Safety Precautions
Working with hot tools and materials like lead requires your full attention and a healthy respect for safety. While soldering is a perfectly safe activity when done correctly, ignoring basic precautions can expose you to unnecessary risks, from burns to fume inhalation. Setting up a safe workspace and following a few simple rules will protect your health and allow you to enjoy the art of stained glass for years to come. These aren’t just suggestions; they are essential practices for every artist, whether you’re a beginner or a seasoned pro.
Work in a Well-Ventilated Area
When you heat solder and flux, they release fumes that you should not inhale. The smoke you see is primarily from the burning flux, but it can also contain vaporized lead particles. To protect your lungs, you should always work in a well-ventilated area. This could mean opening windows and using a fan to create cross-breeze, but the best option is to use a dedicated fume extractor. These devices have a carbon filter that pulls the smoke away from your face and traps harmful particles, ensuring the air in your workspace stays clean and safe to breathe.
Use Eye and Skin Protection
Molten solder can sometimes pop and splatter unexpectedly. To prevent a painful burn or serious eye injury, you must always wear safety glasses. Regular eyeglasses are not enough; you need proper, impact-rated eye protection that shields you from all angles. It’s also a good idea to wear closed-toe shoes and clothing made from natural fibers like cotton, as synthetic fabrics can melt if a drop of hot solder lands on them. Keeping a small first-aid kit nearby with burn cream is also a smart practice, just in case an accident happens.
Lead Safety Best Practices
Since most stained glass solder contains lead, it’s crucial to practice good hygiene to prevent lead ingestion. Lead cannot be absorbed through the skin, but it can be transferred from your hands to your mouth. Because of this, you should never eat, drink, or smoke in your work area. Most importantly, always wash your hands thoroughly with soap and water after you finish handling solder or cleaning your finished project. By following this simple rule, you can safely enjoy this beautiful craft without any health concerns.
1. The Classic: Using the Foil and Flux Method
- Set up your materials and switch on your soldering iron. Prepare your copper foil, liquid flux, and solder coil. Connect your soldering iron, place it on its stand, and heat it up.
- Attach your glass pieces by cutting a length of adhesive copper foil. The solder requires another metal on the surface to stick to the glass. The copper foil will stick around the edge of the stained glass.
- Line up the copper foil along the edge of the glass, leaving roughly 18 inches (3.2 mm) on either end. Then, cut the foil carefully.
- Take off the lining from the back of the adhesive foil strip. After you’ve cut the foil into pieces, gently scrape the lining away.
- Apply the copper foil’s adhesive side to the glass’s edge. Place the glass’s edge directly on the center of the copper foil. Then, gently press the foil around the glass’s edges. Wear heavy-duty gloves to prevent any cuts from sharp edges on your hands.
- Repeat until all of your glass pieces’ edges are covered with foil.
- Apply a coat of liquid flux to the entire surface of the copper foil. The flux aids in the permanent bonding of the metal in the solder and the foil.
2. For Clean Lines: The Glass Slit Method
- Choose a design. Determine what you want to create and how much glass and solder you’ll require. The amounts of both will vary depending on what you’re attempting to create.
- Place the glass on a hard surface above a towel. Brace the glass against something hard, but don’t use too much force or it will shatter.
- Mark the glass. Press your glass cutter down firmly and make a single slit from one side to the other, where you want the glass to break. Be cautious while slitting the glass as it can be dangerous.
- Break the glass along the line carefully. A quick snapping motion with one hand on each side of the line will separate the glass.
- Continue to score and break the glass until you have enough pieces to complete your project.
- Wipe the glass gently to remove any small fragments. Wet sponges or paper towels can be used for the same.
3. Get Creative with the Solder Coil Method
- Place your glass pieces in their design position. Allow a very small gap (about 116 inches (1.6 mm)) between the pieces so that the solder can flow into the seam.
- The glass can be assembled on any solid, heat-resistant surface, but metal tables are recommended. This will melt and form the connection between the two bits of glass.
- Unwind nearly 4 inches (100 mm) of solder from the coil. This will melt and fuse the two bits of glass together.
- Keep the soldering iron in your working hand and the soldering coil in the other hand.
- Place the unrolled solder tip above the copper foil. Maintain a solder height of at least 12 inches (13 mm) above the foil. Allow the melted solder to fall into the seam between the glass pieces.
- Connect the soldering iron tip to the unrolled solder tip. It will instantly start to melt the solder, which will fall into the seam.
- Maintain the same position with your hands: one holding the solder and the other holding the soldering iron up to it. While the solder spills down onto the glass, work your way along the seams.
- When you come to the end of the seam, remove the soldering iron tip. A continuous line of solder should be visible along the intersection of the two sheets of glass. The glass is now permanently and strongly bonded together.
 Concluding…
So, those were some easy methods of soldering stained glass. Hope you find them easy too. During the entire process (irrespective of method), wear heavy-duty gloves to protect your hands from cuts and scratches. Make sure you do not hold the solder where it is extremely hot.
It is very important to use high-quality and safe glass art tools during the soldering process to prevent injuries. For any guidance on the right tools and equipment contact our team.
Foiling and Burnishing
Before you can solder, you need to give the solder something to stick to. That’s where copper foil comes in. Solder won’t adhere directly to glass, but it bonds perfectly with the copper foil wrapped around the edges of your glass pieces. Carefully cut a length of adhesive foil and center the edge of your glass on it. Gently fold the foil over both sides, making sure it’s smooth and even all the way around. Once the foil is in place, grab a burnishing tool, or even a sturdy plastic pen, and press down firmly on all surfaces of the foil. This step, called burnishing, ensures a tight seal and prevents any solder from seeping underneath.
Securing Your Project
With all your pieces foiled and burnished, it’s time to assemble your design. Lay your glass pieces out on a heat-resistant work surface, fitting them together like a puzzle. To keep everything from shifting while you work, you can use push pins or small finishing nails to frame the project, holding it securely in place. This is especially helpful for larger panels. For smaller suncatchers, simply ensuring the pieces are tightly fitted together on a flat surface is often enough. Taking a moment to secure your project now will save you the headache of pieces sliding around once you start applying heat and solder.
Applying Flux
Flux is the magic ingredient that makes soldering possible. It’s a chemical cleaning agent that removes oxidation from the copper foil, allowing the solder to form a strong, permanent metallurgical bond. Without it, the solder would just ball up and refuse to flow smoothly along your seams. Using a small brush, apply a thin, even coat of liquid or paste flux to all the copper-foiled areas you plan to solder. You don’t need to drench it; a light coating is all it takes. Remember to only apply flux right before you’re ready to solder, as it can lose its effectiveness if left to sit for too long.
Step 2: Tack Solder Your Project
Now that your project is foiled, fluxed, and secured, the first soldering step is to “tack” everything in place. Tack soldering involves melting small dots of solder at key intersections where multiple glass pieces meet. This locks your design together so it won’t move or shift while you work on creating the final, smooth solder lines. Simply touch your hot soldering iron tip to your solder, pick up a small amount, and press it onto a fluxed joint for a second. The goal isn’t to create a perfect seam yet, but to create a few solid anchor points across your entire piece.
Step 3: Tin the Seams
After tacking your project, the next step is tinning. Tinning is the process of applying a thin, flat layer of solder over all the copper foil seams. This initial layer creates a foundational bond across the entire piece and makes it much easier to run a perfect bead later on. Apply a fresh coat of flux over your seams. Then, hold your soldering iron at a low angle and drag the tip along the foil, melting the solder so it flows and covers the copper completely. Work in sections, and don’t worry about making it look raised or rounded yet—the goal here is full, flat coverage on both the front and back of your project.
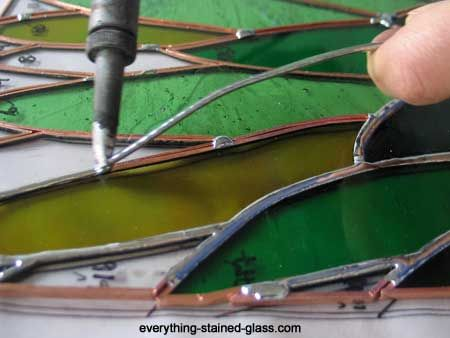
Step 4: Run a Solder Bead
Running a bead is where your stained glass piece really starts to look professional. A “bead” is the raised, rounded line of solder that sits on top of your tinned seam, giving it strength and a beautiful, finished appearance. After applying another light layer of flux, hold your soldering iron so the tip is almost parallel to the seam. Touch your solder to the tip of the iron and the seam simultaneously, and move steadily along the line. You want to move at a consistent speed—not too fast, not too slow—to create a uniform, convex bead. This takes practice, so don’t be discouraged if your first few attempts aren’t perfect.
Proper Iron Handling Technique
How you hold your soldering iron can make a huge difference in the quality of your solder beads. Instead of holding it like a pen, which can lead to flat or uneven lines, try a different grip. Hold the iron more upright, almost like you’re holding a bicycle handle, with the tip pointing down toward your project. This position uses gravity to your advantage, helping the molten solder flow off the tip and form a naturally rounded bead on your seam. It gives you more control and makes it easier to achieve that smooth, professional finish you’re looking for.
Step 5: Solder Both Sides and Finish the Edges
A structurally sound stained glass piece is soldered on both sides. Once you’ve finished running beads on the entire front of your project, let it cool down completely. Then, carefully flip it over. Just like you did on the front, apply flux to all the seams and run your solder beads. Once the back is done, pay attention to the outside edges. Applying a smooth bead of solder all the way around the perimeter of your piece not only looks clean and finished but also adds significant strength and stability, especially for panels that will be framed or hung.
Cleaning and Finishing Your Piece
Once the soldering is complete, the final steps are all about cleaning and polishing your work to make it truly shine. The flux you used is acidic and, if left on the solder lines, will cause them to corrode and turn dull or even green over time. Thoroughly cleaning your project is a non-negotiable step to ensure its longevity and beauty. After a good cleaning, you can apply a patina to change the color of the solder from silver to copper or black, if you wish. The final touch is a protective layer of wax, which brings out a brilliant shine and protects both the glass and the solder from the elements.
How to Clean Flux Off Your Project
It’s crucial to clean off all flux residue as soon as you’re done soldering. The best way to do this is with warm water, a good dish soap that cuts through grease, and a soft but firm brush, like a nail brush. Gently scrub all the solder lines on both sides of your piece, making sure to get into every corner and intersection. You’ll see the suds start to lift the sticky flux residue. Rinse the piece thoroughly with clean water and dry it completely with a soft cloth. If you notice any brown, crusty spots, it’s likely burnt-on flux that needs a little extra scrubbing to remove.
Polishing and Waxing for a Lasting Shine
To give your project a lasting, brilliant shine and protect it from oxidation, finish it with a good polish and wax. After your piece is completely clean and dry (and after applying patina, if you choose to), apply a small amount of stained glass finishing compound or a quality carnauba wax. Use a soft, clean cloth to rub the wax over the entire piece, covering both the glass and the solder lines. Let it dry to a haze for a few minutes, then take another clean cloth and buff it vigorously until it gleams. This final step makes a world of difference in the finished look.
Adding Hangers
If your piece is meant to be hung, you’ll need to attach hangers. The best time to do this is after you’ve finished soldering the seams but before you do your final cleaning and polishing. The most common method is to solder jump rings directly onto the outer edge or a strong seam of your piece. Make sure you apply enough solder to create a very strong joint, as this will be bearing the full weight of your artwork. For larger, heavier panels, it’s often better to incorporate a zinc frame into your design, which provides a much sturdier foundation for attaching hooks.
Troubleshooting Common Soldering Issues
Even experienced artists run into soldering problems now and then. You might find your solder lines are lumpy, you have gaps between your glass, or worse, you hear the dreaded *tink* of a heat crack. The good news is that most of these issues are fixable and, with a little practice, avoidable. Understanding why these problems happen is the first step to correcting them. Whether it’s adjusting your iron’s temperature, refining your technique, or simply having a bit more patience, you can overcome these common hurdles and create beautiful, clean solder lines on all your stained glass projects.
Filling Gaps Between Glass
Sometimes, despite your best efforts, you’ll end up with small gaps between your pieces of glass. When you try to solder over them, the solder might just flow right through to the other side. Don’t panic; this is a common issue. The trick is to build a bridge. Hold your iron at the gap and add small amounts of solder, letting each bit cool for a second before adding more. You are essentially building up layers from the bottom until the gap is filled. Once it’s filled, you can go back over it to create a smooth, even bead that matches the rest of your seam.
Fixing Messy Solder Lines
If you have a solder line that’s lumpy, bumpy, or just plain messy, it’s easy to fix. First, apply a bit of fresh flux to the problem area. Then, make sure the tip of your soldering iron is clean and freshly tinned. Place the flat side of the iron tip directly onto the messy spot, hold it there for two or three seconds to re-melt the solder, and then lift the iron straight up. This allows the molten solder to resettle into a smoother, more rounded bead. This technique, often called “reflowing,” can turn a frustrating mistake into a perfect seam with just a little heat and patience.
Avoiding Heat Cracks
A heat crack occurs when a piece of glass gets too hot too quickly, causing it to crack from thermal shock. This is most common with thin or small pieces of glass. To avoid this, keep your soldering iron moving at a steady pace and don’t linger in one spot for too long. If you need to rework an area, it’s best to let the entire project cool down completely before applying more heat. Rushing to fix a mistake on an already hot piece of glass is one of the surest ways to cause a crack. Patience is key to keeping your glass intact.
Frequently Asked Questions
My solder lines are bumpy and uneven. What am I doing wrong? This is the most common hurdle when you’re starting out, so don’t worry! Bumpy solder is usually caused by moving the iron too slowly or too quickly, or by not using enough flux. Try to move at a steady, consistent pace along the seam. If a spot is still messy, apply a little more flux, place the flat side of your hot iron tip on the bump for a couple of seconds to remelt it, and then lift the iron straight up. This lets the solder resettle into a smoother bead.
Do I really need a soldering iron with temperature control? While you can get by without one, a temperature-controlled iron makes a huge difference in achieving consistent results. It prevents the iron from getting too hot, which can cause heat cracks, or too cool, which leads to lumpy solder. If you’re using a basic iron without controls, you can manage the heat by unplugging it for a minute if you feel it’s getting excessively hot. Investing in an adjustable model is one of the best upgrades you can make for your craft.
What’s the real difference between 60/40 and 50/50 solder, and which one should I start with? Think of it this way: 60/40 solder (60% tin, 40% lead) stays in a liquid state a bit longer, which gives you more time to work with it and create a nice, high, rounded bead. This makes it the best choice for copper foil projects and is definitely what I recommend for beginners. 50/50 solder solidifies much faster, making it better for creating the flat, structural seams needed for lead came projects.
I sometimes hear a faint cracking sound when I solder. How can I stop breaking my glass? That dreaded sound is a heat crack, caused by thermal shock when the glass heats up too quickly. The best way to prevent this is to keep your iron moving and avoid lingering in one spot for too long, especially on smaller or thinner pieces of glass. If you need to go back and fix a section, give the entire piece a few minutes to cool down before applying more heat to that area.
Why is cleaning the flux off my finished piece so important? Flux is acidic, which is what allows it to clean the metal so the solder can bond to it. If you leave that acidic residue on your project, it will slowly corrode your solder lines over time, causing them to turn dull, white, or even green. A thorough wash with soap, warm water, and a soft brush neutralizes the acid and is the most critical step for ensuring your artwork stays beautiful for years to come.
Key Takeaways
- Master Your Tools for Flawless Solder Lines: A temperature-controlled iron is your best friend for preventing cracks and creating smooth beads. Start with versatile 60/40 solder for rounded lines, and remember that flux is essential for making the solder flow correctly.
- Build Solder Seams in Layers for a Professional Finish: Don’t try to create the perfect bead in one pass. First, tack your pieces in place, then apply a thin “tinning” layer over all the foil before going back to run your final, raised bead for a strong and polished look.
- Prioritize Safety and a Thorough Final Cleaning: Always work in a well-ventilated space and wash your hands after handling lead solder. Once you’re done, scrub your piece with soap and water to remove all corrosive flux residue, which is key to preventing a dull finish later on.
Related Articles
- Glasspro 60 40 Solder 1lb Spool – Foils Solder & Metal
- Slit Hole Scrap Master Casting Mold | Art Glass Supplies – Casting Molds
- Stell Sundial Pattern Glass – ArtGlassSupplies.com – COE90 & 96 Freestyle
- Youghiogheny Glass Silver Yellow Ice Amber Brown 3mm Non-Fusible – Youghio
- Youghiogheny Glass White Ice Lime Green Emerald Green 3mm Non-Fusible – Yo