
You pour your time and expensive materials into every glass project, so you deserve predictable, beautiful results. While many things can go wrong, a durable, well-made ceramic mold is one of the smartest investments for your studio. Think about it: a good glass mold can last for hundreds of firings with proper care, making it a true workhorse. Knowing what to look for when browsing the huge variety of ceramic molds for sale is the first step. This guide will help you choose pieces that will become staples in your creative process for years to come.
Key Takeaways
- Set every project up for success with proper mold prep: Before firing, always apply a quality release agent like kiln wash to your mold. This simple, non-negotiable step creates a barrier that prevents glass from sticking, ensuring a clean release and a smooth finish.
- Your mold, glass, and kiln must work as a team: For predictable results, confirm your mold fits inside your kiln with room for air to circulate. Stick to a single glass COE for each project and adjust your firing schedule based on the mold’s size and depth to get the perfect slump.
- Choose durable molds for long-term value: Investing in well-made ceramic molds from reputable brands pays off in the long run. High-quality molds withstand repeated firings, provide consistent results, and become reliable tools you can depend on for years of creating.
What Are Ceramic Slumping Molds?
If you’ve ever wanted to shape glass into a beautiful bowl, a delicate plate, or a unique piece of art, you’ll need a slumping mold. Think of ceramic slumping molds as the foundation for your three-dimensional glass projects. These specially designed ceramic forms are used in a kiln to give glass a specific shape. The process, known as slumping, involves placing a piece of glass on top of a mold and heating it in a kiln. As the temperature rises, the glass becomes soft and pliable, gently “slumping” down into or over the mold’s contours. Once cooled, the glass holds its new shape permanently.
This technique opens up a world of possibilities beyond flat fused panels. It allows you to transform simple sheets of stained glass or fused designs into functional and sculptural objects. The key is having a reliable mold that can withstand the intense heat of the kiln and release your glass piece cleanly. That’s where ceramic molds truly shine, offering durability and versatility for artists at every level.
How Does the Glass Slumping Process Work?
The magic of slumping happens inside your kiln, but the process starts with careful preparation. First, you’ll prepare your mold with a kiln wash or primer. This fine, powdery coating creates a barrier that prevents the molten glass from sticking to the ceramic surface, ensuring a smooth release after firing. Once your mold is ready, you’ll place your glass piece on it and load it into the kiln.
The material of the mold is incredibly important. It needs to handle slumping temperatures without cracking, melting, or causing any other issues that could ruin your project. The goal is a smooth, controlled slump where the glass perfectly adopts the mold’s shape. This is why choosing high-quality, durable molds designed specifically for glass work is a critical step for achieving beautiful, professional results.
Why Choose Ceramic for Your Molds?
Ceramic is the go-to material for slumping molds for several great reasons. First and foremost, ceramic molds are incredibly durable and can withstand the high temperatures inside a kiln over and over again. With proper care, a single ceramic mold will last for many firing cycles, making it a smart and practical investment for your studio. This longevity means you can create entire series of matching plates or bowls with consistent results every time.
To get the most out of your molds, you need to maintain the primer coat. As long as the kiln wash is free of chips and scratches, your COE90 glass won’t stick. A well-prepared ceramic mold provides a reliable surface that helps you produce flawless pieces, firing after firing.
Nailing Your Firing Schedule
A firing schedule is essentially a recipe of temperatures and times that guides your kiln through the slumping process. Getting this schedule right is crucial for a successful outcome. There isn’t a single, one-size-fits-all schedule because the ideal temperature and duration depend on several factors. You’ll need to consider the size and shape of your mold, how deep you want the slump to be, and the thickness of your glass.
For example, a shallow plate will require a different schedule than a deep bowl. Following a proper firing schedule helps you avoid common problems like over-firing, which can cause the glass to become too thin or pick up unwanted texture from the mold. Carefully planning your schedule ensures the glass slumps just enough to take the desired shape while retaining its integrity and beauty.
Exploring the Broader World of Molds
While our focus is on slumping molds for glass, the world of molds is vast and fascinating. Understanding how molds are used in other fields, from pottery to industrial manufacturing, can give you a deeper appreciation for the tools in your studio. Different materials and techniques are used depending on the final product, but the core principle remains the same: creating a form to shape another material. This knowledge can even inspire new ways to think about your own glass projects. Let’s look at a few examples from outside the glass world to see how versatile this tool really is.
Molds for Pottery and Ceramics
Pottery is a close cousin to glass art, and potters use a variety of molds to create consistent shapes and intricate details. These techniques allow for replication and precision that would be difficult to achieve by hand alone. For example, slip casting is a popular method for producing hollow forms like vases or mugs. In this process, liquid clay called slip is poured into a plaster mold. The plaster absorbs water from the slip, forming a solid clay wall against the mold’s interior. For adding fine details, potters use sprig molds to create “small, decorative relief elements” that can be applied to a piece, adding texture and dimension with perfect consistency.
Molds for Industrial Applications
Molds are also essential in industrial settings, where they are used to produce everything from car parts to consumer goods with incredible precision and durability. These industrial processes often involve high pressures and extreme temperatures, requiring molds made from robust materials like steel or advanced ceramics. For instance, RAM press molds press firm clay between two parts instead of using liquid slip, a method that is faster and creates denser parts for high-volume production. Perhaps the most impressive use is in metal casting, where “ceramic mold casting is a way to make metal parts.” This process relies on the same thermal resilience that makes ceramic perfect for our glass kilns, as it can withstand molten metal without losing its shape.
Common Materials Used for Molds
Molds are made from a surprisingly wide range of materials, including “ceramic, plastic, plaster, silicone, latex, concrete, rubber, glass, and aluminum.” The choice of material depends entirely on the application—what’s being cast and at what temperature. For flexible, detailed castings at room temperature, silicone is a popular choice. For high-heat applications like glass slumping or metal casting, however, ceramic is the clear winner due to its ability to withstand thermal shock without cracking or warping. This is why the durable ceramic molds we rely on are the standard for kiln work, providing reliable and repeatable results for artists.
The Mold Making Process Explained
Have you ever wondered how the molds you use are actually made? The process is a blend of artistry and engineering, designed to ensure every mold is consistent and releases your artwork cleanly. Understanding the basics of mold making can help you appreciate the design of your tools and even inform how you use them. Key principles like avoiding undercuts and using draft are fundamental to creating a mold that works perfectly every time. These concepts are all about making sure your finished piece can be removed from the mold easily and without damage.
From Master to Production: The Mold Hierarchy
To produce many identical molds, manufacturers start with an original, perfectly crafted design. From this, a “master mold is a plaster mold made from your original design” that is kept safe to create new production molds later. This master mold acts as the ultimate blueprint. Production molds are then created from this master, ensuring that every bowl or plate mold you buy has the exact same dimensions and details. This hierarchy is what allows for consistency and quality control, so you can trust that your results will be predictable from one firing to the next.
Key Design Principles for Mold Making
A successful mold isn’t just about the shape; it’s about how that shape is designed to function. Two of the most important design principles are avoiding undercuts and incorporating draft. “Undercuts” are parts of a design that would trap the glass, making it impossible to remove without breaking it or the mold. That’s why slumping molds have open, simple forms. “Draft” is a slight angle added to the vertical walls of a design that helps the piece come out of the mold easily. This subtle taper breaks the vacuum seal that can form, allowing your cooled glass piece to lift right out. These principles are the secret to a clean release and a flawless finish.
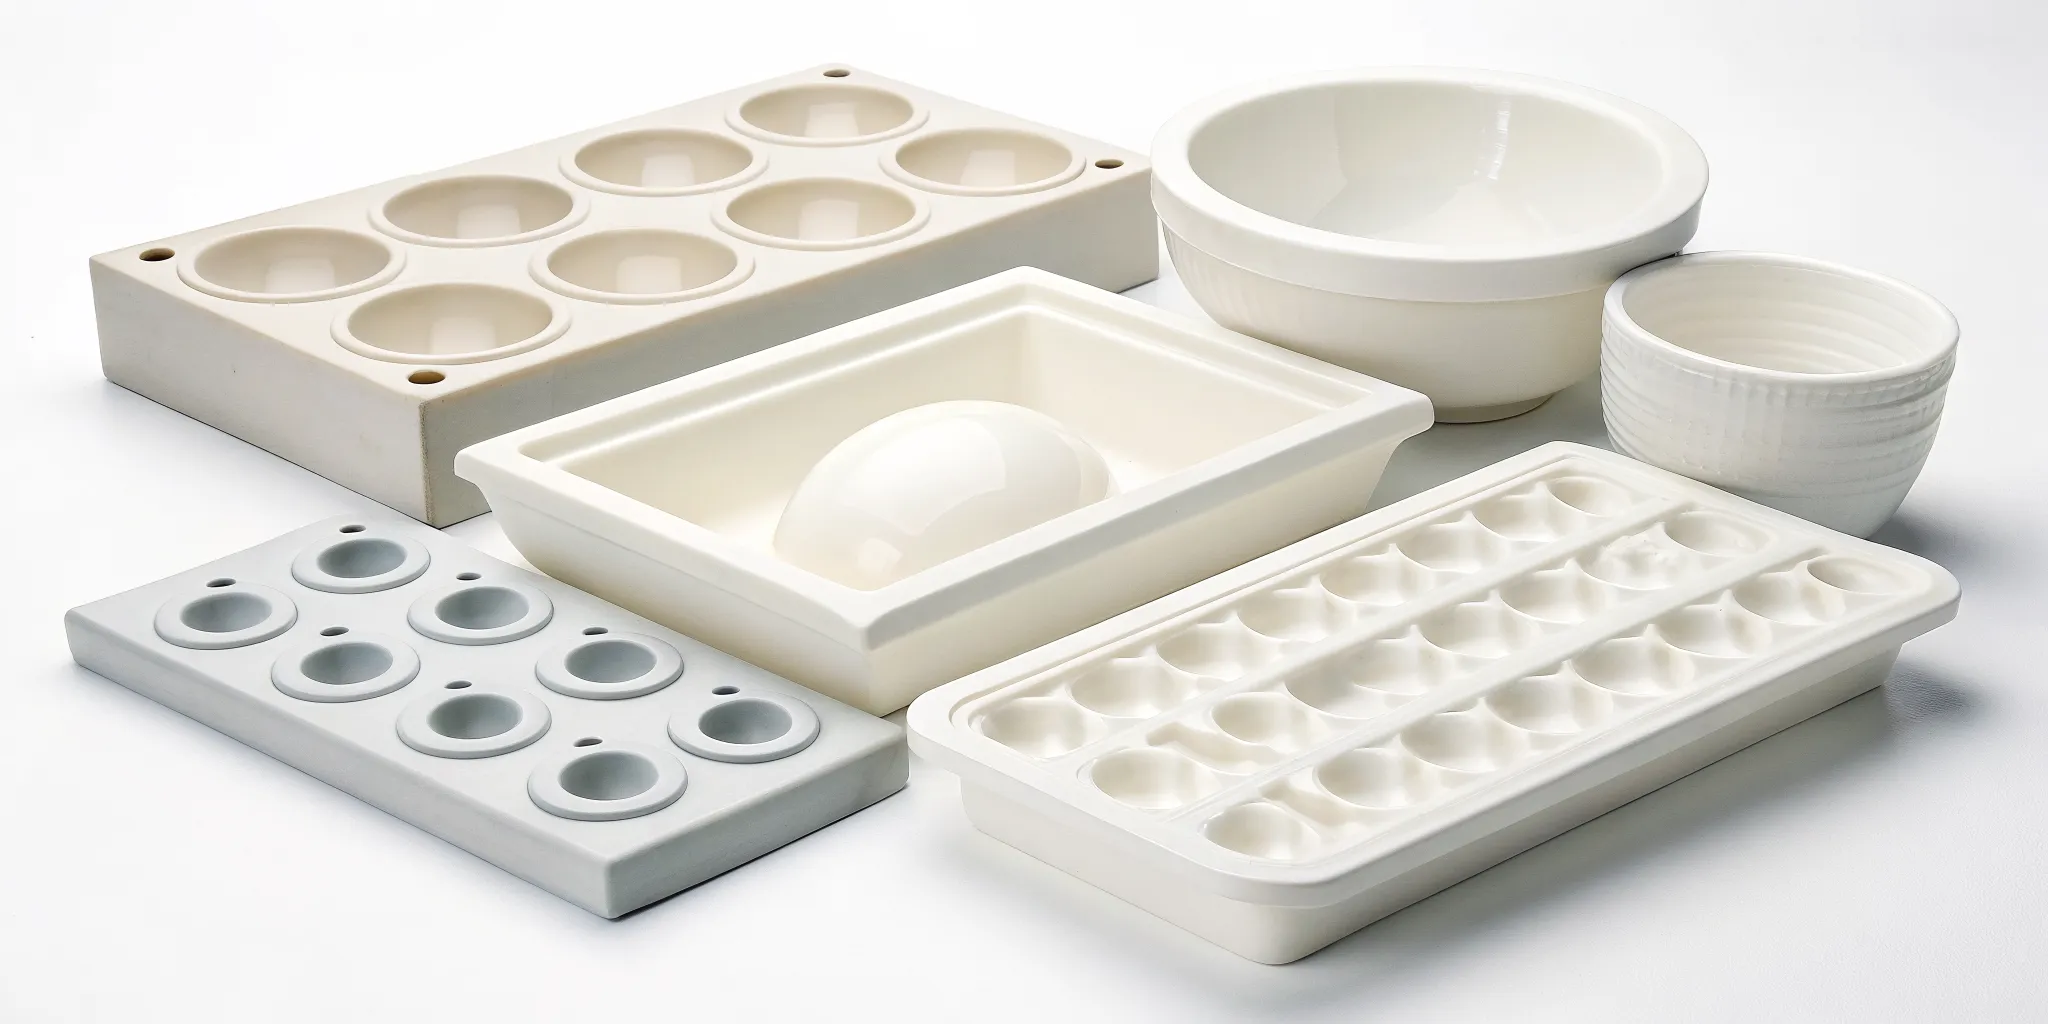
What Kind of Ceramic Mold Do You Need?
Once you get the hang of the slumping process, you’ll realize that the mold you choose is just as important as the glass itself. Ceramic molds come in an incredible variety of shapes and sizes, each designed to help you achieve a different creative vision. From functional dinnerware to intricate art pieces, there’s a mold for nearly any project you can imagine. The type of mold you select will directly influence the final form, texture, and even the complexity of your project. Some molds are simple drop-out rings for creating vases, while others have intricate patterns that emboss the glass surface as it slumps.
Understanding the different categories of molds available is the first step in matching your creative idea with the right tool. It helps you plan your project, select the right type of glass, and anticipate how it will behave in the kiln. For example, a deep bowl mold will require a different firing schedule and glass placement than a shallow, textured plate mold. Knowing what’s possible with each type of mold saves you time, materials, and potential frustration. Let’s look at some of the most common types you’ll find and what they can help you create.
For Bowls, Plates, and Dishes
This is often the first stop for many glass artists. Molds designed for bowls, plates, and platters are perfect for creating beautiful, functional pieces for your home or to sell. You can find them in classic shapes like circles, squares, and rectangles, as well as more organic, free-form designs. These molds are fantastic for learning how glass drapes and settles at slumping temperatures. By considering the material, size, and surface quality, you can find a mold that not only works for your current project but will also become a staple in your glass art toolkit for years to come.
For Artistic and Sculptural Forms
When you’re ready to move beyond functional pieces, molds for artistic shapes open up a whole new world of creativity. These molds are designed to create sculptural forms, wall art, suncatchers, and other decorative items. Think of wavy drape molds that create elegant, flowing shapes or abstract forms that serve as a canvas for your glass designs. The most important thing with these molds is their durability. A quality mold won’t crack, melt, or stick to your glass at high temperatures, ensuring your artistic vision comes to life without any technical hiccups. This reliability is key when working with intricate designs and expensive COE90 glass.
For Adding Unique Textures and Patterns
Some molds do more than just shape your glass; they also imprint it with beautiful textures and patterns. These are a fantastic way to add depth and a three-dimensional quality to your work. You can find molds with designs ranging from geometric grids and basketweaves to delicate floral patterns and natural textures like wood grain. These molds help you create unique glass art, adding textures that transform simple sheets of glass into stunning platters, plates, tiles, and even jewelry components. They are an excellent tool for artists who want to add a signature touch to their fused glass pieces.
For One-of-a-Kind Custom Pieces
For those projects that require a very specific shape, custom and specialty molds are the answer. This category includes everything from small molds for creating jewelry pendants and cabochons to larger, more complex forms for casting thick sculptural pieces. You might also find molds for specific items like candle holders, soap dishes, or business card holders. When you’re working with a new or particularly intricate mold, it’s a great idea to test it first. I always fire a clear piece of scrap glass in the mold before using it with expensive colored glass. This gives me valuable information about how the glass will behave in that specific shape inside my kiln.
Top Brands: Where to Find Ceramic Molds for Sale
When you’re investing your time, creativity, and beautiful sheets of glass into a new project, the quality of your tools can make all the difference. This is especially true for ceramic slumping molds, which are central to shaping your final piece. Choosing a mold from a trusted brand is one of the best ways to ensure consistent, beautiful results every time you fire up the kiln. While it might be tempting to grab the cheapest option, a well-made mold from a reputable manufacturer offers reliability that saves you from frustration and wasted materials down the road.
So, what sets these popular brands apart? It often comes down to a few key factors: material quality, design innovation, and manufacturing consistency. High-quality ceramic can withstand repeated firings without cracking or degrading, and a smooth surface finish translates directly to a flawless finish on your glass. Brands that invest in thoughtful design offer shapes that are not only beautiful but also slump glass evenly without causing unwanted bubbles or sharp edges. Consistency means that when you buy a mold, you know exactly what to expect, which is crucial for artists who produce a line of similar items. Below, we’ll explore some of the most respected names in the industry, each offering something unique for your studio.
The ArtGlassSupplies.com Collection
Our own collection of ceramic molds is designed with the artist’s workflow in mind. We focus on creating practical, reliable shapes that become staples in your studio. For example, our Retro Plate Slumping Mold is a favorite among artists because it’s incredibly easy to use and consistently produces great results, helping you create perfectly formed plates with less fuss. We understand that your tools should support your creativity, not complicate it. That’s why we develop molds that are not only durable enough for frequent use but also thoughtfully designed to help you achieve the clean, professional finish you’re looking for in your slumped glass pieces. They are a fantastic choice for building a foundational collection of shapes you’ll return to again and again.
Creative Ceramics
Creative Ceramics has built a stellar reputation for producing exceptionally high-quality slumping molds, so much so that top glass manufacturers often carry their products. These molds are slipcast from a specially formulated clay body, which results in a durable tool with an incredibly smooth surface. This pristine surface is ideal for glass fusing, as it helps prevent imperfections from transferring to your glass during the slumping process. When you use a Creative Ceramics mold, you can feel the quality and trust that it will perform reliably in the kiln. Their focus on superior materials makes them a preferred choice for artists who demand precision and a flawless finish, especially when working with premium COE90 glass.
Colour de Verre
If you’re looking to create pieces that truly stand out, Colour de Verre is a brand you need to know. They are celebrated in the glass art community for their innovative and often intricate designs. While many brands focus on classic shapes, Colour de Verre pushes the boundaries with unique forms, detailed textures, and artistic molds that inspire new creative directions. Artists often turn to this brand when they want to make something special, like a decorative bowl with a botanical imprint or a platter with a geometric pattern. Their molds are known for their reliable performance and high-quality construction, giving you the confidence to experiment with complex designs and add a signature touch to your work.
Slumpy’s Molds
Slumpy’s is a household name among glass fusers for a reason: they offer an extensive and versatile range of molds that cater to just about any project you can imagine. Whether you need a simple round drape mold, a complex sectional platter, or a novelty shape, chances are Slumpy’s has it. Their molds are designed to be workhorses in the studio, built to withstand high temperatures inside the kiln and deliver consistent results time after time. This reliability makes them a favorite for both hobbyists who are just starting to build their mold collection and professional artists who need dependable tools for production work. With Slumpy’s, you get a great combination of variety, durability, and performance.
Spectrum Glass
Spectrum Glass is another highly respected brand known for producing durable and versatile slumping molds that artists can depend on. One of the key strengths of their molds is how well they work with a wide variety of glass types. This versatility is a huge plus, as it means you can confidently use their molds with different glass brands and coefficients of expansion, including popular options like COE96 glass. Their designs tend to be classic, functional shapes that are essential for any glass studio. If you’re looking for sturdy, all-purpose molds that will give you predictable and successful results across different projects and glass styles, Spectrum is an excellent and reliable choice to add to your collection.
Finding Vintage and Used Molds on Online Marketplaces
If you love the thrill of the hunt, online marketplaces like eBay and Etsy can be absolute goldmines for vintage and used molds. These sites are where you’ll find unique, often out-of-production shapes from brands like Duncan or Clay Magic, alongside countless unbranded treasures. Finding a vintage mold can add a truly one-of-a-kind character to your work that you just can’t get with new designs. When you’re browsing, pay close attention to the seller’s photos and descriptions. You’ll want to look for molds that are free of cracks or major chips, as these flaws can transfer to your glass or cause the mold to break in the kiln. You can find a huge selection of shapes, from functional dinnerware to intricate artistic forms. Many sellers are collectors themselves and provide great details, but it never hurts to ask questions if you’re unsure about the condition.
How to Choose the Right Ceramic Slumping Mold
Picking the right ceramic mold is like choosing the perfect canvas for a painting. It sets the foundation for your entire piece and can be the difference between a project you love and one that doesn’t quite work out. With so many shapes and sizes available, the options can feel endless. But don’t worry, finding the right one is straightforward when you know what to look for. By focusing on a few key factors like size, compatibility with your glass, and how it fits your kiln, you can confidently select a mold that will become a go-to tool in your studio for years to come. Let’s walk through the simple checks you can make to ensure you bring home the perfect mold for your next glass art creation.
Check the Mold’s Size and Depth
The first thing to think about is the final piece you want to create. Are you picturing a delicate, shallow trinket dish or a deep, dramatic fruit bowl? The size and depth of the mold directly shape your outcome. A mold’s dimensions also influence your firing schedule. A deeper slump or a larger piece of glass will require more time and heat to fully take the mold’s shape.
Before you buy, have a clear vision for your project. Measure the space you want the final piece to occupy and compare it to the mold’s dimensions. Remember that the glass will shrink slightly during firing, but the mold’s size is your best guide. Choosing the right profile from our collection of molds is the first step toward bringing your idea to life.
Check for Glass and COE Compatibility
In glass fusing, compatibility is everything. Using glasses with different Coefficients of Expansion (COE) in the same project can cause stress and cracking as the piece cools. Always stick to one COE for a single project, whether it’s COE90 glass or COE96.
While your ceramic mold doesn’t have a COE, its design can affect how the glass behaves. Some intricate molds work better with glass that has a bit more flow at slumping temperatures. By considering the material, size, and surface quality, you can find a mold that not only works for your current project but will also become a reliable tool for future ones. This thoughtful approach ensures your mold and glass work together beautifully.
Match the Mold to Your Kiln
This might sound obvious, but it’s a step you can’t afford to skip: your mold must fit inside your kiln. Before you fall in love with a large or uniquely shaped mold, measure the interior of your kiln, including the height. You’ll need to leave at least an inch of space on all sides of the mold to allow for proper air circulation. This clearance ensures your piece heats and cools evenly, which is critical for preventing thermal shock and cracks.
Once you know it fits, remember to properly prepare your mold with a separator like kiln wash or Thinfire paper. This simple step prevents the glass from sticking to the mold during firing, making for a clean release. If you’re thinking about upgrading, check out our range of kilns to find one that fits your artistic ambitions.
Inspect the Surface Quality and Air Holes
The surface of your mold will transfer directly to your glass. For a smooth, glossy finish on your final piece, you need a mold with a smooth, clean surface. Run your hand over it to check for any bumps, chips, or rough patches that could mar your glass. Small imperfections can often be sanded down, but it’s best to start with a high-quality surface.
Also, look for small air holes in the mold, especially in deeper or more complex designs. These holes are essential because they allow trapped air to escape as the glass slumps into place. Without them, you risk capturing bubbles or having the glass fail to take the full shape of the mold. These little details make a big difference in achieving professional-quality results.
Look for Durability and Heat Resistance
Your molds will go through intense heating and cooling cycles, so they need to be tough. A quality ceramic mold is a worthy investment that can withstand repeated firings without cracking or degrading. The last thing you want is a mold that fails in the kiln, potentially ruining both your project and your kiln shelf.
Look for molds made from high-quality ceramic designed specifically for glass slumping. These are formulated to handle thermal shock and last for many firings. While a well-made mold might cost a bit more upfront, its longevity makes it more economical in the long run. Investing in durable tools is a key part of building a reliable studio practice, whether you’re working with stained glass or fused art.
How Much Do Ceramic Slumping Molds Cost?
Investing in ceramic slumping molds doesn’t have to be a mystery. The price can range quite a bit, but understanding what drives the cost will help you find the perfect molds for your projects and your budget. Generally, you can expect to pay more for larger sizes, intricate designs, and well-known brands. But don’t worry, there are plenty of high-quality, affordable options out there, especially when you’re just starting to build your collection. Let’s break down what you can expect to spend and how to get the most value for your money.
Typical Price Ranges for Ceramic Molds
The cost of ceramic slumping molds varies widely, so you can find something that fits almost any budget. Smaller, simpler molds for things like jewelry pendants or small dishes can start around $10 to $20. As you move into medium-sized molds for plates or decorative tiles, prices often fall between $30 and $70. For large or highly detailed molds, such as those for big platters or complex sculptural shapes, you can expect to pay anywhere from $75 to over $130. This range allows you to start small and experiment with different shapes without a huge initial investment, then add more ambitious pieces to your collection as you grow.
What Influences the Price?
Several key factors determine the price of a ceramic slumping mold. The most obvious is size; a large platter mold simply requires more material and kiln space to produce than a small coaster mold. Complexity is another major driver. A mold with intricate textures, unique curves, or detailed patterns takes more skill and time to design and create, which is reflected in its cost. Finally, the brand and manufacturing quality play a role. Molds from reputable companies are often made with more durable ceramic material, ensuring they can withstand many firings in your kiln and produce consistent results every time.
Understanding a Mold’s Lifespan
A high-quality ceramic mold is a true studio investment, but it won’t last forever. With proper care, you can expect to get dozens of firings from a single mold. The lifespan depends heavily on the mold’s design and how you treat it. For example, a mold with very fine, intricate details might show wear sooner than a simple, smooth bowl mold. A good general estimate is around 50 to 80 uses, but this can vary. To get the most out of your investment, always handle your molds with care, apply a fresh, even coat of kiln wash before each use, and avoid sudden temperature changes that could cause thermal shock. By treating your molds as the valuable tools they are, you can rely on them for many creative projects to come.
The Cost of Creating Custom Molds
Sometimes, a unique vision calls for a one-of-a-kind shape that you just can’t find on a shelf. This is where custom molds come in, but they represent a significant step up in cost. Creating a custom mold involves a much more intensive process than producing standard shapes, including design work, prototyping, and specialized production. Because of this, the price for a custom piece will be considerably higher than the stock molds you see online. This option is typically best for professional artists creating a signature product line or for a specific, high-value commission. For most hobbyists and artists, the vast and creative selection of ready-made molds offers more than enough variety to bring incredible ideas to life without the expense of custom work.
How to Find Great Molds on a Budget
Building a great collection of molds without overspending is entirely possible with a little strategy. Start by focusing on versatile shapes like simple circles, squares, or gentle curves that you can use for multiple projects. Shopping from specialized retailers like ArtGlassSupplies.com allows you to compare different brands and sizes in one place. It’s also a good idea to begin with smaller, less expensive molds to test new ideas and techniques. This approach lets you experiment freely and discover what shapes you enjoy working with most before committing to larger, more expensive pieces. By being thoughtful about your purchases, you can find excellent slumping and draping molds that will serve you well for years.
Troubleshooting Common Slumping Issues
Even the most seasoned glass artists encounter a project that doesn’t turn out quite right. It’s all part of the creative process! When your slumped piece comes out of the kiln with unexpected cracks, warping, or an uneven shape, it’s usually due to a handful of common issues. The good news is that they are almost always preventable. By understanding what can go wrong, you can set yourself up for success and create beautiful, consistent results with your ceramic molds. Let’s walk through some of the most frequent challenges and how to solve them.
Solving COE Mismatches
One of the first things to check when you have issues like cracking is the Coefficient of Expansion, or COE. In simple terms, glass and ceramic expand and contract at different rates when heated and cooled. If your glass and mold have very different expansion rates, it creates stress that can cause the glass to crack during the cooling process. While most ceramic molds are designed to be compatible with popular fusing glass, it’s a detail you can’t afford to overlook. Always double-check that the mold you’re using is suitable for your glass, whether you’re working with COE90 or COE96 glass. This simple check can save you a lot of heartache.
Getting Even Heat and Proper Support
Does your final piece look lopsided or distorted? The culprit is often uneven heating or improper support inside the kiln. Every kiln has its own personality, with slight hot and cold spots. If one side of your glass gets hotter faster, it will slump unevenly. To fix this, make sure your glass is perfectly centered on the mold and that the mold itself is placed on a level, stable kiln shelf. For larger or deeper molds, you might need to use kiln posts to ensure everything stays put. Proper support gives your glass the best chance to slump uniformly into the beautiful shape you envisioned.
Avoiding Glass Compatibility Problems
Following a proper firing schedule is essential for a successful slump. If you fire your glass too hot or hold it at the top temperature for too long, it can become overly fluid and warp, sag excessively, or lose fine details. This is especially important when working with different types of glass, as a schedule that works for COE96 glass might over-fire more sensitive glasses. Always start with the manufacturer’s recommended firing schedule for your specific glass. If you’re experimenting, begin with a conservative schedule and keep detailed notes. Adjusting your firing program gives you precise control over the final outcome.
Mastering Mold Prep and Release Techniques
Nothing is more frustrating than opening your kiln to find your beautiful glass creation stuck firmly to the mold. This is why mold preparation is a step you should never skip. Before every firing, you need to apply a release agent to prevent the glass from bonding with the ceramic surface. You can use a quality kiln wash, applying several thin, even coats and allowing each to dry completely. A smooth application is key, as any brush strokes can transfer to your glass. Alternatively, you can line your mold with a product like ThinFire or fiber paper. Proper prep ensures a clean release and helps extend the life of your favorite molds.
How to Care for Your Ceramic Slumping Molds
Your ceramic molds are an investment, and with a little bit of care, they can last for years and countless firings. Taking the time to properly clean, prepare, and store your molds not only extends their lifespan but also ensures you get beautiful, consistent results with every project. Think of it as setting yourself up for success before you even place your glass in the kiln. A well-maintained mold releases glass easily, provides a smooth finish, and won’t cause unexpected problems mid-firing. These simple habits will help you protect your collection and keep your creative process running smoothly.
Cleaning and Storing Your Molds Correctly
Before each use, make sure your mold is clean and free of any dust or debris from the previous firing. If you’re applying a fresh coat of primer, gently scrub or sand off any old, flaky kiln wash. When you’re ready to prepare a mold, a good rule of thumb for mixing Bullseye Shelf Primer is to use five parts water to one part dry powder. Apply several thin, even coats, letting each one dry completely. Once your molds are primed, handle them with care to keep the surface pristine. Store them in a dry, safe place where they won’t get chipped or bumped, stacking them with soft cloth in between to prevent damage.
Why You Should Test New Molds
It’s always a good idea to do a test run with a new mold before committing your best glass to it. As one artist puts it, “When I get a new mold, I fire a clear piece of glass in the mold first. This provides me with a lot of valuable information before I use the mold with expensive glass.” A simple test firing with a scrap piece of clear COE90 glass can show you how the glass drapes, if there are any potential sticking points, and whether your firing schedule needs adjustments. This small step can save you a lot of frustration and materials, giving you the confidence to move forward with your final design.
Tips to Make Your Molds Last
The most important step in protecting your molds is preventing the glass from sticking. Always coat your mold with a separator like kiln wash or line it with fiber or Thinfire paper. This creates a barrier that allows the glass to release easily after firing. When applying kiln wash, aim for three to five thin, even coats, letting each layer dry before applying the next for better coverage. Before every firing, give your mold a quick inspection for any small cracks or chips. Firing a compromised mold can cause it to break completely inside your kilns, which can damage the kiln itself and ruin your project.
Related Articles
- Glass Slumping 101: A Complete Beginner’s Guide
- How to Make Slumped Bottles: A Simple DIY Guide
- A Complete Guide on, How to Prepare for Glass Fusing?
Frequently Asked Questions
How many times can I reuse a ceramic mold? With proper care, a high-quality ceramic mold can last for dozens, sometimes even hundreds, of firings. The key to its longevity is careful handling and consistent maintenance. Always make sure your mold is properly coated with a separator like kiln wash to prevent glass from sticking, which is the most common cause of damage. Storing it in a safe place where it won’t get chipped will also ensure you can use it for many years to come.
Do I need to reapply kiln wash before every single firing? Not necessarily. You don’t need to strip and re-coat the mold every time, but you should inspect the kiln wash surface before each use. Look for any chips, flakes, or thin spots where the glass might come into contact with the bare ceramic. If the surface is smooth and intact, you’re good to go. If you see any imperfections, just touch them up with a fresh, thin coat of primer and let it dry completely before firing.
My glass slumped unevenly. What went wrong? Uneven slumping is usually caused by one of two things: uneven heating or an improper firing schedule. First, make sure your glass is perfectly centered on the mold and that the mold is placed in the center of your kiln to avoid hot or cold spots. Second, review your firing schedule. If you heat the kiln too quickly, the edges of the glass can soften and drop before the center has a chance to catch up, causing a distorted shape.
What’s a good “starter” mold for a beginner? If you’re just starting out, I always recommend beginning with a simple, versatile shape. A shallow round or square plate mold is a fantastic first choice. These shapes are very forgiving and teach you a lot about how glass moves at slumping temperatures. They are also incredibly useful, allowing you to create beautiful, functional pieces like dishes, coasters, or candle plates right away.
Can I use the same mold for both COE90 and COE96 glass? Yes, you absolutely can. The ceramic mold itself is not COE-specific, so it will work perfectly with any type of fusible glass, including COE90 and COE96. The critical rule to remember is that you cannot mix different COEs of glass in the same project. As long as your entire glass piece is one COE, you can slump it on any compatible ceramic mold you have.