
Opening a new glass cutting kit can feel like you’ve been handed a box of secrets. You see pistol grip cutters, running pliers, and grozers, but what does it all do? Understanding these tools is the first step to mastering your craft. It’s the real secret behind how to break glass cleanly, especially when you’re cutting thick glass. This guide will demystify your kit. We’ll break down the function of each essential piece and give you the confidence to use every tool inside it like a pro.
Key Takeaways
- Invest in a Quality Cutter: Your glass cutter is the most important tool in your kit, so choose wisely. A model with a tungsten carbide wheel and a self-oiling handle will give you cleaner scores and last much longer than a basic steel one.
- Technique and Safety Are Everything: A perfect cut comes from light, consistent pressure, not force. Listen for a gentle zipping sound as you score, and always wear safety goggles to protect your eyes from sharp splinters.
- Start with a Curated Kit for the Best Value: Buying a complete kit from a specialty supplier is the most efficient way to get started. It saves you money compared to buying tools individually and ensures you have everything you need to begin your project.
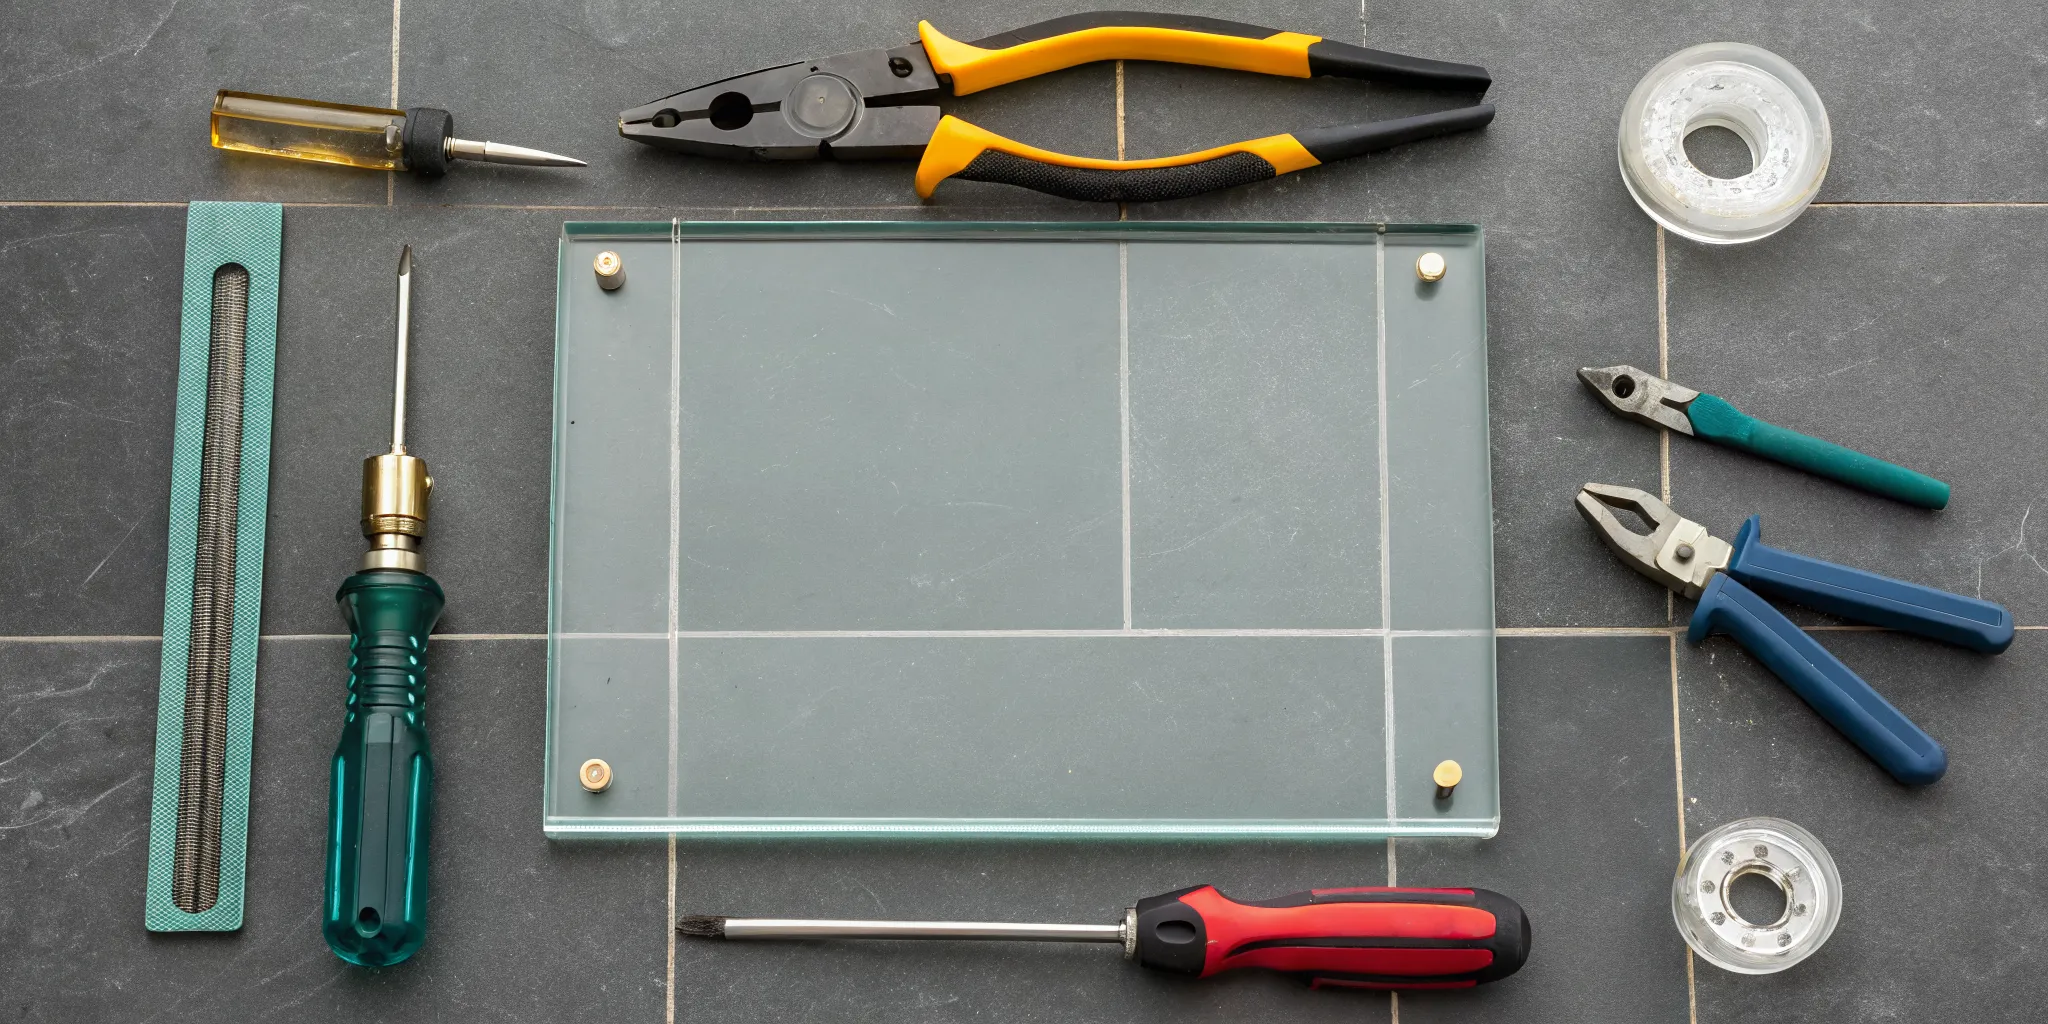
What’s Actually in a Glass Cutting Kit?
Opening a new glass cutting kit feels like unlocking a box of possibilities. While kits can vary, most come packed with a core set of tools designed to get you from a sheet of glass to a finished piece. Understanding what each tool does is the first step toward making clean, confident cuts. Let’s walk through the essentials you’ll typically find inside.
Meet Your Glass Cutter and Wheels
The glass cutter is the heart of any kit. This is the tool you’ll use to score a precise line across the glass, preparing it for a clean break. The cutting head is the business end of your glass cutter, and its design directly impacts your work. You’ll find different styles, like pencil-grip cutters for detailed work or pistol-grip cutters that offer more leverage and comfort for longer sessions. Many kits also include replacement cutting wheels, which is a huge plus since a sharp wheel is critical for a perfect score on all types of stained glass. A dull wheel can drag and create a weak score line, leading to frustrating, jagged breaks.
Using Pliers for a Perfect, Clean Break
Scoring the glass is just half the battle; you still need to break it along that line. This is where specialized pliers come in. Glass running pliers and breaking pliers are important for cleanly breaking glass after you’ve scored it. Running pliers have a curved jaw that applies gentle, even pressure to “run” the score from one end to the other, making them perfect for straight lines. Breaking or grozing pliers have a flat jaw and are used to snap off smaller pieces or nibble away at edges to refine a shape. Using the right pliers helps ensure your cuts are precise and reduces the risk of chipping your beautiful COE90 glass.
Tools for a Straight, Accurate Score
Precision is everything in glass art, whether you’re creating a mosaic or a fused glass piece to fit a specific mold. That’s why a good kit includes tools for accurate measuring and marking. A T-square or set square is essential for making straight cuts and perfect right angles. You’ll likely find a durable ruler in your kit as well. These tools ensure your measurements are exact before you ever make a score. A fine-tip permanent marker is also a must-have for tracing your patterns onto the glass. Taking the time to measure and mark carefully is a simple step that prevents wasted glass and ensures all your pieces fit together perfectly in your molds.
Safety First: Gear and Storage You Can’t Skip
Working with glass requires a healthy respect for safety, and a thoughtful kit will reflect that. Always wear safety goggles to protect your eyes from glass splinters, even if you wear regular glasses. Some kits include a basic pair, but it’s always a good idea to have a comfortable, high-quality pair on hand. You might also find cut-resistant gloves. Beyond personal protection, look for a kit that comes with a durable case or pouch. This not only keeps your tools organized and easy to find but also protects the delicate cutting wheels from getting chipped or damaged. A good storage solution makes your tools last longer and keeps your workspace tidy.
The Glass Cutting Process: From Prep to Finish
Now that you know your tools, let’s put them to work. A successful cut isn’t just about the final snap; it’s a series of small, deliberate steps that ensure a clean break every time. From preparing your workspace to smoothing the final edges, each stage is crucial for achieving a professional result. Following a consistent process will build your confidence and help you turn that beautiful sheet of glass into the precise shapes you envision for your art.
Preparing the Glass and Workspace
Before you even think about scoring, a little prep work goes a long way. Setting up your space correctly not only makes the process smoother but also safer. A clean piece of glass and a well-organized work area are the foundations of a perfect cut.
Clean the Glass for a Smooth Score
Start by making sure your glass is completely clean. Any dirt, dust, or oil on the surface can interfere with the cutting wheel, causing it to skip and create an uneven score. This can lead to a messy, unpredictable break, which is the last thing you want when working with a gorgeous sheet of COE96 glass. Simply wipe the glass down with a lint-free cloth and a glass cleaner, then make sure it’s completely dry. Once it’s clean, lay it on a flat, stable surface where it won’t wobble or shift while you work.
Set Up a Soft, Well-Lit Work Area
Your workspace is just as important as your tools. Good lighting is non-negotiable; you need to be able to clearly see your pattern lines and the score you’re making. Work near a window for natural light or under a bright lamp. It’s also a good idea to work on a soft surface, like a cutting mat, a piece of felt, or even a flattened cardboard box. This cushions the glass, prevents it from getting scratched, and helps absorb some of the pressure as you score and break it, reducing the risk of accidental cracks.
Techniques for Snapping Scored Glass
Once you’ve made a clean score, it’s time for the satisfying snap. The goal is to apply pressure evenly along the score line to encourage the glass to break exactly where you want it to. There are several effective techniques for this, and the one you choose often depends on the size and shape of your cut.
Using a Table Edge for Clean Breaks
For larger pieces and long, straight cuts, the edge of your worktable is your best friend. Carefully align the score line directly with the edge of the table. Hold the main part of the glass firmly on the table with one hand. With your other hand, apply quick, firm downward pressure to the piece of glass hanging over the edge. It should snap cleanly along the score. This method uses leverage to your advantage, creating a clean break with minimal effort, and it’s perfect for trimming down large sheets of stained glass to a more manageable size.
Tapping the Score Line
Sometimes a score needs a little encouragement before it’s ready to break. This is where tapping comes in. After scoring, you can gently tap along the line from the underside of the glass using the ball end of your cutter. You’ll see a faint line, or “run,” start to form as the fissure deepens. This technique helps to weaken the glass along the score, making it much easier to separate with your hands or with running pliers. It’s especially useful for curved cuts that might not break as easily with simple pressure.
Using a Raised Object for Leverage
This technique works on the same principle as running pliers but without the specialized tool. Place your scored glass on your work surface with the score line positioned directly over a small, firm object like a wooden dowel or even the shaft of a screwdriver. With the score facing up, apply gentle, even pressure with your hands on both sides of the line. The upward force from the object underneath will cause the glass to snap cleanly along your score. This is another great method for straight cuts and an easy way to get a feel for how glass breaks.
Finishing and Smoothing Sharp Edges
After breaking your glass, you’ll be left with sharp edges that need to be smoothed. This step is essential for safety, as it prevents cuts while you’re handling the pieces. It also ensures your project will fit together perfectly, whether you’re foiling for stained glass or placing pieces into a slumping mold. A smooth edge provides a better surface for copper foil to adhere to and prevents chipping.
Wet-Sanding with Different Grits
For a simple and effective way to smooth edges, wet-sanding is a great option. Start with a medium-grit sandpaper or a diamond hand pad to gently knock down any sharp points or flares. Then, move to a finer grit to get a smoother finish. The key is to sand under a slow stream of water or dip the glass and sandpaper in a tray of water. This technique, known as wet-sanding, is crucial because it prevents fine glass dust from becoming airborne, which is a significant safety hazard. It also keeps the sandpaper from getting clogged.
Using a Glass Grinder for a Professional Finish
If you plan on doing a lot of glass work, investing in a glass grinder is a game-changer. A grinder uses a diamond-coated bit to quickly and precisely smooth and shape glass edges, saving you a tremendous amount of time and effort compared to hand-sanding. It’s especially indispensable for perfecting intricate curves and inside corners that are nearly impossible to finish by hand. A grinder gives you a uniform, slightly roughened edge that is ideal for copper foil adhesion, ensuring your stained glass projects are strong and professionally finished. It’s an essential tool for any serious glass artist.
How Do Different Glass Cutting Kits Stack Up?
Not all glass cutting kits are created equal. While they might look similar at first glance, the quality of the tools inside can dramatically affect your work, your frustration levels, and even the amount of glass you waste. The right kit feels like an extension of your hand, helping you achieve clean, precise cuts every time. The wrong one can lead to jagged edges and shattered projects. Let’s break down what separates a basic kit from a professional one and help you figure out which features are truly worth it for your art.
What Defines a Professional-Grade Kit?
When you move up to a professional-grade kit, you’re investing in precision and durability. These kits are designed for artists who spend hours cutting glass and need tools that can keep up. The star of the show is always the cutter itself. The cutting head is the business end of your glass cutter, and its design directly impacts your work. Professional kits typically include cutters with long-lasting carbide wheels and might offer interchangeable heads for different glass thicknesses. You’ll also find higher-quality running and grozer pliers, which give you more control for clean breaks and shaping intricate curves in your stained glass projects.
How to Spot a High-Quality Glass Cutter
The secret to a great glass cutter lies in its wheel. Most glass cutting wheels are made of steel because it’s the most economical option, but they tend to dull faster, leading to messy scores. A quality cutter, however, will feature a tungsten carbide wheel. Carbide is a much harder material that holds its sharp edge significantly longer, giving you consistently clean scores with less pressure. Another key factor is lubrication. Using cutting oil can significantly enhance the performance of your glass cutter by reducing friction and prolonging the life of the cutting wheel. It prevents microscopic glass chips from dulling the blade and helps ensure a smooth, deep score every time.
Features to Look For: Self-Oiling and Ergonomics
Two features that make a world of difference in your workflow are self-oiling reservoirs and ergonomic grips. Self-oiling cutters are a fantastic convenience. They both have a reservoir for oil which feeds down into the cutter head and onto the wheel, providing consistent lubrication as you cut. This means you don’t have to stop and dip your cutter in oil constantly. On the comfort side, pistol grip cutters have an ergonomic handle that fits comfortably in your hand, reducing strain on your fingers and wrist. When you’re working on a large project with lots of COE96 glass, an ergonomic grip can prevent fatigue and help you maintain steady control.
How to Find the Best Kit for Your Budget
Finding the best value isn’t about finding the cheapest kit; it’s about finding the right tools for your needs and skill level. For a beginner, a simple kit is a great starting point. However, investing in a high-quality carbide wheel cutter will make cutting glass easier and more precise right from the beginning, which can save you a lot of frustration. Some specialized tools can be tricky for newcomers to master, so it’s wise to start with the essentials and build from there. A good rule of thumb is to buy the best quality you can afford, as a reliable tool will pay for itself in saved glass and better results.
Which Glass Cutting Kits Are Top-Rated?
Finding the right glass cutting kit can feel like a quest, but the perfect match really comes down to your experience level and the kind of art you want to create. A beginner just learning to score a straight line has very different needs than a professional crafting an intricate mosaic. The good news is there’s a kit out there for everyone. Let’s look at some of the top-rated options, broken down by who they’re best for and what makes them stand out. By understanding the landscape of available tools, you can confidently choose a kit that will serve you well on your glass art journey.
The Best Glass Cutting Kits for Beginners
When you’re just starting, your main goal is to get a feel for scoring glass without getting discouraged. The best beginner kits include tools that are forgiving and easy to control. Some traditional cutters, for example, can be tricky for new hands to manage. You’ll want to look for a kit that features an ergonomic cutter, like a pistol grip or a pencil grip style. These designs give you better leverage and control, helping you learn to apply consistent pressure. A great starter kit makes the learning process smoother, so you can focus on building your skills and bringing your first few projects to life.
Professional-Grade Kits Worth the Investment
For seasoned artists, a glass cutting kit is an investment in precision and efficiency. When you’re working on complex pieces, you need tools you can rely on for clean, accurate cuts every single time. Professionals often gravitate toward brands known for their durability and superior engineering. Some of the best glass-cutting tools include the Toyo Pistol Grip Cutter for its comfort and control, and the Silberschnitt Oil Glass Cutter for its long-lasting performance. These high-quality tools are built to withstand daily use and deliver the flawless results that professional work demands, making them a worthy upgrade for any serious artist.
Need a Specialty Kit? Stained Glass and Fusing Options
Different glass art forms require specific techniques, and having the right tools can make all the difference. If you’re working on stained glass, a pencil grip cutter is fantastic for achieving the crisp, straight lines needed for panel work. For glass fusing artists, clean cuts are just as critical. Whether you’re working with COE90 glass or another type, precise edges ensure your pieces fit together perfectly before heading into the kiln. A specialty kit designed for these disciplines will include the cutters and pliers best suited for creating intricate shapes and ensuring your final piece is seamless.
The Features Glass Artists Swear By
Beyond the basics, certain features can seriously improve your glass cutting experience. One of the most popular is a self-oiling system. Many modern cutters have a small reservoir in the handle that you can fill with cutting oil. The oil automatically lubricates the cutting wheel as you score, which reduces friction and keeps the wheel sharp for much longer. Another feature artists appreciate is interchangeable cutting heads. This allows you to swap out the wheel to match the thickness of the glass you’re working with, giving you more versatility from a single tool. These thoughtful details are what separate a good kit from a great one.
Specialty Cutting Techniques
While having a dedicated glass cutting kit is the gold standard for precision work, sometimes you need a different approach. Maybe you’re upcycling materials, or perhaps you just want to experiment with new methods. These specialty techniques can be incredibly useful, whether you’re in a pinch without your standard tools or you’re tackling a unique project like cutting a bottle. They showcase the amazing properties of glass and how it responds to pressure and temperature. Let’s explore some creative ways to cut glass that go beyond the traditional score-and-snap.
How to Cut Glass Without a Standard Cutter
It happens to the best of us—you’re mid-project, and you realize you’ve misplaced your cutter or the wheel has gone dull. Before you pause your creative flow, know that you might have a solution already sitting in your workshop. These unconventional methods use common tools to achieve a score line strong enough to break glass. While they might not replace your favorite pistol grip for intricate stained glass work, they are fantastic tricks to have up your sleeve for straight cuts when you’re in a bind.
Using a High-Carbon Drill Bit
Believe it or not, a high-carbon drill bit can stand in for a cutting wheel. The key is to use the hard edge of the bit to score a line on the glass surface. For this to work, you need to apply firm, steady pressure and drag the bit across the glass to create a scratch. It’s a good idea to repeat this motion three or four times over the exact same line to deepen the score. This ensures the weakness is significant enough to guide the break, giving you a surprisingly clean snap when you apply pressure.
Using a Screwdriver and Soldering Iron
This technique combines a mechanical score with thermal stress. Start by using a small, sharp screwdriver to scratch a deep line where you want the cut. Make sure to score both sides of the glass for the best results. Next, carefully run a hot soldering iron along the scored line on one side for about a minute. The focused heat will cause the scratch to expand into a tiny fracture. While the glass is still hot, you can flip it over and apply pressure to break it cleanly along your intended line.
Using a Broken Spark Plug
Here’s a resourceful method that puts old materials to good use. The white ceramic housing on a spark plug is incredibly hard—hard enough to scratch glass. If you have a broken spark plug, you can use one of its sharp ceramic edges to score a line, much like you would with a standard cutter. It takes a bit of practice to get the pressure right, but once you have a visible score, you can break the glass along that line. It’s a creative and effective way to repurpose something that would otherwise end up in the trash.
How to Cut Glass Bottles
Turning old wine, beer, or soda bottles into drinking glasses, candle holders, or planters is a popular and sustainable craft. However, cutting a cylinder cleanly presents a unique challenge. Unlike flat sheets of glass, bottles require techniques that can handle their curved shape. The goal is to create a single, perfect score line around the circumference and then use thermal shock to force a clean break. These methods are perfect for anyone looking to give beautiful glass bottles a second life.
The Thermal Shock Method
The thermal shock method is one of the most reliable ways to cut a glass bottle. First, you’ll need to create a consistent score line around the bottle using a cutting tool or jig. Once you have a solid score, slowly pour hot water directly over the line for about 30 seconds, rotating the bottle to heat it evenly. Immediately after, switch to running cold water over the same line. The rapid change in temperature will stress the glass, causing it to crack perfectly along your score.
The String and Fire Method
This method feels a bit like a magic trick, but it’s pure physics. Start by soaking a piece of cotton string in rubbing alcohol or acetone. Tightly tie the string around the bottle exactly where you want the cut to be. After carefully lighting the string on fire, rotate the bottle slowly for about a minute to heat the glass evenly along the line. As soon as the flame burns out, plunge the bottle into a bucket of cold water. The sudden cooling will cause a clean break right where the string was.
Best Bottles for Beginners
If you’re new to bottle cutting, setting yourself up for success starts with choosing the right kind of bottle. Your best bet is to begin with standard wine or round soda bottles, as they typically have thinner, more uniform walls. This consistency makes them much easier to score and break cleanly. Try to avoid bottles with thick glass, embossed designs, or irregular shapes, like champagne bottles. These can be much more challenging to cut and often lead to uneven breaks, which can be frustrating when you’re just learning the ropes.
Common Glass Cutting Mistakes (and How to Avoid Them)
Even with the best tools, a few common slip-ups can stand between you and a perfect cut. We all make mistakes, but learning to recognize them is what helps us grow as artists. Getting a clean break consistently comes down to good habits and understanding how your tools interact with the glass. Let’s walk through some frequent missteps and how to sidestep them. By focusing on the right techniques, preparation, and tool care, you can save yourself a lot of frustration and wasted glass, letting you focus on bringing your creative vision to life.
Are You Using the Right Cutter for Your Glass?
Choosing the right glass cutter is the first step to a successful project. It’s not a one-size-fits-all situation. The cutter that works beautifully for thin, delicate stained glass might struggle with thicker sheets of COE90 glass meant for fusing. Different cutting heads are designed for different thicknesses and textures, so matching your tool to your material is critical. Using the wrong one can lead to a bad score, a messy break, or even a damaged cutting wheel. Before you start a project, take a moment to confirm that your cutter is up to the task for the specific glass you’re using.
How to Perfect Your Scoring Technique
A good cut starts with a good score. Many beginners think they need to press down hard, but it’s really about consistent, even pressure. As you draw the cutter across the glass, listen for a gentle, continuous sound, almost like ripping silk. That sound is your confirmation of a perfect score. If you hear a gritty, grinding noise, you’re likely pressing too hard. The cutting head is the business end of your tool, and its job is to create a tiny fissure that guides the break. Let the tool do the work. A single, confident scoring line is all you need to set up a clean snap.
Mistake: Going Over the Same Score Line Twice
It’s a tempting habit, especially when you’re new to glass cutting: if one score is good, two must be better, right? Unfortunately, going over the same score line is a classic mistake that does more harm than good. Instead of reinforcing the cut, rescoring creates tiny, secondary fractures that can cause the glass to break unpredictably, leaving you with a jagged edge or a ruined piece. It also dulls your cutting wheel much faster. As glass manufacturer Wissmach Glass advises, you should only score once. The key is to trust your initial pass. Focus on applying steady, even pressure and listen for that crisp, zipping sound. A single, confident score creates the clean fissure needed for a perfect snap, so let your cutter do its job and resist the urge to go over it again.
The Two Things You Can’t Ignore: Safety and Prep
This might be the most important tip of all: always prioritize safety. It’s easy to get caught up in your work, but glass shards are incredibly sharp. Always wear safety goggles to protect your eyes from tiny splinters that can fly off during scoring and breaking. Even if you wear prescription glasses, they don’t offer enough protection. For beginners, wearing gloves is also a great idea until you get a feel for handling the edges. Even experienced artists get cut sometimes. A clean, organized workspace is also part of your safety prep, as it prevents accidents and helps you work more efficiently.
How to Keep Your Tools Sharp and Ready
Your tools are an investment, and a little maintenance goes a long way. Using cutting oil is a simple step that makes a huge difference. It lubricates the cutting wheel, which reduces friction, gives you a smoother score, and helps the wheel last much longer. Just as important is how you handle your tools. If you drop your glass cutter on a hard floor, you should assume the cutting head is damaged, even if you can’t see it. A compromised wheel won’t score properly and will ruin your glass. Treat your tools with care, and they’ll return the favor with reliable, clean cuts for years to come.
Knowing When to Hire a Professional
While the satisfaction of cutting your own glass is immense, some projects are best left to a professional. If you’re dealing with large-scale installations like replacement windows, or if a cut requires absolute structural precision, hiring a glazing contractor is a smart move. They have the specialized equipment and experience to handle jobs where safety and accuracy are critical. For artists, this might mean outsourcing the cutting of a very large, expensive piece of glass for a commission. Knowing your limits isn’t a sign of failure; it’s a mark of a smart crafter who knows how to protect their investment in time and materials, ensuring the final result is flawless.
Where to Learn More and Hone Your Skills
Becoming great at cutting glass is a journey of continuous learning. The best place to start is often within the community. Online forums and social media groups are filled with artists sharing tips on everything from when to replace a worn-out cutter tip to which tools work best for specific projects. Local workshops can also provide invaluable hands-on instruction. Beyond that, practice is your best teacher. The more you work with glass, the more you’ll develop a feel for the right amount of pressure. Supplement your practice with online tutorials and blogs, which can help you understand the technical aspects of your tools, like why a carbide wheel makes such a difference.
How to Find the Best Deal on a Glass Cutting Kit
Finding the right glass cutting kit at a great price is about more than just hunting for the lowest number on a price tag. A true “deal” means getting high-quality, durable tools that fit your artistic needs without overspending. It’s an investment in your craft, so you want to make sure your money is well spent. A cheap tool that breaks or scores poorly isn’t a bargain; it’s a frustration waiting to happen. To find the best value, you’ll want to think about where you shop, whether a bundle is right for you, and what protections you have after the purchase. Let’s walk through how to find a fantastic deal on a kit that will serve you well for years to come.
Where to Buy: Specialty Shops vs. Big Box Stores
When you start shopping, you’ll notice two main types of stores: specialty art supply shops and large general retailers. Specialty shops, like us here at ArtGlassSupplies.com, are curated specifically for artists. We offer quality products that are well-regarded by other glass artists, so you can trust that you’re getting reliable tools. The expertise and customer support you find at a specialty store can be invaluable, especially if you’re new to the craft. General retailers might offer lower prices, but the quality can be inconsistent, and you won’t find the same level of specialized knowledge. It’s a choice between a carefully selected inventory and a mass-market selection.
Are Bundles and Starter Kits a Good Deal?
Many artists, especially those just starting, prefer to buy a complete tool kit. These bundles offer significant savings compared to purchasing each item individually and ensure you have everything you need to get going. There’s no guesswork involved; the kit provides a full set of compatible tools for cutting glass, from the cutter itself to grozing pliers and a straight edge. This convenience is a huge plus, as it lets you focus on your project instead of hunting down separate components. A well-assembled stained glass kit is designed to give you a solid foundation for all your future projects.
How to Compare Prices Like a Pro
When you’re ready to compare prices, look beyond the initial cost. Use website filters to sort products by price, brand, and customer ratings to see how different options stack up. This can help you quickly identify kits that fit your budget and have positive reviews from other artists. Also, factor in shipping costs and look for any available promotions or sales. Sometimes, signing up for a newsletter can give you a discount code. The goal is to compare similar kits to make sure you’re evaluating them fairly. A slightly more expensive kit with higher-quality tools is often a better long-term value than a cheaper one you’ll need to replace quickly.
Always Check the Warranty and Return Policy
A quality glass cutting kit is an investment that should make your work easier and more precise. Before you click “buy,” always take a moment to check the store’s warranty and return policy. A clear and fair policy shows that the company stands behind its products and gives you protection in case a tool doesn’t meet your expectations or arrives with a defect. This is especially important for more expensive items like a high-quality carbide cutter or specialized molds. Knowing you have that safety net provides peace of mind and makes the entire buying process feel more secure.
Related Articles
- A Complete Guide on Stained Glass Tools & Supplies
- The Ultimate Guide to COE 90 Glass Suppliers – ArtGlassSupplies
- Glass for Jewelry Making: Your Complete Guide – ArtGlassSupplies
Frequently Asked Questions
Do I really need to use cutting oil with my glass cutter? Yes, I highly recommend it. Using cutting oil isn’t just about making the cutter glide smoothly; it actually helps you get a better score. The oil keeps the wheel lubricated, which prevents tiny glass chips from dulling the blade and creates a deeper, more consistent score line. This small step leads to cleaner breaks, less wasted glass, and a much longer life for your cutting wheel.
What’s the difference between a pistol grip and a pencil grip cutter? The main difference comes down to comfort and control. A pistol grip cutter has a handle that you hold like, well, a pistol. This design gives you more leverage and can reduce hand fatigue, making it great for long sessions or cutting thick glass. A pencil grip cutter is held just like a pen, offering excellent control for detailed work and intricate curves, which is why many stained glass artists love them.
How can I tell when it’s time to replace my cutting wheel? You’ll start to notice a few signs. A sharp wheel makes a clean, quiet “zipping” sound as it scores the glass. When the wheel gets dull, you might hear a gritty, scratching noise instead. You may also find yourself pressing harder to make a score, or your glass might not break cleanly along the line. If your cuts are getting sloppy, a dull wheel is the most likely culprit.
Is it better for a beginner to buy a complete kit or build one piece by piece? For most people starting out, a complete kit is the way to go. It’s more cost-effective than buying each tool separately, and it takes the guesswork out of the process. A good starter kit ensures you have all the essentials, like a quality cutter, running pliers, and a straight edge, so you can get right to creating. You can always add more specialized tools later as you discover what you need.
Can I use the same tools for both stained glass and fusing projects? Absolutely. The fundamental tools for cutting glass are the same regardless of what you plan to do with it afterward. A good cutter, breaking pliers, and a ruler are essential for both stained glass and fusing. The primary difference is in the type of glass you use, such as specific COE90 or COE96 glass for fusing, and the techniques you apply after the pieces are cut.