
The heart of any glass slumping project is the mold itself. These ceramic or stainless steel forms are what give your artwork its final shape, turning a flat sheet of glass into a functional bowl or a piece of sculptural art. With so many shapes available, from simple plates to intricate textures, the creative possibilities are nearly endless. But having the right mold is only half the battle; you also need to know how to work with it. Understanding how to use glass slumping molds correctly is the most critical part of the process. This guide will teach you everything from applying kiln wash to positioning your glass for a perfect slump.
Key Takeaways
- Prep work is your project’s best friend: Before you even think about firing, coat your mold with a separator like kiln wash and cut your glass to the correct size. This essential prep ensures your piece releases cleanly and slumps predictably.
- Respect the rules of glass and heat: For a strong, crack-free result, always use glass with a single compatible COE (like all COE90 or all COE96) in your project. Pair this with a slow, controlled firing and cooling schedule to prevent thermal shock.
- Start simple, stay safe, and take notes: Build your confidence by beginning with uncomplicated mold shapes. Always use your safety gear, especially heat-resistant gloves and eye protection, and keep a firing log to track your settings and results for future projects.
What Is Glass Slumping?
If you’ve ever wanted to transform a flat sheet of glass into a beautiful three-dimensional object like a bowl or a platter, then glass slumping is the technique for you. Think of it as using heat and gravity to gently persuade glass into a new form. You start with a piece of flat glass, place it over or into a ceramic or stainless steel mold, and heat it in a kiln. As the temperature rises, the glass softens and gravity pulls it downward, causing it to “slump” and take the shape of the mold beneath it.
It’s a fascinating process that opens up a world of creative possibilities, allowing you to move beyond flat panels and create functional, sculptural art. Whether you’re aiming to make a set of custom dinner plates or a one-of-a-kind piece of garden art, understanding the fundamentals of slumping is your first step. The magic happens inside the kiln, but the artistry begins with your choice of glass and mold. This technique is surprisingly accessible for beginners and offers a satisfying way to bring your artistic visions to life in three dimensions.
How Does Glass Slumping Work?
The process of slumping glass is methodical and rewarding. It starts with preparing your mold by coating it with a separator called kiln wash, which prevents the hot glass from sticking. Once the mold is ready, you’ll place your piece of glass on top of it, making sure it’s centered. Then, the mold and glass go into the kiln for a carefully controlled heating process.
The kiln is slowly heated to a slumping temperature, typically between 1180 and 1250 degrees Fahrenheit. At this point, the glass becomes soft enough to bend under its own weight and sink into the mold’s form. After the glass has fully slumped, it must be cooled down very slowly in a process called annealing. This step is crucial for relieving internal stresses in the glass and preventing it from cracking. Once completely cool, you can remove your new, beautifully shaped piece.
Slumping vs. Draping: What’s the Difference?
While often used interchangeably, slumping and draping are slightly different techniques. The main distinction lies in the type of mold you use and how the glass is shaped. Slumping typically involves placing glass inside a concave mold, like a bowl or platter form. The glass sinks into the mold to create its shape. Draping, on the other hand, is when you place glass over a convex mold, like a vase former or a post. The glass melts down and around the form.
It’s also helpful to know how slumping differs from fusing. Fusing is the process of joining two or more pieces of glass together by melting them at a higher temperature than what’s needed for slumping. Often, artists will first create a flat, fused design and then slump that piece into a final shape in a separate firing.
What Can You Make With Glass Slumping Molds?
The possibilities with glass slumping are nearly endless, limited only by your imagination and the shapes of the molds you have. You can create a wide range of functional and decorative items for your home or to sell. Popular projects include custom dinnerware like bowls, plates, and serving platters. You can also make smaller items like soap dishes, spoon rests, candle holders, and catch-all trays.
Beyond functional kitchenware, slumping is perfect for creating unique art pieces. You can make beautiful ruffled vases, decorative wall hangings, and even stunning garden art that catches the light. By combining different colors and textures of COE90 glass, you can turn a simple slumped shape into a true work of art. It’s a wonderful way to add depth and dimension to your glasswork.
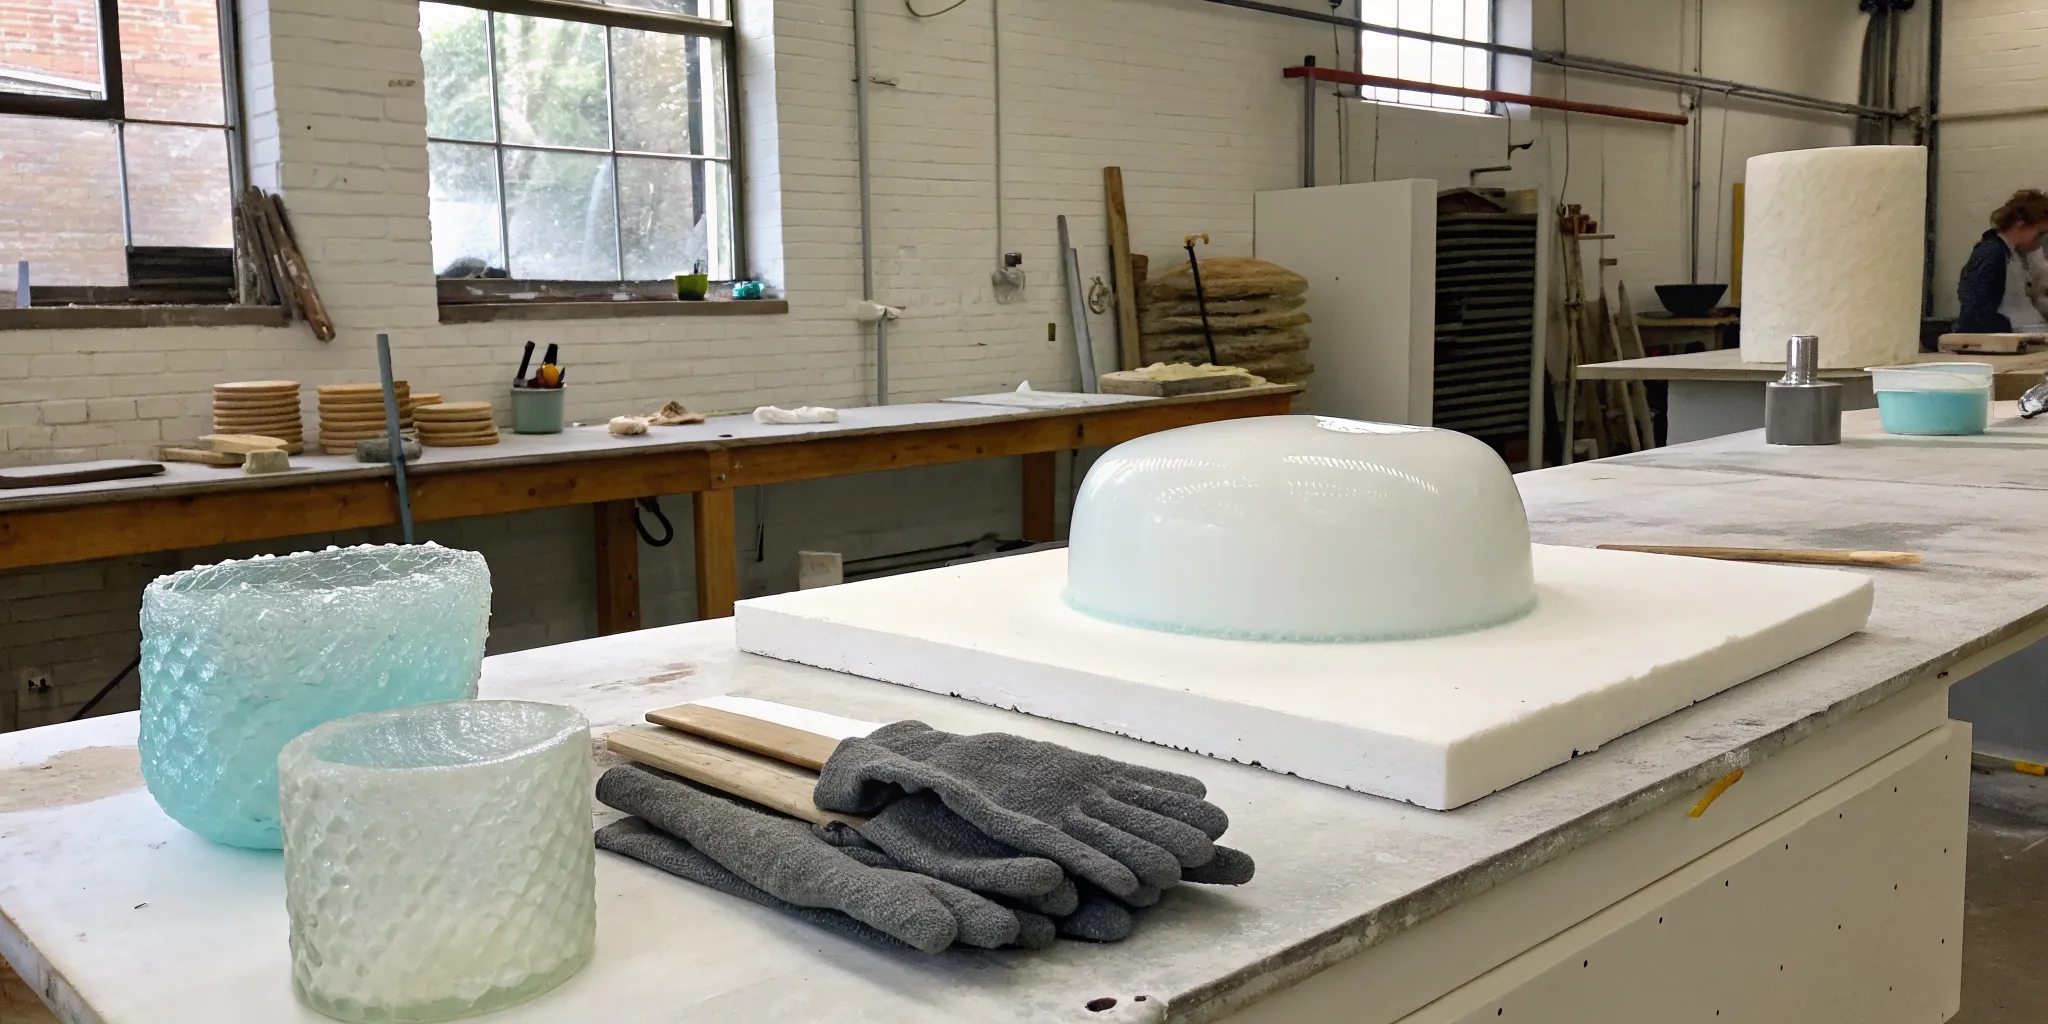
Your Glass Slumping Toolkit
Before you can transform a flat piece of glass into a beautiful, curved creation, you need to gather a few key supplies. Think of this as your creative arsenal. Having the right tools on hand not only makes the process smoother but also ensures your final piece comes out just the way you imagined. Let’s walk through the essential items you’ll need to get started with glass slumping.
Slumping Molds
This is where the magic of shaping happens. Glass slumping molds are the forms that your glass will take as it heats and softens in the kiln. They come in an incredible variety of shapes and sizes, from simple bowls and plates to more intricate, textured designs. Most molds are made from durable ceramic or stainless steel, designed to withstand the high temperatures of the kiln time and time again. Choosing your mold is one of the most exciting parts of the process, as it directly dictates the final form of your artwork. Whether you’re making a soap dish, a platter, or a decorative piece, the mold is your starting point for bringing that vision to life.
Kiln
A kiln is the heart of any glass slumping studio. This special, high-temperature oven is what makes the entire process possible. Unlike a conventional oven, a kiln can reach the extreme temperatures needed to soften glass, typically between 1300 and 1500 degrees Fahrenheit. It’s inside the kiln that gravity gently pulls your glass down into the contours of the mold. Modern kilns come with programmable controllers that allow you to set precise firing schedules, which is crucial for heating and cooling the glass at the right pace to prevent stress and cracking. Investing in a reliable kiln is essential for achieving consistent, professional-quality results in your glass art projects.
Kiln Wash and Shelf Paper
Think of kiln wash and shelf paper as your project’s insurance policy. These materials act as a separator, creating a protective barrier between your glass and the mold or kiln shelf. Without a separator, the molten glass would fuse directly to the ceramic surfaces, ruining both your project and your mold. You should always apply several thin, even coats of kiln wash to your molds before every firing. For an easy-to-use option, Bullseye offers a shelf primer that you mix with water. This simple step is non-negotiable for a successful slump and ensures you can easily remove your beautiful finished piece from the mold once it has cooled.
Safety Gear
Working with high temperatures and glass requires a serious commitment to safety. Before you even think about turning on the kiln, make sure you have the right protective gear. You’ll need heat-resistant gloves for handling hot items and infrared safety glasses to protect your eyes from the intense heat and light when you peek into the kiln. It’s also wise to have a good pair of oven mitts for handling pieces after they have been removed from the kiln but are still warm. Your safety is the most important part of the entire process, so never skip this step. Taking these precautions allows you to focus on the creative side of your work with peace of mind.
Choosing the Best Glass for Slumping
Picking the right glass for your slumping project is the first step toward a beautiful finished piece. While it might seem like any glass will do, there are a few key things to understand before you buy. The most important factor is the glass’s coefficient of expansion, or COE. This is just a fancy way of describing how much the glass expands and contracts when it’s heated and cooled.
Think of it like this: if you try to fuse two types of glass with different COEs, they’ll fight against each other as they cool down. One will shrink faster than the other, causing stress that will almost certainly lead to cracks. That’s why the golden rule of glass fusing and slumping is to never mix COEs in a single project. Stick to one COE family for your base glass, accents, and any decorative elements like frit or stringers. This ensures all your pieces are compatible and will cool down as a happy, unified whole. The two most common types you’ll encounter are COE90 and COE96.
COE90 vs. COE96 Glass
So, what’s the real difference between COE90 and COE96, and which one should you choose? Honestly, there’s no single “best” option; it really comes down to personal preference and the project you have in mind. Many artists find that COE90 glass offers a slightly wider range of colors and decorative components, making it a versatile choice if you love experimenting with intricate designs.
On the other hand, COE96 glass is known for being incredibly stable and a bit more forgiving, which can lower the risk of thermal shock (cracking from temperature changes). Many beginners find COE96 to be a great starting point because of its reliability. My best advice is to pick one system and get to know it well. Once you understand how one type of glass behaves in your kiln, you’ll have a much easier time getting consistent results.
Considering Glass Thickness and Size
Once you’ve chosen your COE, you need to think about the thickness of your glass. For most slumping projects, a total thickness of 6mm (about 1/4 inch) is the perfect starting point. This is typically achieved by stacking two 3mm sheets of glass on top of each other. This thickness is sturdy enough to survive the slumping process without being so thick that it requires a complicated firing schedule in your kiln.
The size of your glass piece also matters. It needs to fit your mold correctly, but it also affects your firing time. A larger, thicker piece will need to be heated and cooled much more slowly than a small, thin one to prevent cracking. If you decide to work with glass that’s thicker or thinner than 6mm, just know that you’ll need to adjust your firing schedule to give the glass enough time to heat and cool evenly.
Preparing Your Glass Slumping Mold
Before you can even think about firing up your kiln, you need to get your mold ready. Think of this as setting the stage for your masterpiece. A little prep work goes a long way in making sure your glass slumps beautifully and releases from the mold without any issues. Taking the time to follow these steps will save you from potential frustration later and help you get that perfect shape you’re aiming for. Let’s walk through exactly what you need to do.
Applying Kiln Wash
First things first, you need to apply a separator to your mold. This is a non-negotiable step that prevents your beautiful glass piece from permanently sticking to the mold during firing. A quality kiln wash or shelf primer is your best friend here. If you’re using a powder like Bullseye Shelf Primer, a good rule of thumb is to mix five parts water to one part dry powder until you get a smooth, creamy consistency. Apply a thin, even coat to the entire surface of the mold where the glass will touch. Let it dry completely before you even think about putting it in the kiln.
Checking for Clear Air Holes
If you’re working with ceramic molds, take a moment to look for a small air hole. This tiny detail is incredibly important. As the glass heats and slumps into the mold, any air trapped between the glass and the mold needs a way to escape. Without a clear air hole, you can end up with bubbles or an incomplete slump, which is definitely not the look we’re going for. Before each use, just take a pin or a small tool to gently clear out any leftover kiln wash or debris from the hole to ensure a smooth firing.
Cutting Glass to Size
Now it’s time to prepare your glass. Your goal is to cut a piece of glass that is the same size as the top of your mold. If your glass is too large, it will melt over the edges as it slumps, making it difficult (or sometimes impossible) to remove from the mold without breaking it. If it’s too small, it won’t slump evenly to take the full shape of the mold. Grab your glass cutter and be precise. Whether you’re using COE90 glass or another type, careful cutting is the key to a clean, professional-looking final piece.
Positioning the Glass on Your Mold
Once your mold is prepped and your glass is cut, the final step is to place the glass correctly. Carefully center your glass piece on top of the mold. You can often do this right inside the kiln to avoid shifting it during transfer. Just make sure both the mold and the glass are sitting level and are at least two inches away from the kiln’s heating elements on all sides. This spacing ensures even heating and prevents any part of your project from getting scorched. Proper placement is the final touch before the firing magic begins.
A Step-by-Step Guide to Glass Slumping
Ready to turn that flat piece of fused glass into a beautiful, three-dimensional object? This step-by-step guide will walk you through the entire slumping process. While every project is a little different, these fundamental steps will give you a solid foundation for success. Remember that glass art is a mix of science and creativity, so don’t be afraid to take notes and learn from each firing. Soon, you’ll be pulling stunning bowls, plates, and sculptures from your kiln.
The key is to work methodically and pay close attention to the details, from preparing your molds to programming your kiln. It’s a process that rewards patience and precision, but the results are always worth the effort. Think of this guide as your trusted companion in the studio. We’ll cover everything from the initial setup to the final moment you hold your finished piece. Let’s get started.
Step 1: Gather Your Tools and Safety Gear
Before you even think about turning on the kiln, let’s get everything organized. Having your tools and materials ready makes the process smoother and safer. You’ll need your fused glass piece, a slumping mold, kiln wash or shelf paper, and a kiln. Most importantly, you need your safety gear. Always wear safety glasses to protect your eyes from any stray glass shards. When you’re handling the kiln or hot glass, heat-resistant gloves are an absolute must. A well-ventilated workspace is also crucial, especially when your kiln is running.
Step 2: Coat the Mold With Kiln Wash
This is a step you absolutely cannot skip. Kiln wash acts as a separator, creating a barrier between your glass and the mold. Without it, the glass will stick to the mold during firing, likely ruining both your project and your mold. Apply a few thin, even coats of kiln wash with a soft brush, letting each coat dry completely before applying the next. You’re aiming for a smooth, consistent surface. Alternatively, you can use kiln shelf paper cut to fit the mold. This preparation ensures your beautiful glass piece will release cleanly after cooling.
Step 3: Fuse Your Glass Flat First
For the best results, slumping is a two-part process. First, you create your design and fuse the glass pieces together into a flat panel. Once you have a solid, fused piece, you can move on to slumping it into a shape. Fusing first ensures your design elements are locked in place and won’t shift around on the mold. It also gives you a single, stable piece of glass to work with, which is much easier to position correctly for the slumping fire. Make sure you are using glass with a compatible COE, like COE90 glass, for your initial fusion.
Step 4: Position the Glass on the Mold
Carefully place your flat, fused glass piece onto the prepared mold. The goal is to center it as perfectly as possible. If the glass is off-center, gravity will do its work in the kiln, and you may end up with a lopsided or unevenly slumped piece. Take a moment to look at it from all sides to ensure it’s balanced. For a bowl or plate, this means the glass is centered over the depression. For a drape mold, it means the glass is centered over the highest point.
Step 5: Load the Kiln and Set Your Firing Schedule
Once your glass is positioned on the mold, it’s time to load it into the kiln. Place the mold in the center of the kiln shelf, making sure it’s level. This helps ensure an even distribution of heat. Now, it’s time to program your firing schedule. A slumping schedule is much cooler and slower than a fusing schedule. You’ll need to heat the glass slowly to the slumping temperature, hold it there long enough for it to drop into the mold, and then cool it down carefully. Your specific schedule will depend on your kiln, the size of your glass, and the depth of the mold.
Step 6: Monitor the Slump
While firing schedules are a great guide, glass can be unpredictable. The best way to get a perfect slump is to watch it happen. Many kilns have peepholes that allow you to look inside safely (with eye protection, of course). As the kiln reaches its target temperature, you can check on the glass to see how far it has slumped. This allows you to stop the firing process as soon as the glass has taken the shape of the mold. This prevents over-slumping, where the glass becomes too thin or distorted.
Step 7: Anneal and Cool the Glass
Once your glass has slumped to the desired shape, the cooling process begins. This isn’t just about letting it get cold; it’s about annealing. Annealing is the process of slowly cooling the glass to relieve internal stresses that build up during heating. A proper annealing cycle is critical for the durability of your finished piece. Without it, the glass could crack or break, even days later. Your firing schedule should include an annealing hold at a specific temperature before the kiln cools down completely. Never open the kiln until it is back to room temperature.
Step 8: Remove the Glass From the Mold
Patience is key here. Even after the kiln has turned off, it will take several hours to cool to room temperature. Opening the kiln too early can cause thermal shock, cracking your beautiful new piece. Once the kiln is completely cool, you can open it and admire your work. Carefully lift the piece from the mold. Thanks to the kiln wash, it should separate easily. You can then clean any residual kiln wash off your piece and your molds, getting them ready for your next project.
Essential Safety Tips for Glass Slumping
Working with hot glass is an incredible experience, but it requires respect for the process and your materials. Think of safety not as a set of restrictive rules, but as the foundation that allows you to create with confidence and freedom. When you have your safety practices down, you can focus all your creative energy on your project instead of worrying about what could go wrong. Taking a few simple precautions protects you, your workspace, and your beautiful glass creations. Before you even think about turning on the kiln, make sure your safety habits are just as solid as your artistic vision. These tips will help you build a secure and sustainable studio practice for years to come.
Your Protective Gear Checklist
Before you start a project, get your safety gear in order. The right equipment is essential when you’re working with high temperatures. First, you’ll need a good pair of heat-resistant gloves for reaching into a hot kiln to make adjustments or check on your project. For handling hot glass after it’s been removed from the kiln, a sturdy pair of oven mitts will do the trick. Most importantly, protect your eyes with infrared safety glasses. They shield you from the intense heat and light that radiates from the kiln’s interior, which is something regular sunglasses or safety glasses can’t do.
Kiln Safety and Ventilation
Your kiln is the heart of your studio, so it’s important to treat it with care. Always make sure your kiln, shelves, and molds are perfectly level before firing. If anything is tilted, your glass could slide or slump unevenly, leading to a disappointing result or even a damaged mold. Proper ventilation is also a must. Firing glass can release fumes from binders, shelf paper, or other substances, so working in a well-ventilated area is critical for your health. Whether you have a dedicated ventilation system or can open a garage door, make sure fresh air is circulating to whisk away any potential irritants.
Handling and Storing Glass Safely
Properly handling your glass and molds is key to preventing injuries and getting great results. Before every single firing, you must prepare your mold by applying a separator, like kiln wash. This step is non-negotiable, as it creates a barrier that prevents the hot glass from fusing permanently to your mold. When you’re working with sheet glass, remember that the edges can be sharp, so handle it carefully. After a firing, always clean your molds thoroughly to remove any leftover kiln wash or tiny glass debris. A clean, well-maintained mold is a safe mold that will last you for many projects to come.
Common Glass Slumping Mistakes to Avoid
Every artist makes mistakes, especially when learning a new technique. Think of these common slip-ups not as failures, but as rites of passage in your glass slumping journey. Knowing what to watch for can save you a lot of time, materials, and heartache. Let’s walk through some of the most frequent hurdles beginners face and how you can gracefully sidestep them. Getting these fundamentals right from the start will help you create beautiful, successful pieces much sooner.
Skipping the Kiln Wash
This is the one step you absolutely cannot skip. Think of kiln wash as the release agent that creates a protective barrier between your glass and your mold. Without it, the molten glass will fuse directly to the mold’s surface during firing. The result is a beautiful piece that is permanently stuck and will likely break itself and the mold if you try to force it out. Before every single firing, you must prepare your molds by applying several thin, even coats of kiln wash and letting it dry completely. It’s a small task that prevents a huge disaster.
Using Incompatible Glass COEs
In the world of glass fusing, COE is king. COE, or Coefficient of Expansion, tells you how much a specific type of glass will expand when heated and shrink when cooled. It is critical that all the glass in a single project has the same COE. If you mix glass with different COEs, like COE90 and COE96, they will fight against each other as they cool. This creates internal stress that will cause your finished piece to crack, either in the kiln or days later. Always check your glass and stick to one COE system for your entire project.
Heating or Cooling Too Quickly
Patience is a virtue, especially when firing glass. Heating or cooling your project too rapidly causes thermal shock, which is a primary cause of cracking. Your glass and your mold need to heat up and cool down at a slow, controlled rate. A proper firing schedule gradually brings the kiln up to temperature, allows the glass to slump, and then slowly cools it down through an annealing phase. This process relieves stress in the glass, making it strong and stable. Rushing it is a recipe for a cracked project, so always follow a tested firing schedule.
Cutting Glass to the Wrong Size
Precision matters when you’re preparing your glass for a slumping mold. As a general rule, the glass you cut should be the same size as the top of your mold. If your glass is too large, it will droop over the sides as it softens, creating an unwanted lip and making it difficult to remove from the mold. If your glass is too small, it may not slump enough to fully take the shape of the mold, or it could shift during firing. Measure carefully and cut your glass to fit the mold’s top dimensions for a clean, predictable slump.
Caring for Your Glass Slumping Molds
Your glass slumping molds are an investment, and with the right care, they can last for many, many firings. Taking a few extra minutes after each project to clean and store them properly will protect their delicate surfaces and ensure you get beautiful, consistent results every time. Think of it as part of the creative process. Just like you care for your brushes or other tools, your molds need a little attention to stay in top shape. Proper care boils down to three simple habits: cleaning them after each use, storing them correctly, and knowing when it’s time for a replacement. Mastering these steps will save you from frustrating mishaps and help you get the most out of your collection.
Cleaning After Each Use
After you’ve removed your cooled glass piece, your first step should always be to clean the mold. Any leftover kiln wash or primer needs to be completely removed before you reapply a fresh coat for your next project. The easiest way to do this is with a stiff, dry brush. Gently scrub the surface to brush away all the old material. Be thorough but not aggressive, as you don’t want to scratch the ceramic.
Never use water to clean a mold, especially when it’s still warm, as the sudden temperature change can cause it to crack. A dry brush is all you need. Once it’s clean, you have a fresh surface ready for a new, even coat of kiln wash. This simple cleanup routine prevents residue buildup and keeps the mold’s surface smooth for your next slump.
Storing Your Molds Correctly
How you store your molds is just as important as how you clean them. Once you’ve applied a fresh coat of kiln wash, handle the mold carefully to keep the primed surface in perfect condition. Any chips or scratches in the primer can transfer to your glass or cause it to stick during firing.
Find a dedicated spot for your molds on a flat, sturdy shelf where they won’t be bumped or knocked over. Avoid stacking them directly on top of one another, as this can damage the surfaces and intricate details. If you need to stack them, place a soft cloth or piece of kiln shelf paper between each one. Keeping them in a dry, stable environment ensures they are always ready for your next firing in the kiln.
Knowing When to Replace a Mold
While a well-cared-for mold can last for dozens of firings, they don’t last forever. It’s important to know the signs of wear and tear so you can replace a mold before it ruins a project. Inspect your molds regularly for any significant damage. Look for deep scratches, chips, or fine cracks that develop over time.
If you notice damage that could cause the glass to stick or create an unwanted texture on your finished piece, it’s time to retire that mold. Firing with a compromised mold risks your glass sticking permanently, which can destroy both your artwork and the mold itself. While it can be hard to say goodbye to a favorite shape, replacing a worn-out mold is a necessary step to guarantee successful slumping.
Tips for Your First Slumping Project
You’re ready to start slumping! It’s an exciting process, and these tips will help make your first few projects successful and fun. Think of these as your friendly guideposts as you begin to explore how glass takes shape in the heat.
Start With Simple Mold Shapes
When you’re just starting, it’s best to begin with uncomplicated shapes. Think of it as learning to walk before you run. Simple molds for small plates, soap dishes, or trinket trays are perfect for your first few projects. You can take a flat fused piece you’ve already created and give it a new dimension. This approach lets you get a feel for the slumping process and observe how the glass moves without the complexity of a deep or intricate mold. Starting simple builds your confidence and provides a solid foundation for the more ambitious projects you’ll tackle later. You’ll be amazed at the beautiful, functional art you can create right from the start.
Keep a Firing Log
This might sound like homework, but trust me, keeping a firing log is a game-changer. The exact time and temperature needed to slump a piece can change based on the mold’s shape, the depth you want to achieve, and the thickness of your glass. By writing everything down, you create a personal playbook for your specific kiln and materials. Note the type of glass, its thickness, the mold you used, and the full firing schedule you programmed. Don’t forget to add a photo or a quick sketch of the final result. This log will become your most valuable tool for replicating your successes and figuring out what went wrong if a piece doesn’t turn out as expected.
Experiment With Color, Thickness, and Temperature
Once you have a few simple projects under your belt, it’s time to play! Don’t be afraid to experiment with different colors, glass thicknesses, and firing temperatures. See how a vibrant sheet of COE90 glass slumps compared to a more transparent piece. Try using a slightly thicker blank to see how it affects the final shape and durability. Small adjustments to your peak temperature or hold time can create subtle or dramatic differences in the final slump. As long as you remember the basics, like applying kiln wash, this is your chance to get creative. Every firing is a new opportunity to learn what your glass and kiln can do together.
Related Articles
- Glass Slumping 101: A Complete Beginner’s Guide
- How to Make Slumped Bottles: A Simple DIY Guide
- 3 Types of Glass Art Techniques
- Glass Casting 101: A Complete Beginner’s Guide
Frequently Asked Questions
What’s the real difference between slumping and fusing? Think of it this way: fusing is like gluing with heat, while slumping is like bending with heat. Fusing is the process of melting two or more pieces of glass together to create a single, flat piece. Slumping takes that single piece of glass and gently heats it just enough for it to soften and take the shape of a mold. You almost always fuse your design flat first, and then slump it into its final three-dimensional form in a separate firing.
Do I really need a kiln, or can I use my home oven? You absolutely need a kiln designed for glasswork. A kitchen oven simply cannot reach the high temperatures, often over 1200 degrees Fahrenheit, required to soften glass. Even more importantly, kilns are built to cool down very slowly and precisely. This controlled cooling process, called annealing, is what makes the glass strong and prevents it from cracking due to stress.
My slumped piece cracked after it cooled. What went wrong? This is a common and frustrating problem, and it’s almost always caused by thermal shock. This happens when the glass heats up or, more often, cools down too quickly. The most likely culprit is opening the kiln before it has returned all the way to room temperature. Even a small draft of cool air can be enough to crack a piece. It could also happen if you accidentally mixed glass with different COEs, so always double-check that your glass is compatible.
How do I know what firing schedule to use for my project? Finding the right schedule is a key part of the learning process. Your kiln’s manual is an excellent place to start, as most manufacturers provide basic schedules for fusing and slumping. The glass manufacturer is another great resource; for example, Bullseye provides tested firing guides for their glass. As you get more experience, you’ll learn how to adjust these schedules for different molds and glass thicknesses, which is why keeping a detailed firing log is so valuable.
Do I have to fuse my glass flat before I slump it? While you can technically slump a single sheet of glass, you will get much better results by fusing your glass into a solid blank first. Most slumping projects work best with a glass thickness of about 6mm, which is usually achieved by fusing two 3mm sheets together. This creates a piece that is sturdy, slumps evenly, and is durable enough to be used as a bowl or plate. Fusing first also ensures any decorative elements in your design are locked in place.