
As a glass artist, you know that your tools can either support or hinder your creative vision. When it comes to shaping glass, you have options, but stainless steel glass slumping molds are in a class of their own. Unlike ceramic molds, which heat and cool slowly, stainless steel is incredibly efficient, making it perfect for specific techniques like draping glass over a form. This quality allows the glass to slide and form smooth, organic curves without sticking. If you want to create a series of matching plates or elegant, stand-up art pieces with consistent results, these durable molds are your best friend. Let’s explore the different types and how to select the perfect one for your next project.
Key Takeaways
- Embrace Stainless Steel for Clean Shapes and Quick Firings: Use stainless steel molds to create elegant, simple forms like bowls and draped art. Their ability to heat and cool quickly allows for shorter firing schedules, making them an efficient choice for your studio.
- Master Your Prep for Flawless Results: The success of your project depends on preparation. Always apply a smooth, even coat of kiln wash to prevent sticking, and use a firing schedule that accounts for steel’s unique thermal properties to avoid cracks or warping.
- Protect Your Investment with Smart Buying and Care: Choose molds made from thick, 316-grade stainless steel for maximum durability. After firing, clean your molds gently and store them properly to prevent scratches, ensuring they remain a reliable tool for countless projects.
What Is a Stainless Steel Glass Slumping Mold?
If you’re looking to shape glass, a stainless steel slumping mold is one of the most versatile tools you can have in your studio. Think of it as a sturdy, heat-resistant form that helps you transform a flat sheet of glass into a beautiful, three-dimensional piece. While ceramic molds are great for intricate details, stainless steel molds are the go-to for creating simpler, elegant shapes. They are perfect for making gentle curves, shallow bowls, and draped forms that look clean and modern. Let’s get into exactly how the process works and why stainless steel is such a popular choice among glass artists.
The Glass Slumping Process
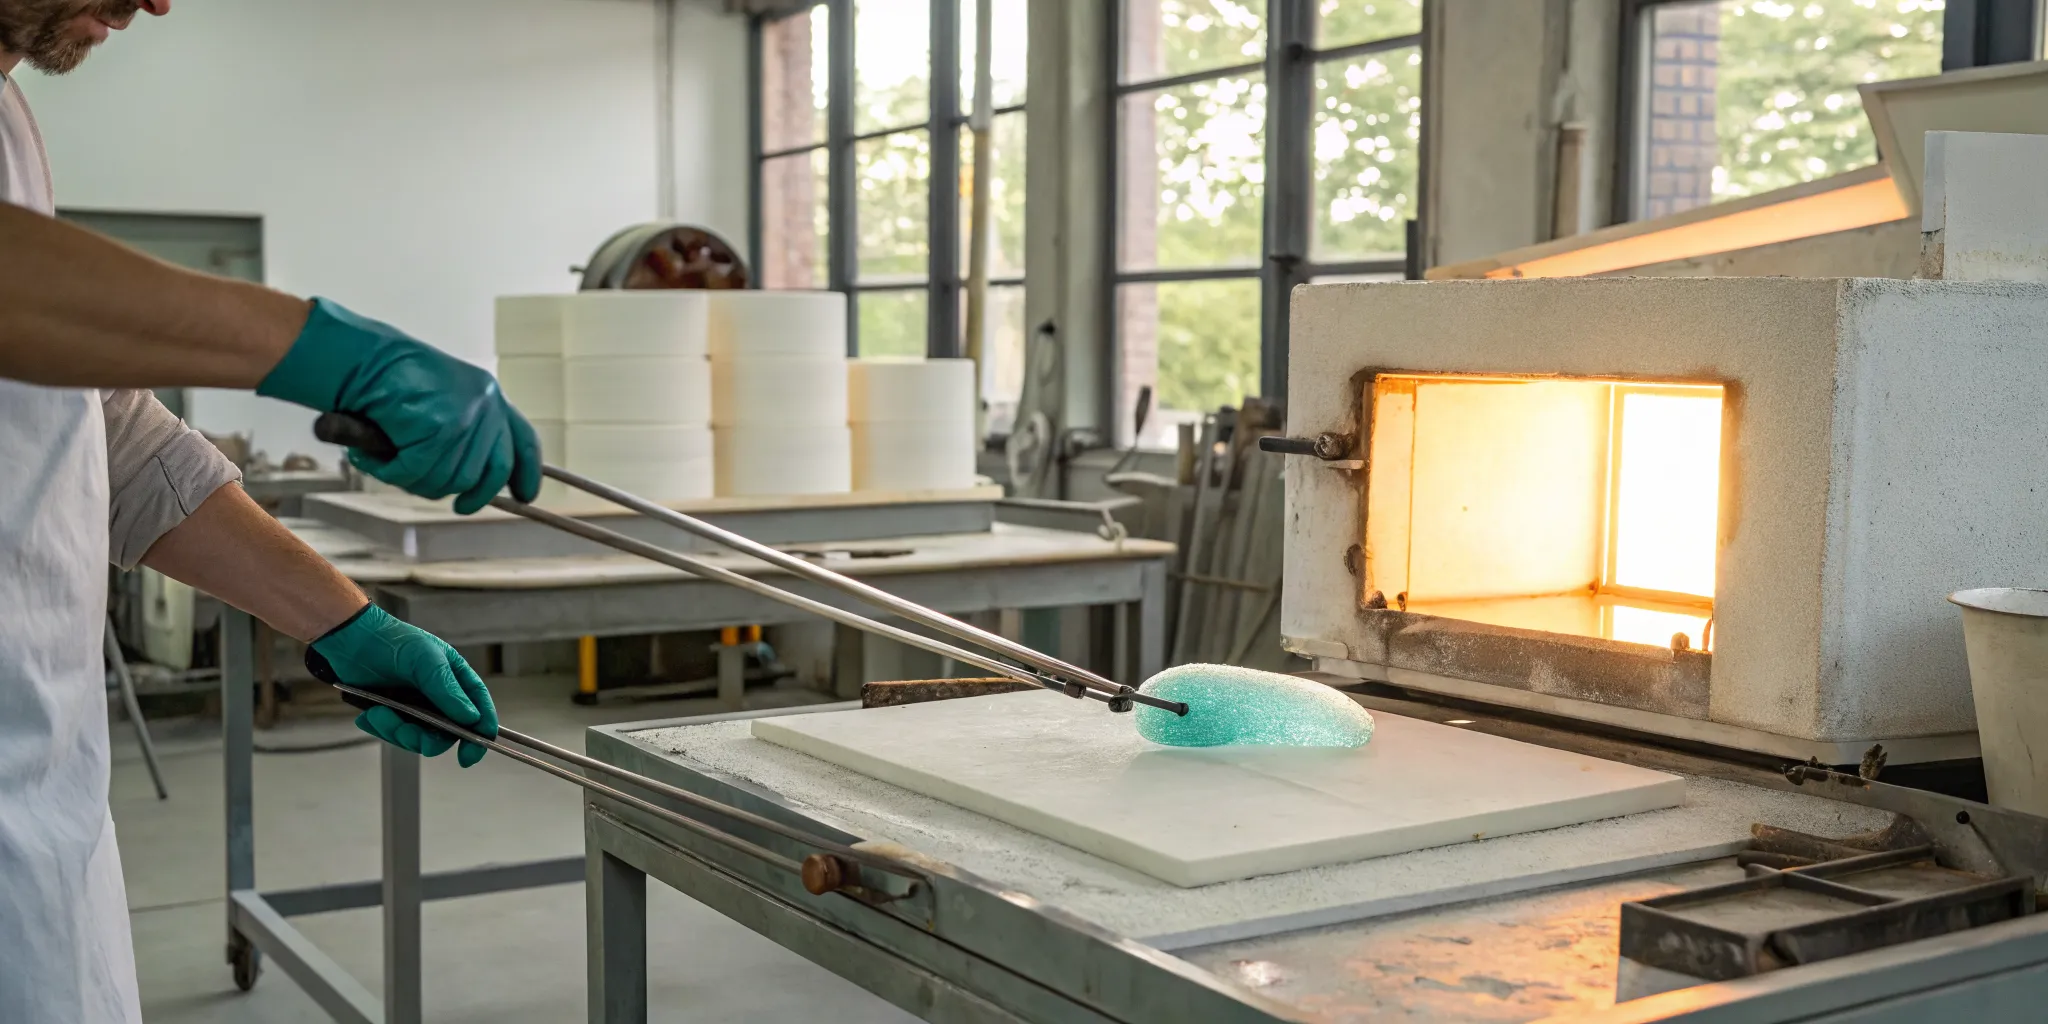
Glass slumping sounds technical, but it’s a pretty straightforward concept. The process uses heat and gravity to shape sheet glass over a form. You start by placing your sheet of COE90 glass or COE96 glass on top of a mold. Then, the mold and glass go into a kiln. As the kiln heats up, typically to around 1300°F, the glass softens and “slumps” or sinks into or over the shape of the mold. Once it has taken the desired form, you carefully cool it down to create a solid, finished piece. It’s a fantastic way to create functional art like plates, bowls, and decorative panels.
Why Choose Stainless Steel Molds?
So, why reach for stainless steel over other materials? The biggest advantage is how quickly it heats and cools. This efficiency means you can have shorter firing schedules, which saves you time and energy. Stainless steel molds are also incredibly durable. Unlike plaster or ceramic molds that can degrade over time, a good stainless steel mold can last for years, if not a lifetime, with proper care. This makes them a great long-term investment for your studio. For the best results, look for molds made from 316-grade stainless steel, as it offers higher resistance to the intense heat inside your kiln.
Common Types of Stainless Steel Molds
When you start exploring the world of glass slumping, you’ll quickly find that stainless steel molds are essential tools in any artist’s studio. Unlike their ceramic counterparts, which can be intricate and detailed, stainless steel
Understanding the different types of stainless steel molds available is the first step toward bringing your vision to life. It’s not just about picking a shape you like; it’s about matching the mold to your artistic goal, your glass, and your equipment. From the technique you use, like slumping or draping, to the size of your kiln, several factors will guide your choice. Choosing the right one can be the difference between a beautiful, finished piece and a frustrating learning experience. Let’s walk through the most common types and how to select the perfect one for your next project, so you can feel confident firing up your kiln.
Slumping vs. Draping: What’s the Difference?
The easiest way to understand the difference between slumping and draping is to ask yourself: are you forming the glass into a mold or over one? Slumping is the process of placing glass inside a concave mold, like a bowl or platter, and heating it until it sinks down to take the mold’s shape. Draping involves placing glass on top of a convex form, like a small hill or curve, and letting gravity pull the softened glass down and around it.
While you can use ceramic molds for slumping, stainless steel molds are the go-to choice for draping. Their smooth surfaces allow the glass to slide and form organic curves without sticking. You can certainly slump with stainless steel molds too, especially for creating simple bowls or curved panels.
Popular Shapes and Designs
Stainless steel molds are typically used for simpler, more geometric shapes. Think of elegant S-curves for creating stand-up art pieces, gentle arcs for making spoon rests, or simple round forms for crafting shallow bowls and plates. Because they are so durable and consistent, they are perfect for artists who want to produce a series of matching items, like a set of appetizer plates or coordinating curved panels for a larger stained glass project.
Some stainless steel molds are even designed to be bent by hand, giving you the freedom to create your own custom curves. These versatile tools are usually thin sheets of steel that you can shape before placing them in the kiln, offering a great way to experiment with unique forms.
How to Choose the Right Mold Size for Your Project
Choosing the right mold size is about more than just the final dimensions of your artwork. First and foremost, you need to consider your kiln. Before you buy a mold, measure your kiln shelf. You’ll want to make sure the mold fits with at least one inch of clearance on all sides to allow for proper air circulation, which is critical for even heating.
Next, think about the piece of glass you plan to use. The size of your glass blank should correspond to the mold’s shaping surface. Product descriptions often provide a “maximum slumping size” to guide you. Using a piece of COE90 glass that’s too small won’t allow it to properly take the mold’s shape, while a piece that’s too large might flow over the edges unpredictably.
How to Spot a Quality Stainless Steel Mold
When you’re ready to invest in a new tool for your studio, you want to make sure it’s built to last. Stainless steel molds are no exception. While they might look similar at first glance, not all are created equal. A high-quality mold will give you consistent results and withstand countless firings, while a poorly made one can lead to frustration, warped projects, and wasted glass. It’s the kind of tool that, when chosen well, becomes a dependable part of your creative process for years.
Knowing what to look for can save you a lot of headaches down the road. It’s about more than just the shape; it’s about the material itself, the craftsmanship, and how it’s designed to work with your glass. A little bit of knowledge goes a long way in making a smart purchase that supports your art instead of hindering it. By paying attention to a few key details, you can confidently choose a mold that will become a reliable workhorse in your studio. Let’s walk through the three most important factors to consider when you’re shopping for your next stainless steel mold.
Check the Steel Grade and Thickness
The first thing to look at is the type of stainless steel used. For the high temperatures required in a glass kiln, you should look for molds made from 316 stainless steel. This specific grade has a higher temperature resistance compared to other common types of stainless steel, which is essential for durability. A mold made from a lesser grade is more likely to warp or degrade over time, losing its shape and ruining your projects. The thickness of the steel also matters. A thicker, sturdier mold will hold its shape better through repeated heating and cooling cycles, ensuring your slumped pieces come out just as you intended, firing after firing.
Look for a Smooth Finish and Proper Ventilation
Next, inspect the surface of the mold. A quality mold will have a smooth, even finish. Any rough spots, burrs, or deep scratches on the mold’s surface can transfer to your glass or, even worse, cause the glass to stick during the slumping process. While you should always apply a good separator like kiln wash, starting with a smooth surface makes your job much easier and gives you a cleaner release. Also, check for proper ventilation. Some molds incorporate small holes or gaps that allow air to escape as the glass slumps, which promotes even heating and helps prevent air from getting trapped under your project, ensuring a flawless slump.
Ensure Compatibility with Your Glass (COE90 & COE96)
Finally, think about the types of projects you plan to create. Stainless steel molds are fantastic for achieving gentle curves, simple bowls, and clean, geometric forms. They are an excellent choice when working with popular materials like COE90 glass. Because of their simple shapes, they are also very forgiving for artists just getting started with slumping. Whether you’re using sheets of COE96 glass or your own fused designs, matching the mold’s capabilities to your artistic goals is key. For highly intricate or detailed shapes, you might explore other mold materials, but for beautiful, functional basics, stainless steel is a reliable and versatile option that belongs in every glass artist’s toolkit.
Your Step-by-Step Guide to Using Stainless Steel Molds
Ready to turn a flat piece of glass into a beautiful, three-dimensional work of art? Using stainless steel molds is a straightforward process that opens up a world of creative possibilities. By following a few key steps, you can ensure your glass slumps perfectly every time, resulting in a smooth, professional finish. Let’s walk through the process together, from prepping your mold to the final cooldown.
Prepare Your Mold with Kiln Wash
First things first, you need to prepare your mold. This is a critical step you should never skip. Applying a separator, like kiln wash, is essential because it prevents the hot glass from sticking to your mold during the slumping phase. A thin, even coating creates a barrier that allows your finished piece to release easily. For best results, apply several thin coats of kiln wash, letting each one dry completely before adding the next. A smooth application is your secret weapon for a flawless glass surface, free of unwanted textures from the mold.
Set Up Your Kiln and Firing Schedule
Glass slumping is a fascinating process that uses gravity and heat from a kiln to shape sheet glass over a mold. To get it right, you need a reliable firing schedule. This schedule dictates how quickly your kiln heats up, how long it holds at specific temperatures, and how it cools down. The right schedule depends on the type of glass you’re using, its thickness, and the size of your project. Start with a schedule recommended by your glass manufacturer and keep a detailed log. This will help you fine-tune your process for consistent, beautiful results with every firing.
Find the Perfect Slumping Temperature
The key to a successful slump is finding that sweet spot temperature where the glass becomes soft enough to bend but doesn’t melt completely. For most slumping projects, this happens around 1200°F to 1250°F. At these temperatures, your stainless steel mold will hold its shape perfectly while the glass drapes over it. The exact temperature and hold time will determine the depth of your slump. A lower temperature might give you a gentle curve, while a slightly higher one will create a more defined shape. Don’t be afraid to experiment with scrap glass to find what works best in your kiln.
Properly Cool and Anneal Your Glass
What goes up must come down, and how your glass cools is just as important as how it heats. After the glass has slumped into its new shape, it must be cooled slowly in a process called annealing. This controlled cooling relieves internal stress within the glass, preventing it from cracking due to thermal shock. Your firing schedule must include a proper annealing cycle specific to the type of COE90 glass you are using. As tempting as it is, resist the urge to peek. Opening the kiln too early can ruin your piece, so patience is truly a virtue here.
Common Beginner Mistakes to Avoid
We’ve all been there, peeking into the kiln with high hopes, only to find a piece that didn’t quite turn out. While every mistake is a learning opportunity, avoiding a few common pitfalls with stainless steel molds can save you time, materials, and a bit of heartache. Let’s walk through some of the most frequent slip-ups I see and how you can sidestep them on your way to creating beautiful slumped glass art. Getting these basics right will help you build a strong foundation for your glass art practice and ensure your projects are successful from the start.
Rushing Mold Prep
One of the most tempting shortcuts is skimping on mold prep, but trust me, it’s not worth the risk. When glass melts directly onto an unprepared stainless steel surface, it can stick permanently. This can ruin both your beautiful glass piece and your mold. Unlike some other materials, you can’t just rely on a quick swipe of kiln wash. You need to ensure your mold is thoroughly and evenly coated with a quality separator to create a reliable barrier between the hot glass and the steel. Taking those extra few minutes to prep correctly is one of the best investments you can make in your project.
Ignoring Your Firing Schedule
Every glass artist learns that the kiln is where the magic happens, but that magic depends on a precise recipe: your firing schedule. It’s not just about hitting a target temperature; it’s about the speed of heating and cooling. Stainless steel heats and cools differently than ceramic, so you can’t use the same schedule for both. Ignoring the specific needs of your mold and glass can lead to thermal shock, incomplete slumping, or an over-melted puddle. Always follow a schedule designed for your specific materials to get predictable, successful results every time.
Using Too Much Glass
It can be exciting to think big, but overloading your stainless steel mold is a classic beginner error. While sturdy, some stainless steel molds are made from thinner sheets that can bend or warp under the weight of too much glass during firing. This not only damages your mold but can also distort your final piece, leaving you with a shape you didn’t intend. Before you start, consider the size and thickness of your mold. It’s better to start with a slightly smaller piece of glass and learn how it behaves than to risk damaging your equipment.
Mismatching Your Mold and Glass
Not all molds are created equal, and using the right one for your technique is key. Stainless steel molds are fantastic for draping glass over a form, as their quick heating properties allow the glass to soften and fall gracefully. However, for slumping glass into a deep form, like a bowl, a ceramic mold often provides better support and slower, more even heating. Using a stainless steel mold for a deep slump can sometimes be tricky. Matching your mold material to your artistic goal is a fundamental step that sets you up for success from the start.
How to Care for Your Stainless Steel Molds
Stainless steel molds are workhorses in the studio, but a little maintenance goes a long way. Taking care of your molds isn’t just about keeping them looking nice; it’s about ensuring they perform perfectly for every project. Proper care prevents your glass from sticking, protects the mold’s surface, and extends its lifespan, saving you money and frustration. Think of it as a simple routine that protects your investment and guarantees beautiful, consistent results. By focusing on cleaning, handling heat-related changes, and storing them correctly, you can keep your molds in prime condition for years of glass slumping.
Clean Your Mold After Every Firing
This seems straightforward, but it’s one of the most important steps. After each firing, you need to remove the old kiln wash. This primer is what prevents the hot glass from sticking to your mold, but leftover residue can create an uneven surface on your next piece. Once your mold has cooled down completely, use a stiff nylon brush and some water to gently scrub away the old primer. Avoid using steel wool or harsh abrasives, as they can scratch the mold’s surface. After cleaning, make sure the mold is completely dry before you apply a fresh, even coat of kiln wash for your next project.
Handle Surface Changes from Heat
Don’t panic if your shiny new mold comes out of the kiln looking a little different. It’s completely normal for stainless steel to discolor when exposed to high temperatures, often turning a golden, bronze, or bluish hue. This is just a surface reaction and won’t affect your mold’s performance. What you want to avoid is spalling, which is when the metal itself starts to flake or peel. This is very rare with high-quality molds made from temperature-resistant steel, like 316 stainless. As long as the surface of your mold remains smooth, the color change is nothing to worry about. It’s just a sign that your kiln is doing its job.
Store Molds Correctly to Prevent Damage
Your stainless steel molds are a valuable part of your creative toolkit, so storing them properly is key to their longevity. The main goal is to protect them from scratches, dents, and warping. A scratch on your mold can easily transfer to your finished glass piece. Find a dry, dedicated spot for them, like a flat shelf or a wide drawer. Avoid piling them on top of each other, which can cause damage. If your molds have holes, you can even hang them on a wall rack. Taking a moment to store your molds carefully after each use ensures they’ll be ready to go and in perfect shape for your next flash of inspiration.
Take Your Art Further: Advanced Techniques
Once you feel comfortable with the basics of slumping glass in stainless steel molds, you can start exploring more advanced techniques. This is where the real fun begins, and you can push your creative boundaries to make pieces that are truly unique. Stainless steel is an excellent partner for this kind of experimentation. Because it heats and cools relatively quickly, you can often achieve your desired results with shorter firing times compared to denser ceramic
Moving beyond a single piece of glass in a mold opens up a world of possibilities. You can start thinking about your projects in multiple stages, combining different warm glass techniques to achieve complex and beautiful results. Think about creating your own patterned glass first, then giving it shape. Or, consider how layering different colors and textures can add incredible visual depth to a simple bowl or platter. These advanced methods allow you to put more of your personal artistic signature into every piece you create. The key is to build on the skills you already have, so let’s look at a few ways you can take your glass art to the next level using your trusty stainless steel molds.
Combine Fusing and Slumping for Complex Designs
Combining fusing and slumping is a fantastic way to create intricate, patterned forms. The process involves two separate firings. First, you’ll arrange and fuse your glass pieces together on a flat kiln shelf to create a single, designed blank. This is your chance to play with color blocking, mosaic-like patterns, or abstract arrangements. Once your fused piece has cooled, you can place it on top of a stainless steel mold and fire it a second time to slump it into its final three-dimensional shape, like a bowl or a platter. This two-step technique gives you precise control over both the surface design and the final form of your art.
Layer Glass for Incredible Depth and Color
Layering is one of the most effective ways to create stunning depth and unique color interactions in your slumped pieces. By stacking two or more sheets of compatible glass, you can blend colors and create new hues that you couldn’t achieve with a single layer. Try combining transparent and opaque glass to play with light, or add a layer of shimmering dichroic glass for a pop of iridescence. Remember that every layer adds thickness, which will affect your firing schedule. It’s a great idea to start with two or three layers of COE90 glass and keep detailed notes on your combinations and results.
Create Unique Textures and Patterns
Stainless steel molds are perfect for creating smooth, consistent shapes, but you can also use them to produce pieces with incredible texture. Before you even get to the slumping stage, you can create a textured surface on your glass blank during the initial fusing fire. Another popular method is to incorporate elements like glass frit, stringers, or confetti between your layers. When fused, these elements create beautiful, tactile patterns within the glass. While stainless steel itself provides a smooth surface, understanding what glass slumping molds are made of can help you choose the right tool for any project you dream up.
Where to Find the Best Stainless Steel Molds
Finding the right mold can feel like a treasure hunt, but knowing where to look makes all the difference. When you’re ready to add a stainless steel mold to your collection, you want to find a quality piece from a reliable source without spending hours searching online. Let’s walk through where to find the best molds and what to look for so you can buy with confidence.
Your One-Stop Shop: ArtGlassSupplies.com
When you need a specific tool for your studio, the last thing you want to do is jump from site to site. I always recommend starting your search at ArtGlassSupplies.com because they have a fantastic selection of molds for glass slumping. You can find a variety of simple, geometric shapes like gentle curves and bowls that are perfect for stainless steel. Because they cater to glass artists, you can trust that their products are designed for your needs. It’s so much easier to find what you’re looking for in a place that’s curated for your craft, whether you’re just starting out or expanding your professional toolkit.
Understanding the Cost: Entry-Level vs. Pro Molds
As you browse, you’ll likely notice a range of prices for stainless steel molds. The cost often comes down to the grade of the steel. If you see a more expensive option, it’s probably made from a higher-quality material like 316 stainless steel, which has better heat resistance. While any stainless steel mold will discolor over time (which is totally normal), a higher-grade steel is less likely to have issues like spalling at the high temperatures inside your kiln. Think about your budget and how often you plan to use the mold to decide if an entry-level or professional-grade option is the right investment for you.
What to Look For When Buying Molds Online
One of the biggest advantages of stainless steel is how quickly it heats and cools. This efficiency means you can achieve shorter firing times compared to denser ceramic molds, which is a huge plus for any busy artist. When you’re shopping online, look for product descriptions that highlight the steel’s quality and smooth finish. Most importantly, always double-check that the mold is a good fit for the glass you work with. Whether you’re using COE90 or COE96 glass, ensuring compatibility is key to a successful slump. A little bit of research upfront saves you from any surprises later.
Related Articles
- Glass Slumping 101: A Complete Beginner’s Guide
- How to Make Slumped Bottles: A Simple DIY Guide
- Large Round Slump Ring Mold | Art Glass Supplies – Slumping & Draping Mold
- Coaster Slumping Mold | Art Glass Supplies – Slumping & Draping Molds
- Round Slumper 11.8″ Bullseye Glass Mold | Art Glass Supplies – Bullseye Gl
Frequently Asked Questions
When should I choose a stainless steel mold over a ceramic one? Think of it this way: stainless steel molds are your go-to for graceful curves and quick projects. Because they heat and cool faster, they are perfect for draping glass over a form to create things like S-curves or shallow platters. Ceramic molds heat more slowly and evenly, which makes them ideal for slumping glass into a form, especially if you want to capture intricate details or create a deeper bowl.
Do I really have to clean and re-apply kiln wash after every use? Yes, this is one step you should never skip. Think of the old kiln wash as a used-up canvas. It’s full of tiny imperfections that can transfer to your next project. Taking a few minutes to scrub the mold clean and apply a fresh, smooth coat of separator ensures your glass will release cleanly and have a perfect, unblemished surface.
My shiny stainless steel mold turned a bronze color in the kiln. Is it ruined? Not at all, this is completely normal. When stainless steel is exposed to the high temperatures in a kiln, it naturally develops a patina, which can be a golden, bronze, or even bluish color. This discoloration is only on the surface and will not affect the mold’s performance. As long as the surface remains smooth and isn’t flaking, your mold is in great shape.
What’s the best firing schedule to use with a stainless steel mold? There isn’t one single schedule that works for every project. The right firing schedule will always depend on the type of glass you’re using (like COE90 or COE96), its thickness, and your specific kiln. A great starting point is to use the schedule recommended by your glass manufacturer. Keep a detailed log of your firings so you can see what works and make small adjustments for future projects.
Can I make a deep bowl using a stainless steel mold? While you can create beautiful shallow bowls and plates, stainless steel molds are generally not the best choice for deep forms. The quick heating properties that make them great for draping can sometimes make it tricky to get an even slump into a deep cavity. For a deep bowl, a ceramic mold is often a better option because it provides more support and heats the glass more slowly and evenly.