
As a jewelry artist, I’m always looking for new ways to add a personal touch to my work. That’s why I fell in love with liquid enamel. It gives you so much artistic freedom, letting you move beyond simple metalwork and literally paint with glass. You can create intricate lines with a fine brush, pour colors for stunning abstract effects, or layer shades to build incredible depth. This versatility is what makes creating liquid enamel jewelry so rewarding. It truly combines the art of painting with the craft of metalwork. I’ll walk you through my favorite application techniques, from basic coverage to advanced effects like sgraffito.
Key Takeaways
- Nail your prep work for a flawless finish: Your success starts before you even touch the kiln. Mix your enamel powder with water until it reaches a smooth, creamy consistency and always let your piece dry completely before firing to avoid bubbles and cracks.
- Understand your kiln for consistent results: Firing at the right temperature (around 1450°F) for the correct amount of time is what creates that beautiful, glassy surface. Remember to always prioritize safety with heat-resistant gloves and proper ventilation.
- Pick the right enamel for your project: For a true, luminous glass surface, kiln-fired enamel is the way to go. If you don’t have a kiln or are working with heat-sensitive materials, cold enamel offers a great resin-based alternative for adding durable color.
What is Liquid Enamel?
If you’ve ever wanted to paint with glass, liquid enamel is your new best friend. Think of it as a special kind of paint made from finely powdered glass suspended in water. Sometimes called brushable enamel, it allows you to add vibrant, permanent color to metal surfaces like copper, silver, or steel. You simply paint your design onto your metal piece and then fire it in a kiln. The heat melts the glass particles, fusing them to the metal and creating a smooth, glossy, and incredibly durable finish.
This process opens up a whole world of creative possibilities for jewelry makers and metal artists. Unlike other coloring methods, enameling gives you a true glass coating that won’t chip or fade over time. It’s perfect for adding intricate details, creating bold fields of color, or even achieving delicate watercolor-like effects. Whether you’re making pendants, earrings, or decorative tiles, liquid enamel gives you the control to bring your colorful visions to life with a professional, lasting result. It’s a fantastic way to combine the art of painting with the craft of metalwork.
Art Enamel vs. Dental Enamel: A Quick Clarification
If you search for “liquid enamel,” you might find results from your dentist’s office, which can be confusing. It’s important to know that this is a completely different product from what we use in the studio. Dental enamel is a therapeutic paste containing minerals like calcium phosphate, designed to help restore and strengthen tooth surfaces. It’s all about oral health. The liquid enamel for artists, on the other hand, is a creative medium. It’s made from finely powdered glass suspended in a liquid, ready to be painted onto metal and fired in a kiln. This process creates a permanent, decorative finish. So, while they share a name, one belongs in a medical cabinet, and the other belongs on your workbench.
The Composition and History of Liquid Enamel
The liquid enamel we use for jewelry is a beautifully simple yet powerful medium. It begins as a fine, dry powder of ground glass, which you mix with water or a binding agent to create a smooth, paintable liquid. This allows you to apply it with a brush, pour it, or even dip your metal piece for full coverage. After your design is completely dry, you fire it in a kiln. The heat melts the glass particles, fusing them to the metal and creating a hard, brilliant surface that won’t fade. This technique has been used for centuries, and it also opens the door to advanced methods. For example, with sgraffito, you can scratch designs into a dried base coat before adding more layers, creating incredible depth and texture in your finished piece.
Liquid or Powdered Enamel: What’s the Difference?
It’s helpful to know that liquid enamel actually starts its life as a powder. The enamel you buy is a dry, finely ground glass that you mix with water to create a liquid consistency. This is great because it puts you in complete control. You can decide exactly how thick or thin you want your enamel paint to be, depending on the effect you’re going for. A thicker mix is perfect for opaque coverage, while a thinner, more watery consistency can create beautiful, transparent layers of color. This is different from sifting, where you apply the dry powder directly onto your metal piece.
Why Powder Form Is Often Recommended
Many artists lean towards powdered enamel for a few key reasons, and the biggest one is longevity. When you keep it in a dry place, powdered enamel lasts practically forever, so you can build a collection of colors without worrying about them expiring. You simply mix the amount you need for your current project, which cuts down on waste and saves money in the long run. This is a much more economical approach, especially when you’re experimenting with a wide palette. It ensures that the quality of your enamel remains consistent from the first scoop to the last.
The other major advantage is creative control. When you mix the enamel yourself, you get to decide the exact consistency for your project. Need a thick, opaque layer for a bold design? Add less water. Want a delicate, transparent wash of color that mimics watercolor? Add a bit more. This simple process gives you incredible artistic flexibility. High-quality enamel powders already contain the necessary glass and binding agents, so you have a reliable base to work from every time, helping you achieve consistent results across all your pieces.
In contrast, pre-mixed liquid enamels can sometimes present challenges. They can be sensitive to temperature, with a risk of freezing during shipping in colder months. The heavy glass particles can also settle at the bottom of the container over time, making it difficult to stir them back into a smooth, usable consistency. If the container isn’t sealed perfectly, the water can also evaporate, leaving you with a hardened clump. For these reasons, starting with powder often provides a more reliable and frustration-free experience from the start.
Why Choose Liquid Enamel?
The biggest advantage of liquid enamel is its versatility. Because it behaves like paint, you can apply it in so many different ways. You can use a fine brush for detailed line work, spray it for even coverage, or even dip or pour it over your piece for unique abstract effects. This makes it ideal for advanced techniques like sgraffito, where you scratch a design through a layer of enamel to reveal the color underneath. It’s also perfect for shading and blending colors or carefully filling in tiny, intricate areas of a design. After firing in a kiln, you’re left with a stunning, glassy finish that becomes a permanent part of your piece.
Cold Enamel vs. Kiln-Fired: Which Should You Choose?
When you first start exploring liquid enamel, you’ll quickly see there are two main paths you can take: cold enameling and kiln-firing. Think of them as two different tools for different jobs. Your choice will come down to the final look you want to achieve, the materials you’re working with, and whether you have access to a kiln. Cold enameling is a fantastic kiln-free option that uses resin-based compounds, while kiln-fired enamel uses actual powdered glass to create a true, permanent glass finish. Let’s break down what each method involves to help you decide.
What You Need to Know About Cold Enamel
If working with a hot kiln feels intimidating, cold enamel is a great place to start. It isn’t technically enamel because it doesn’t contain glass. Instead, it’s a UV resin or a resin-ceramic mixture that mimics the look of enamel. You apply it to your piece and cure it with a UV light or gentle heat. The result is a hard, durable, and colorful finish without high temperatures. This makes it perfect for adding color to materials that can’t withstand the heat of a kiln, like wood or certain plastics.
Getting Started with Kiln-Fired Enamel
Kiln-fired enamel is where the real magic of glass comes into play. This liquid enamel is made from finely powdered glass mixed with a liquid medium, creating a paint-like consistency. You can brush, dip, or pour it onto your metal or glass base. After applying, the piece must be completely dry before it goes into the heat. It’s then fired in a kiln at around 1450°F for a few minutes until the glass particles melt and fuse into a smooth, glossy layer. This creates a permanent, vibrant glass coating that won’t easily fade or scratch.
How to Pick the Right Method for Your Jewelry
So, how do you choose? If you want a simple, non-fired option without a major equipment investment, cold enamel is your best bet. It’s a straightforward way to add color and a durable finish. However, if you want to create pieces with a true, luminous glass surface, kiln-fired enamel is the way to go. It offers a depth of color and permanence that resin can’t replicate. Firing is also essential for classic techniques like sgraffito. Working with heat is central to many glass arts, much like fusing sheets of COE90 glass to create larger designs.
Our Guide to the Best Liquid Enamel Brands
When you’re ready to buy your first set of liquid enamels, you’ll find a few different brands on the market. Having options is great, but it can also feel a little overwhelming when you’re just starting out. The good news is that the enameling community has a few trusted favorites that consistently deliver beautiful, reliable results. Investing in a high-quality enamel from a reputable brand is one of the best things you can do for your art. It means you’ll get rich, consistent colors and a product that’s much easier to work with, which lets you focus on your technique instead of troubleshooting your materials.
Think of it as setting yourself up for success from the very beginning. A quality enamel will mix smoothly, apply evenly, and fire predictably in your kiln. This consistency is key to building your skills and confidence. Below, we’ll look at one of the most popular brands available and discuss what makes it a go-to for so many artists, from beginners to seasoned pros. We’ll also cover what to look for in terms of quality and color vibrancy, so you can make an informed choice and start creating stunning jewelry pieces right away.
Why Choose Thompson Enamels?
Thompson Enamel is a name you’ll see again and again, and for good reason. It’s a popular choice for jewelry makers because of its quality and versatility. Their liquid enamels actually start as a fine, dry powder. You simply add water to create the liquid consistency you need for your project. This flexibility is a huge plus, as it allows you to apply the enamel in several different ways. You can spray it for a delicate, even coat, dip your metal pieces for full coverage, pour it for abstract designs, or use a fine brush for detailed work. This adaptability makes it a fantastic medium for all kinds of creative explorations.
Understanding Enamel Products: Colors and Mesh Sizes
Beyond the incredible rainbow of colors available, another key detail to get familiar with is the mesh size. This simply refers to how finely the glass powder is ground before you mix it into a liquid. Different mesh sizes can completely change the texture and finish of your work. For instance, a finer powder, like an 80-mesh, is a great all-rounder and will give you a smooth, uniform surface after firing—similar to the flawless finish you see on high-quality stained glass. On the other hand, using a coarser mesh can create more texture and depth in your design. Knowing this lets you pick the perfect powder for your project, giving you another layer of creative control over the final look of your enameled pieces.
Shop Our Favorite Liquid Enamels
One of the most exciting parts of enameling is playing with color, and Thompson offers a fantastic palette to work with. You can find everything from deep Maroon and classic Black to vibrant Peacock Blue and sunny Goldenrod Yellow. This extensive range of enamel colors allows you to bring any vision to life. Beyond the standard colors, they also offer special base coats like a rich Cobalt Blue or a versatile Clear. These can be used on their own or as a foundation for other colors, opening up even more possibilities for layering and creating unique effects in your jewelry designs. Having a wide selection of high-quality colors at your fingertips is key to developing your personal style.
How to Spot Quality Liquid Enamel
When you start working with liquid enamel, getting the consistency right is the most important step. The amount of water you add to the powder makes all the difference. If you add too little, the mixture can become lumpy and difficult to apply smoothly, sometimes taking on a texture artists describe as “cottage cheese.” On the other hand, adding too much water can dilute the pigment and cause the color to darken or look washed out after firing. The goal is a smooth, creamy consistency that flows easily from your brush or applicator. Nailing this balance is the key to achieving those vibrant, flawless finishes you’re aiming for in your jewelry.
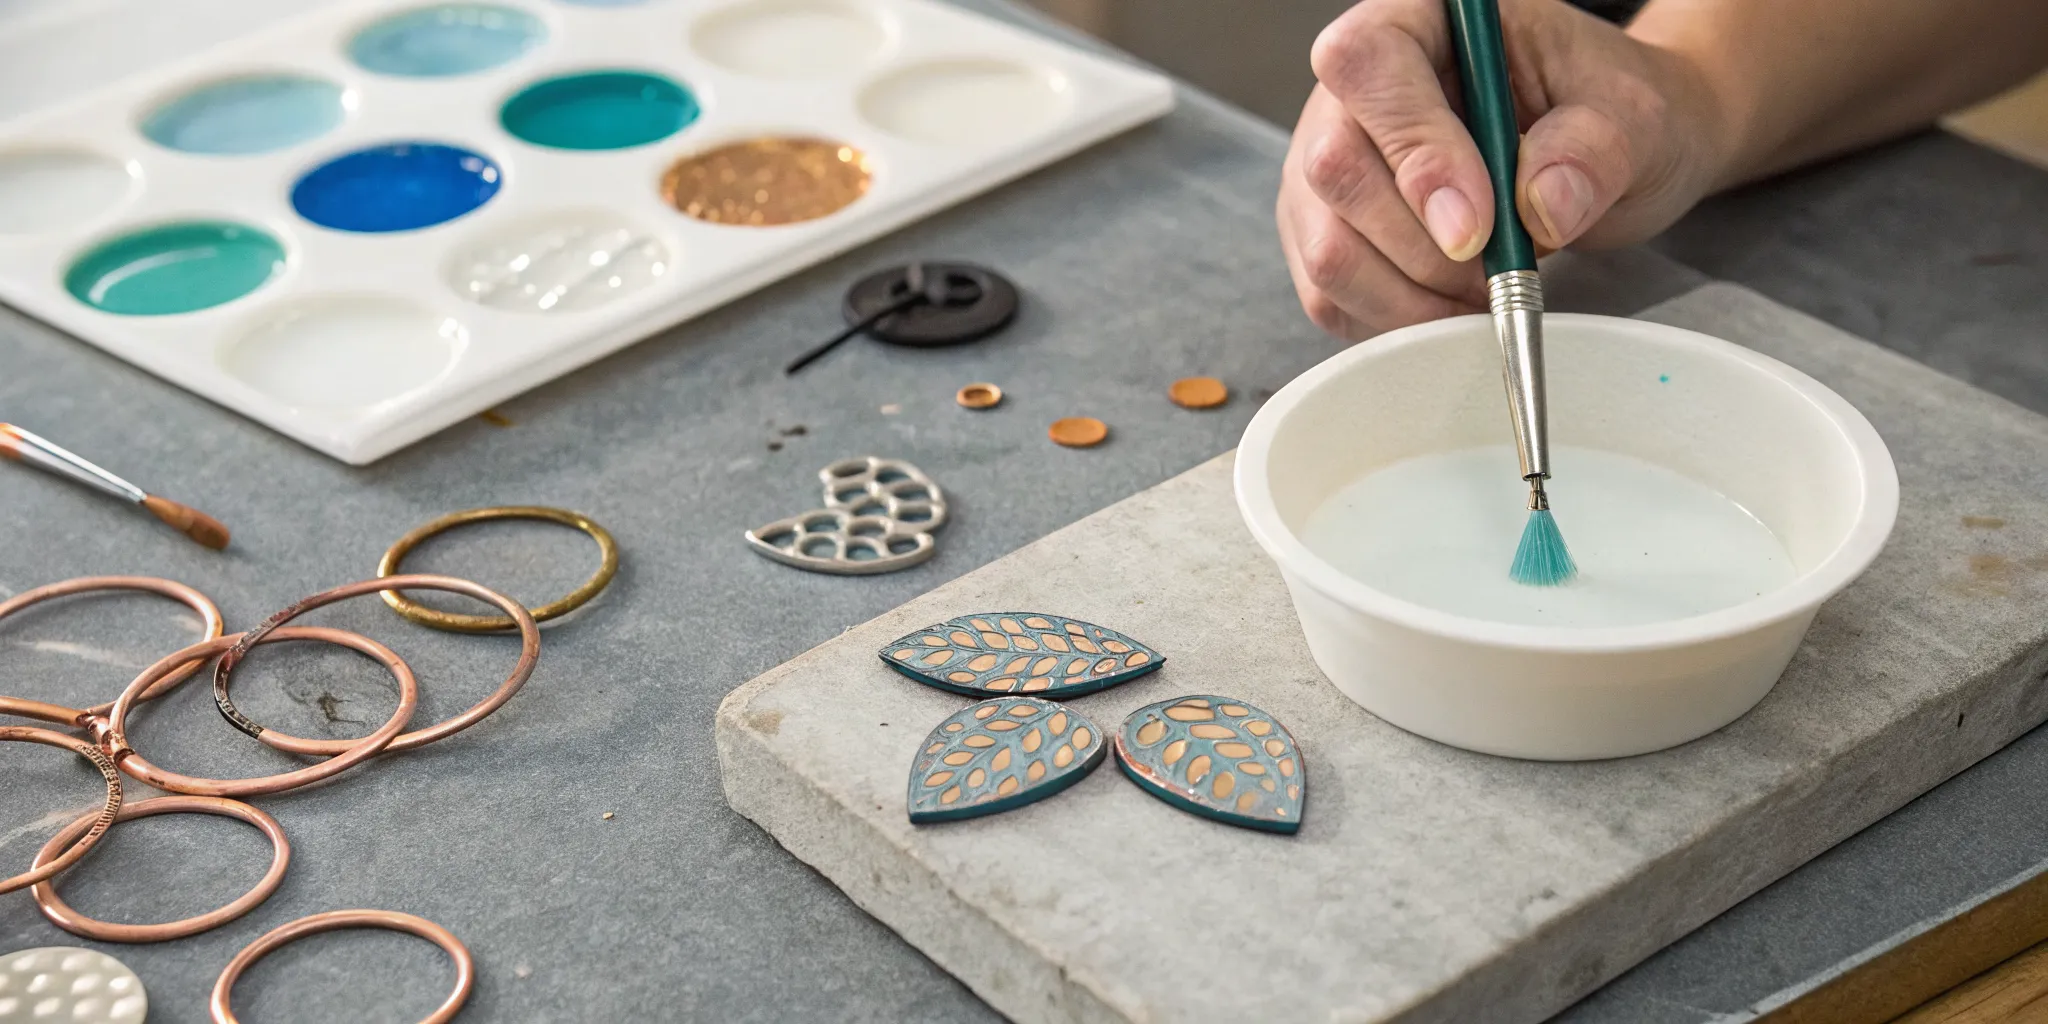
How to Apply Liquid Enamel to Jewelry
This is where your creativity really comes to life. Applying liquid enamel allows for so much artistic freedom, whether you’re aiming for a smooth, solid color or intricate, layered designs. The key is to follow a few simple steps to ensure your piece fires beautifully. It’s easier than it sounds, and once you get the hang of it, you’ll be experimenting with all kinds of techniques. Let’s walk through the process together.
Step 1: Prepping Your Liquid Enamel
First things first, let’s get your enamel ready. Most liquid enamels start as a powder that you mix with water. Think of it like making pancake batter; you’re looking for a smooth, consistent texture. Add a little water at a time and stir thoroughly. It’s super important to stir the mixture right before you use it, as the tiny glass particles can settle at the bottom quickly. Finding that perfect consistency is key. If it’s too lumpy, it won’t apply smoothly, but if it’s too watery, your colors might look faded after firing. Take your time with this step, it makes all the difference.
Mixing Ratios and Techniques
Getting the right consistency is everything when you’re working with liquid enamel. While it’s tempting to just eyeball it, having a starting point can save you a lot of frustration. A great rule of thumb is to mix about 85 to 95 milliliters of water for every 8 ounces of enamel powder. This ratio is your ticket to a smooth, creamy consistency that’s perfect for an even application. Of course, this is just a guideline. If you want rich, opaque coverage, you can use a little less water for a thicker mix. For more delicate, transparent layers, a slightly thinner consistency will do the trick.
There are two simple ways to mix your enamel, and it really comes down to personal preference. The first method is to add the powder to the water. Just pour your water into a mixing cup and gradually sprinkle in the powder while stirring. This technique is great for preventing clumps from forming at the bottom. The second method is the reverse: add water to the powder. Put your powder in the cup first, make a little well in the center, and slowly pour the water in while you mix. Both ways get you to the same smooth result, so try them both and see which one feels more natural to you.
Before you start painting, always give your mixture a final check. If the enamel feels lumpy or gritty, it will create an uneven, bumpy surface on your piece after firing. If it’s too watery, the colors can look weak or even darken unexpectedly in the heat. You’re aiming for a texture that’s smooth and flows easily, kind of like melted ice cream. Getting this right is the first step to ensuring a successful firing in your kiln. By mastering your mixing, you’re setting yourself up for a beautiful, professional finish every time.
Step 2: Applying the Enamel (Brush, Dip, or Pour)
Once your enamel is mixed, you can start applying it. You have a few options: use a fine brush for detailed work, dip your piece for full coverage, or pour the enamel for an organic look. Whichever method you choose, the most important rule is to let the enamel dry completely before it goes into the kiln. Seriously, don’t rush this part. Firing wet enamel can cause bubbles, cracks, or steam pockets that will ruin your smooth finish. Patience here pays off with a flawless, glossy surface on your finished piece.
Step 3: Creating Custom Effects and Layers
Here’s where you can really start to play. Liquid enamel is fantastic for creating custom looks. Feel free to mix different enamel colors together to create your own unique palette. You can also layer colors for depth and dimension. For an interesting texture, try firing liquid enamel over certain low-expansion enamels, like some types of COE90 glass, to create a beautiful crackle effect. This technique adds an incredible, web-like pattern to your work. Don’t be afraid to experiment with different combinations and layers; that’s how you’ll discover your signature style.
Ready to Fire? Kiln Settings and Safety Tips
This is where the magic happens. Firing your piece transforms the liquid enamel into a smooth, glossy, and durable glass surface. It can feel a little intimidating at first, but with the right settings and a focus on safety, you’ll get the hang of it in no time. Think of your kiln as your most important partner in this process. Getting to know how it works is the key to achieving those beautiful, professional results you’re aiming for. Let’s walk through the essentials for a successful and safe firing.
Getting Your Kiln Settings Right
The sweet spot for firing most liquid enamels is around 1450°F (788°C). This temperature is hot enough to melt the enamel into a smooth, glassy layer. Your firing time will typically be between one and three minutes, but this depends on the size of your piece and the thickness of your enamel application. A good rule of thumb is to start with a shorter firing time; you can always fire it again if it’s underdone. It’s much harder to fix an over-fired piece. I recommend keeping a small notebook near your workstation to log your firing times and temperatures for different projects. This will help you repeat your successes and learn from any mistakes. If you’re looking for the right equipment, there are many fantastic kilns designed specifically for glass work.
Don’t Skip This Step: Proper Drying
Patience is your best friend in this step. Before you even think about putting your piece in the kiln, you must make sure the enamel is completely dry. Firing enamel that is still wet or damp will cause the moisture to turn into steam, which can create bubbles, pits, or cracks in your final surface. In some cases, it can even cause the enamel to pop right off the metal. You’ll know your piece is dry when the liquid enamel has a uniform, matte appearance with no shiny or dark spots. To speed things up, you can place your piece on top of your warming kiln or under a heat lamp, but be careful not to get it too hot too quickly. Letting it air dry is always the safest bet.
Your Enameling Safety Checklist
Working with a kiln is perfectly safe as long as you respect the heat and take the proper precautions. Your kiln reaches extremely high temperatures, so protecting yourself is non-negotiable. Always wear safety glasses and heat-resistant gloves when opening the kiln or handling hot tools and pieces. It’s also crucial to work in a well-ventilated space to avoid inhaling any fumes that may be produced during firing. Make sure your work area is clear of any flammable materials, and have a heat-proof surface, like a trivet or soldering brick, ready for your piece when it comes out of the kiln. Never leave your kiln unattended while it’s on, and you’ll be able to focus on the creative fun without any worries.
Important Usage and Safety Warnings
Before you get to the exciting part, let’s talk about prep work. Your success with liquid enamel starts with getting the consistency just right. As we’ve mentioned, the amount of water you add to the powder makes all the difference. If you don’t add enough, you’ll end up with a lumpy texture that’s impossible to apply smoothly. Your goal is to achieve a smooth, creamy consistency that flows easily from your brush. This ensures an even application and a flawless finish after firing. Take your time with this step, adding water little by little and mixing thoroughly. It might seem tedious, but getting your mixture right is the foundation for a beautiful, professional-looking piece of jewelry.
Once your enamel is applied, you have to be patient. It is absolutely essential that your piece is completely dry before it goes into the kiln. As one of our guides points out, firing enamel that is still wet or damp will cause the moisture to turn into steam, which can create bubbles, pits, or cracks in your final surface. This can be heartbreaking after you’ve spent so much time on your design. You’ll know the enamel is dry when it has a uniform, matte look with no dark or shiny spots. You can let it air dry or carefully place it on top of your warming kiln to speed things up, but never rush this step. A little patience here goes a long way.
When you’re ready to fire, knowing your kiln settings is key. For most liquid enamels, the sweet spot for firing is around 1450°F (788°C). Firing times can range from one to three minutes, depending on the size of your piece and how thick your enamel layer is. It’s always a good idea to keep a close eye on your piece through the kiln’s peephole. You’re looking for the surface to become smooth and glossy. It’s better to under-fire and add more time than to over-fire, which can burn out your colors. Keeping a small notebook to track your times and temperatures for different projects will help you get consistent results every time.
Finally, let’s talk safety. Working with a kiln is exciting, but it requires respect for the heat. Always wear safety glasses to protect your eyes and heat-resistant gloves when handling hot pieces or tools. It’s also crucial to work in a well-ventilated space to avoid inhaling any fumes that might be produced during firing. An open window or a fan can make a big difference. Make sure your workspace is clear of flammable materials and have a heat-proof surface, like a soldering brick, ready for your piece when it comes out of the kiln. Taking these simple precautions will keep you safe and allow you to focus on your creativity without any worries.
Common Beginner Mistakes (And How to Avoid Them)
We all make mistakes when trying something new, and enameling is no exception. The good news is that most common slip-ups are easy to fix once you know what to look for. Think of these early projects as learning experiences, not failures. By understanding a few common pitfalls, you can sidestep them and get straight to creating beautiful, professional-looking jewelry. Let’s walk through the three most frequent beginner mistakes and talk about how you can avoid them from the start.
Avoiding Mistake #1: Getting the Right Consistency
Getting the right enamel consistency is one of the first hurdles you’ll face. The amount of water you add is critical. Too little water can make the enamel look lumpy, making it impossible to apply smoothly. On the other hand, too much water can dilute the color, causing it to appear dark or washed out after firing. The goal is a smooth, creamy texture. To get there, add distilled water a few drops at a time and mix thoroughly. It’s a great idea to keep a small notebook to track your water-to-enamel ratios for different colors on your COE90 glass projects.
How to Test Your Enamel’s Thickness
So how do you know when you’ve hit that perfect creamy consistency? Here’s a simple trick that works every time: the spoon test. Grab a clean, dry spoon and dip it into your enamel mixture. Pull it straight up and hold it still until it stops dripping. The enamel left on the spoon should form a smooth, even coat that doesn’t start dripping again when you move it. This gives you a great visual cue, but the ultimate proof is in the firing. Before you commit to your final piece, it’s always a good idea to apply a small amount to a scrap piece of metal, let it dry, and fire it in your kiln. This quick test fire will show you exactly how the color and texture will turn out, saving you from any surprises later on.
Avoiding Mistake #2: Knowing When to Fire
In the excitement of creating, it’s tempting to rush your piece into the kiln, but patience is key. You must make sure the liquid enamel is completely dry before you fire it. Any remaining moisture will turn to steam in the heat, causing bubbles, pits, or cracks in your finished surface. This can undo all your hard work in an instant. To check for dryness, hold your piece under a good light and look for any dark, damp spots. You can place your project on top of your warm (not hot) kiln to gently speed up the drying time, but letting it air dry is always the safest bet.
Avoiding Mistake #3: Nailing Your Firing Time and Temp
Firing is where the magic happens, but the wrong temperature or time can quickly lead to disappointment. If you under-fire your piece, the surface may look dull or grainy. If you over-fire it, the colors can burn out or become muddy. Always start with the manufacturer’s recommendations. For example, many enamels fire at 1450°F, with small pieces needing 1.5 to 2 minutes and larger pieces requiring 2 to 3 minutes. When trying a new color or working with a new kiln, it’s always smart to fire a small test piece first to dial in your settings perfectly.
Tips for Professional-Looking Liquid Enamel Jewelry
Once you’ve mastered the basics of applying and firing liquid enamel, you can start experimenting to create truly unique pieces. Getting that polished, professional look is all about understanding the material and learning a few tricks of the trade. These tips will help you troubleshoot common issues and add some advanced flair to your next jewelry project. Let’s get your work looking like it came straight from a gallery.
Ready for More? Try These Advanced Techniques
Ready to play with color and texture? Don’t feel limited by the enamel shades you have on hand. You can become your own color chemist by mixing different liquid enamels to create custom hues. For an even wider palette, try adding small amounts of ceramic pigments. Another fun effect to try is “crackling.” You can achieve this beautiful, aged look by firing your liquid enamel over a low-expansion base, like certain white or clear enamels. The difference in expansion rates causes the top layer to crackle, adding incredible depth and character to your COE90 glass pieces.
Sgraffito and Layering
Sgraffito is an Italian word that means “to scratch,” and that’s exactly what you do in this fun technique. After applying a base coat of liquid enamel and letting it dry, you use a sharp tool to gently scratch a design into the surface, revealing the metal underneath. From there, you can fire the piece to set your design or take it a step further by layering more colors on top. Applying thin coats of transparent or opalescent enamels over your sgraffito work can create incredible depth and subtle color shifts. Each layer requires a separate firing, allowing you to build up complex, painterly effects that are completely unique to your piece.
Torch Enameling
If you don’t have a kiln, don’t worry—you can still get into enameling. Torch enameling is a popular method where you use a handheld torch to heat your metal piece and fuse the enamel. This technique is fantastic for smaller items like jewelry components and allows for a more direct, hands-on firing process. It’s much faster than waiting for a kiln to heat up, but it does require a bit of practice to apply the heat evenly and avoid scorching your enamel. You’ll need to learn how to read the colors of the hot metal and the melting enamel to know exactly when the piece is perfectly fired. It’s a dynamic process that many artists love for its speed and spontaneity.
Decaling
Want to add intricate images or patterns to your work without spending hours with a tiny brush? Enamel decals are your answer. These are special transfers printed with enamel-based inks. You apply the decal to your fired enamel surface, much like a temporary tattoo, and then fire the piece again. During firing, the paper backing burns away completely, leaving only the beautiful, permanent design fused into your enamel. It’s a fantastic way to incorporate detailed graphics, text, or repeating patterns into your jewelry. You can find a wide variety of pre-made decals, or even have custom ones made with your own designs.
Champleve and Cloisonne
Once you’re comfortable with basic enameling, you might feel drawn to more advanced, traditional techniques like champlevé and cloisonné. Both methods involve creating sections on your metal base to hold the enamel. In champlevé, you carve or etch depressions into the metal, then fill these recessed areas with enamel. In cloisonné, you create a similar effect by soldering thin, flat wires onto the metal surface to build “walls” or cells, which you then fill with different colors of enamel. These techniques require some metalworking skills but are a beautiful way to combine metal and glass into stunning, detailed works of art.
Creating a Professional Satin Finish
While a high-gloss finish is beautiful, sometimes a piece calls for a softer, more subtle look. Achieving a professional satin finish is a great way to add a sophisticated touch to your enamel jewelry. After your final firing, the process involves carefully altering the surface texture. You can start by filing the edges to ensure they are perfectly smooth. Then, you can use an etching solution to gently dull the glossy surface. The final step is to wet-sand the piece with fine-grit abrasive papers until you achieve a smooth, matte texture that feels silky to the touch. This finishing process gives you another layer of creative control over the final look and feel of your work.
Pro Tip: How to Reuse Dried Enamel
It happens to the best of us: you forget to seal your liquid enamel jar tightly, and it dries out. Before you toss it, wait! You can easily bring it back to life. Simply take the dried chunks and grind them into a fine powder using a mortar and pestle. Once you have a powder, slowly add distilled water and mix until you reach that perfect, creamy consistency again. It’s a fantastic way to reduce waste and save a little money on supplies. Your enamel will be good as new and ready for your next project.
Troubleshooting Common Liquid Enamel Issues
If your enamel isn’t turning out quite right, the fix is often simple. One of the most common issues is consistency. If you add too little water when reconstituting your enamel, you’ll get a lumpy, “cottage cheese” texture. Too much water can cause the colors to fire darker than you intended. Another critical step is to ensure your piece is completely dry before it goes into the kiln. Firing enamel that is still damp can lead to bubbles, cracks, or even cause the enamel to pop off the surface. A little patience goes a long way toward a flawless finish.
Your Liquid Enamel Jewelry Shopping List
Getting started with a new craft is so much easier when you have the right supplies and a little inspiration to get you going. Once you have your workspace set up, you can start gathering the fun stuff: beautiful colors, quality tools, and a few project ideas. Here’s a breakdown of what you’ll need to begin your enameling adventure and where to find creative ideas to spark your imagination.
Shop Our Liquid Enamel Collection
Liquid enamels are a fantastic starting point for beginners. They typically come as a fine powder that you mix with water, giving you complete control over the consistency. This versatility means you can create a thin, watercolor-like wash or a thicker, more opaque layer of color. We offer a wide range of vibrant liquid enamels perfect for any project you have in mind. Whether you’re adding a pop of color to a copper pendant or creating intricate designs on a silver blank, you’ll find the perfect shade to bring your vision to life.
Must-Have Tools and Supplies
Beyond the enamel itself, you’ll need a few key tools. You can apply liquid enamel in several ways, so think about what techniques you want to try. You can use fine-tipped brushes for detailed work, or you can dip, pour, or even spray the enamel onto your metal piece for different effects. A high-quality kiln is essential for firing your pieces. Before you fire, always make sure the enamel is completely dry to avoid bubbles or cracks. For small pieces under two inches, a good starting point is to fire at 1450°F for about 1.5 to 2 minutes.
Find Your Next Project: More Enameling Inspiration
Sometimes the best way to learn is by seeing what other artists are creating. Pinterest is an amazing resource for finding enamel jewelry ideas and inspiration. You can find endless examples of different color combinations, techniques, and finished pieces to get your creative gears turning. If you’re feeling ambitious, you could even start a personal project to stay motivated. One artist challenged herself to make a new piece of enamel jewelry every day for 100 days, which is a great way to practice and discover your unique style.
Related Articles
- Innovative Techniques: Dichroic Glass & Metallic Paints
- Glass for Jewelry Making: Your Complete Guide – ArtGlassSupplies
- Glass Etching: A Simple Step-by-Step Guide – ArtGlassSupplies
Frequently Asked Questions
What’s the main difference in appearance between cold enamel and kiln-fired enamel? The biggest difference is in the depth and light. Kiln-fired enamel is true glass, so it has a unique luminosity and richness that you can’t get with resin. It catches the light in a way that makes the colors look deep and vibrant. Cold enamel, on the other hand, creates a very smooth, opaque, and glossy finish that looks more like high-quality plastic or a hard resin coating.
Can I use liquid enamel on glass in addition to metal? Yes, you absolutely can, which is great for artists who work with fusing. The most important thing is to make sure the enamel is compatible with your glass. This means you need to match the COE (Coefficient of Expansion) of the enamel to your glass, like COE90 or COE96, to prevent the piece from cracking during cooling.
What’s the best way to clean my brushes after using liquid enamel? Since the liquid enamel you mix is water-based, cleanup is surprisingly simple. You just need to rinse your brushes thoroughly with plain water right after you’re done using them. The key is to clean them before the enamel has a chance to dry and harden in the bristles, which can ruin your brush.
What if I make a mistake while painting? Can I fix it before I fire the piece? Of course. Mistakes are very easy to fix before you head to the kiln. If the enamel is still wet, you can gently wipe the mistake away with a clean, damp brush or a cotton swab. If the enamel has already dried, you can use a sharp tool, like a scribe or a clean craft knife, to carefully scrape the unwanted enamel off the surface.
Do I need to do anything to my metal before I apply the enamel? Yes, preparing your metal is a crucial step for getting the enamel to stick properly. Your metal piece needs to be perfectly clean and free of any oils from your fingers or dirt. You can scrub it with an abrasive cleaner and water, then rinse and dry it completely. This ensures the enamel has a clean surface to fuse with during firing.